Optimization
Optimization
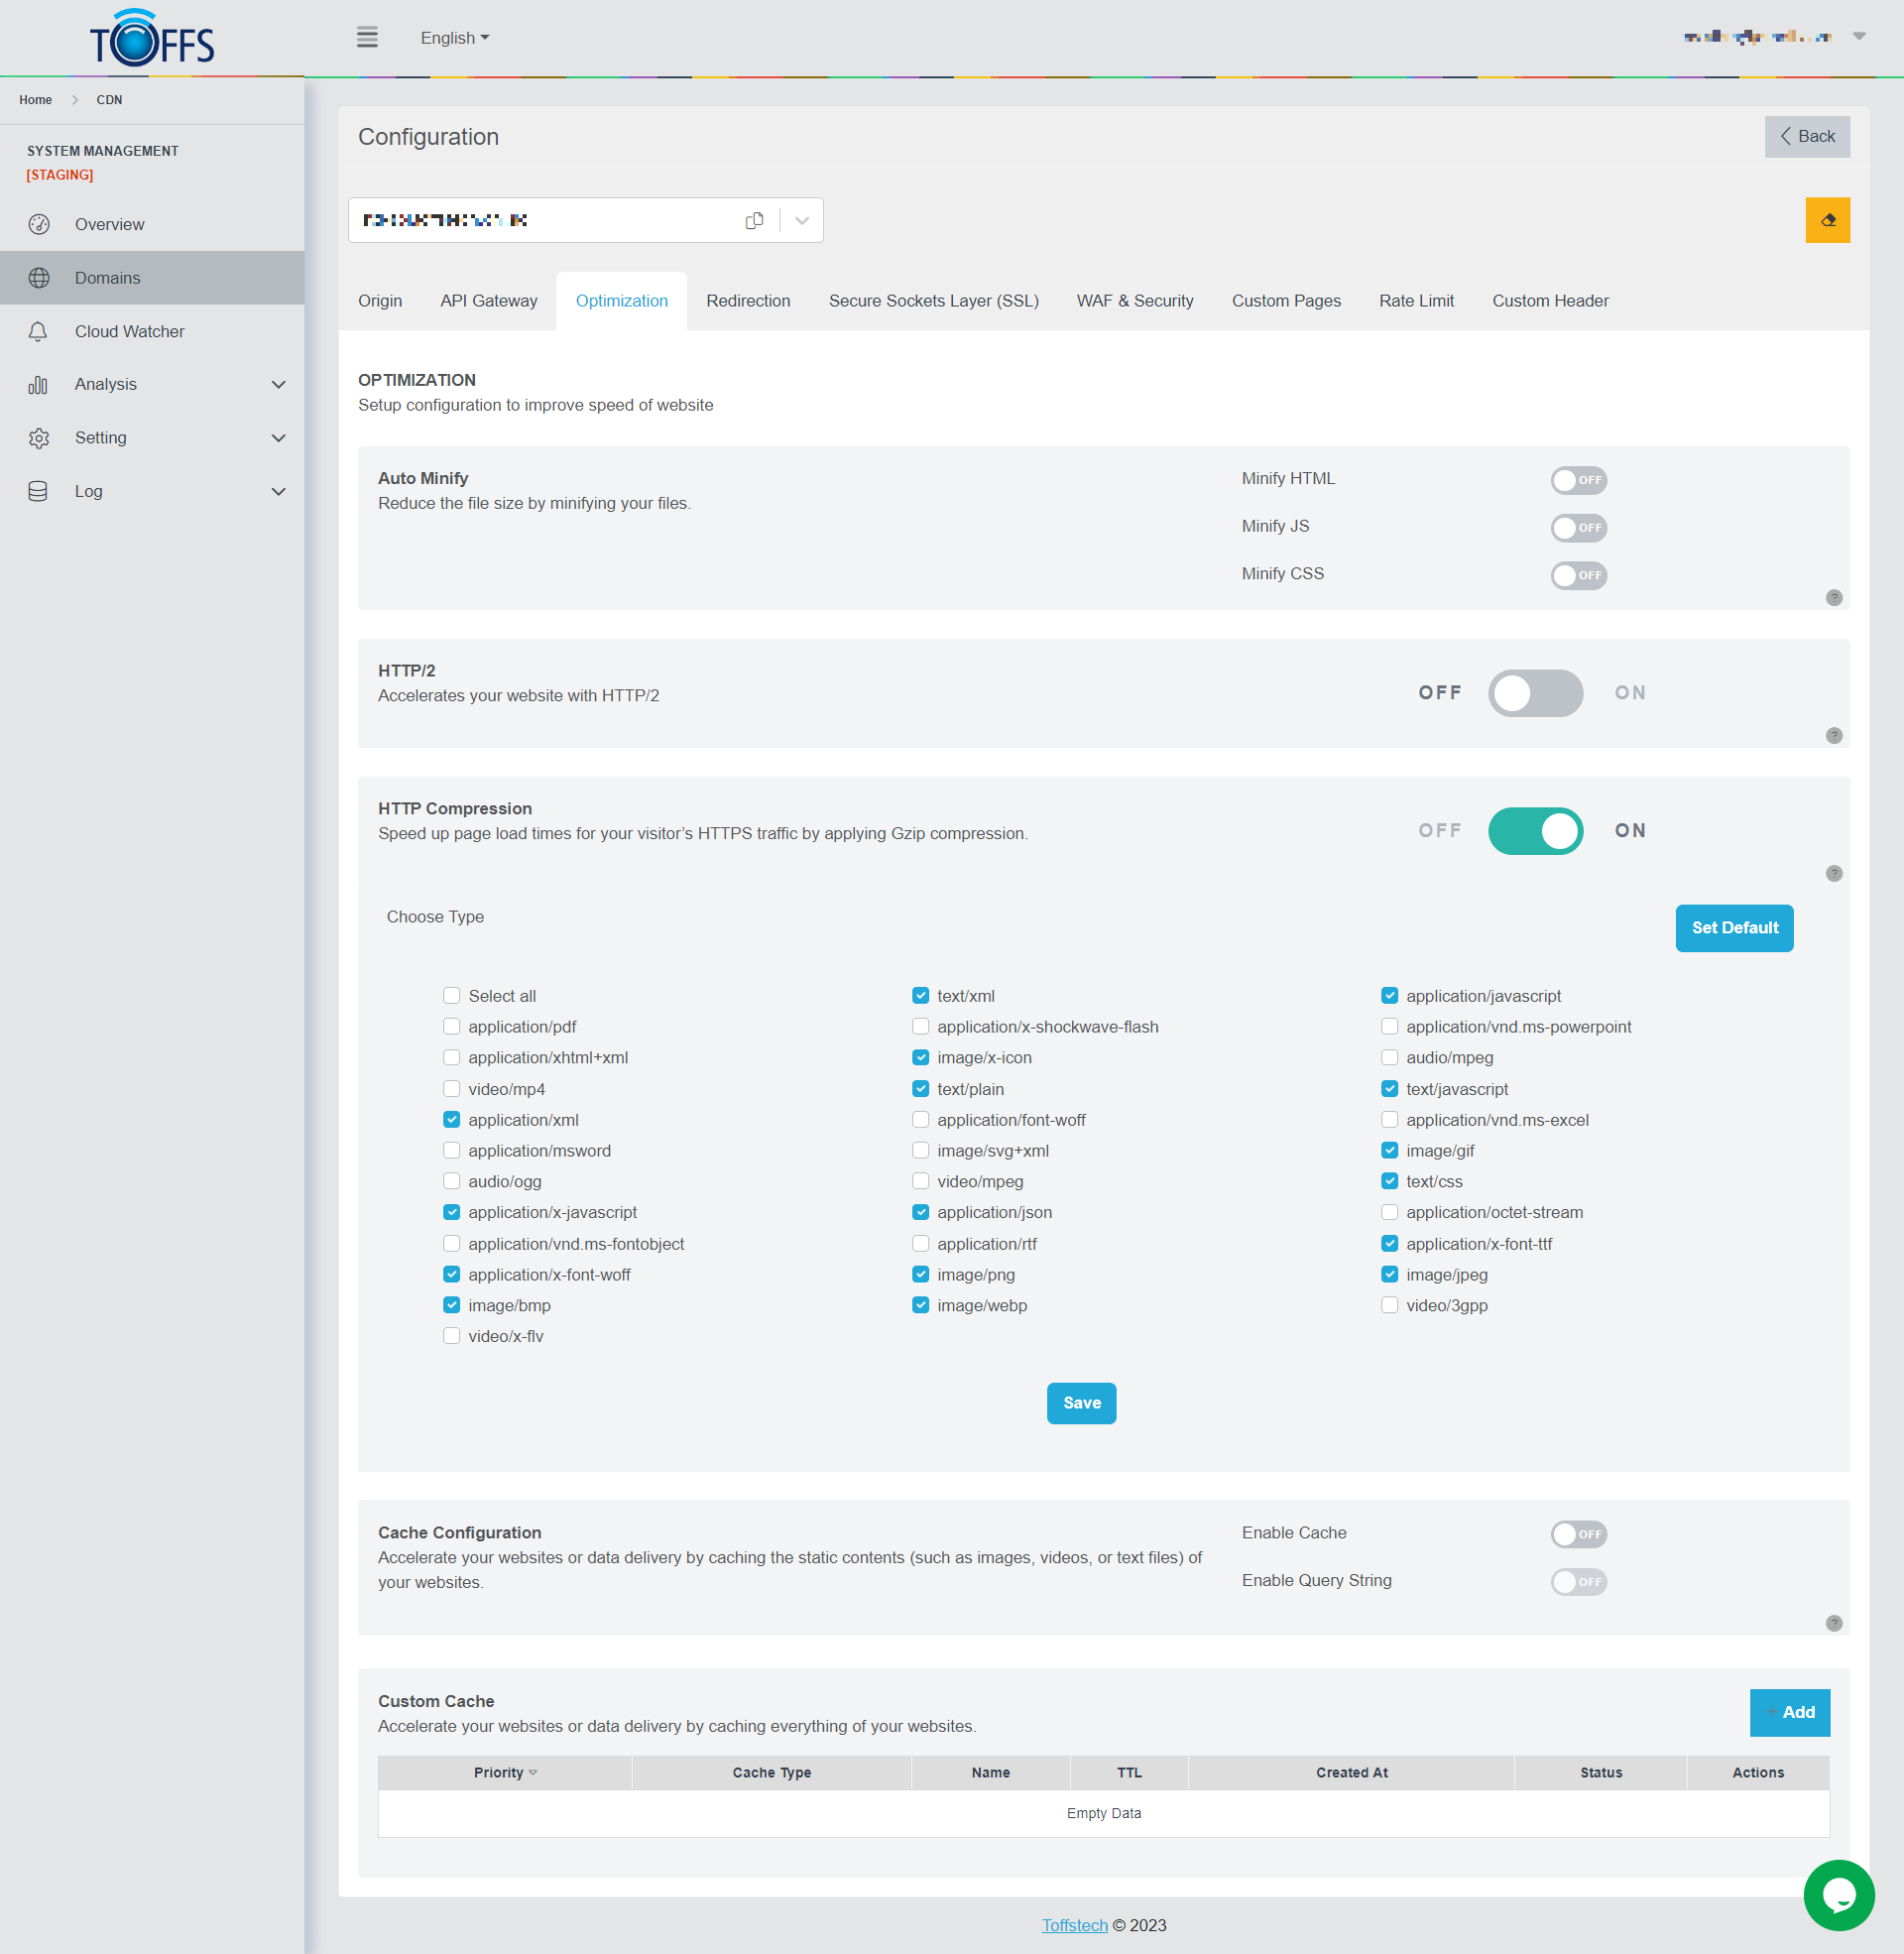 Figure 50
This is the “Optimization” page under the “Configuration” page. This section aims to guide you through the setup process to enhance the speed of your website effectively.
Key functions available on this page include:
-
Auto-Minify: This feature works by eliminating unnecessary characters like blanks, newlines, comments, and blocks from your JavaScript, CSS, and HTML files. By doing so, it optimizes these files for faster loading times.
-
HTTP/2: This function is designed for Enterprise Internet assets placed on dedicated IP ranges. It offers prioritized routing and protection to ensure the utmost speed and availability. You have the option to toggle this feature on or off as per your requirements.
-
HTTP Compression: By applying Gzip compression, this feature significantly speeds up the loading times for your visitors’ HTTPS traffic. It efficiently reduces the size of transmitted data, leading to faster page loads.
-
Cache Configuration: This process involves caching an object’s content in ToffsCDN edge. As a result, when a user requests this content, ToffsCDN can deliver it much more swiftly, reducing latency and improving the overall website performance.
-
Custom Cache: With this functionality, you gain the ability to customize the cache properties of your HTTP requests. For instance, you can create rules specifying the duration for which a resource should be cached in the TOFFS edge network. This allows for fine-tuning the caching strategy to suit your specific needs.
By utilizing these powerful functions, you can optimize your website’s configuration and ensure an enhanced browsing experience for your visitors, with improved speed and performance.
Setup Auto Minify
This feature is designed to eliminate unnecessary characters from your JavaScript, CSS, and HTML files. By removing blanks, newlines, comments, and blocks, this feature helps optimize your files for better performance.
 Figure 51
To get started, follow these simple steps to enable or disable Auto-Minify:
- Look for the toggle switch located within your settings.
- Simply click the toggle to turn Auto-Minify on or off, depending on your preference.
With Auto-Minify, you can effortlessly enhance the efficiency of your website, leading to faster load times and an overall improved user experience. Let’s get started and make the most out of this valuable feature!
Setup HTTP/2
HTTP/2 is an advanced internet protocol designed to optimize website performance by leveraging dedicated IP ranges for Enterprise users. This cutting-edge technology offers prioritized routing and enhanced security measures, ensuring maximum speed and availability for your online assets.
 Figure 52
To activate or deactivate HTTP/2, simply click the toggle switch to turn it on or off.
Please note that “HTTP/2” functionality is exclusively available to users with Professional, Premium, and Enterprise plans. Make the most out of this feature to experience significant improvements in your website’s performance and user experience.
Setup HTTP Compression
CDNs (Content Delivery Networks) can apply Gzip compression to enhance the loading speed of your website pages for visitors. Here’s how to set it up:
Step 1: Enable HTTP Compression
Look for the option to enable HTTP Compression. Once enabled, the system will automatically apply compression to various types of files.
 Figure 53
Step 2: Choose File Types for Caching
After enabling HTTP Compression, the system will list all types of files that can be compressed.
Focus on the file types that you want to cache and apply compression to. For example, you might want to prioritize text files and CSS files to optimize the website’s performance.
 Figure 54
Step 3: Save the Configuration
Once you’ve selected the file types for compression, click the “Save” button to apply the configuration.
The changes might take a few minutes to propagate across the CDN network and take effect.
Step 4: Verify Compression Settings
To check if the compression settings have been applied to your website, open your website in a web browser.
Press the F12 key to open the browser’s Developer Tools.
Go to the “Network” tab in the Developer Tools.
Access your website by clicking on a URL that has a .css extension (for CSS files).
Look for the “Response Headers” section in the Developer Tools.
If compression has been applied successfully, you will see the following information:
Content-Type: text/css
Content-Encoding: gzip
This indicates that the .text or .css files on your website are now being served with gzip compression, which will help improve loading times for your visitors.
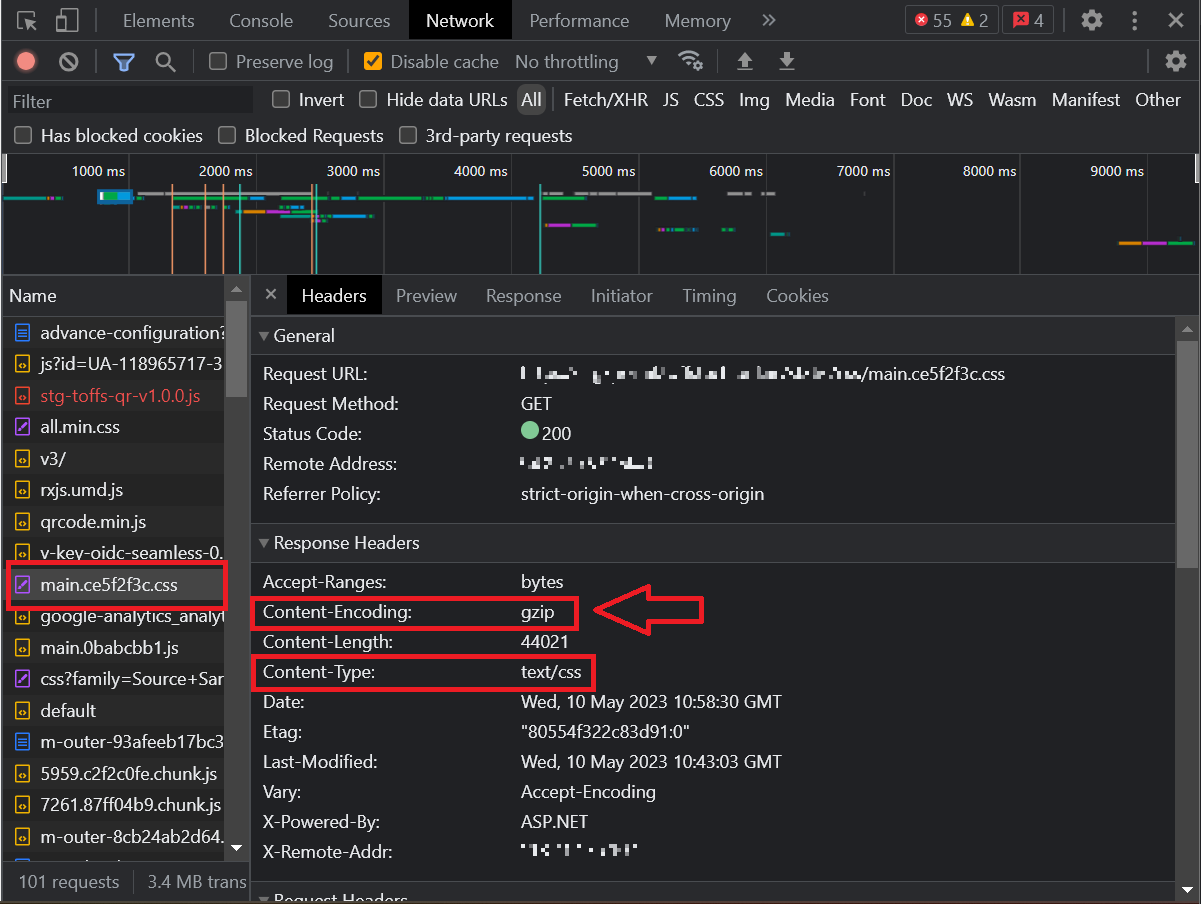 Figure 55
Setup Cache Configuration
“Cache Configuration” can significantly enhance the delivery speed of objects stored in ToffsCDN edge. By enabling cache configuration, you can optimize the caching process and improve user experience. Follow the steps below to set up your cache configuration:
Step 1: Enable Cache
On the Optimization page, locate the “Enable Cache” toggle and switch it on.
 Figure 56
Step 2: Query String
Ignore Query String: By default, the query string is ignored to increase cache hit rates, reducing unnecessary variations of an object stored.
Enable Query String: This option allows you to store dynamic content after the question mark.
Step 3: Advanced Cache Configuration
Click the “Advance” button to access the advanced cache configuration settings, where you’ll find detailed options for customization.
 Figure 57
Step 4: Caching Times (minutes)
The default caching time is set to 120 minutes (2 hours). You have the flexibility to change this cache time as per your requirements.
Step 5: Cache Extensions
You can use the default cache extension.
Alternatively, you have the option to customize the cache extension according to your needs.
To reset the cache extension to the default setting, click the **“Set Default” **button.
Step 6: Follow Origin Cache
Enabling this option will override the CDN cache setting and follow the cache settings defined in the origin server.
Step 7: Force Cache Params
Enabling this option allows caching of parameters without requiring any extension.
You can add multiple params as needed. For example: DXR.axd?r=1_37-R7m2c
Step 8: Save Changes
After configuring your cache settings, click “Save” to apply the changes and complete the setup.
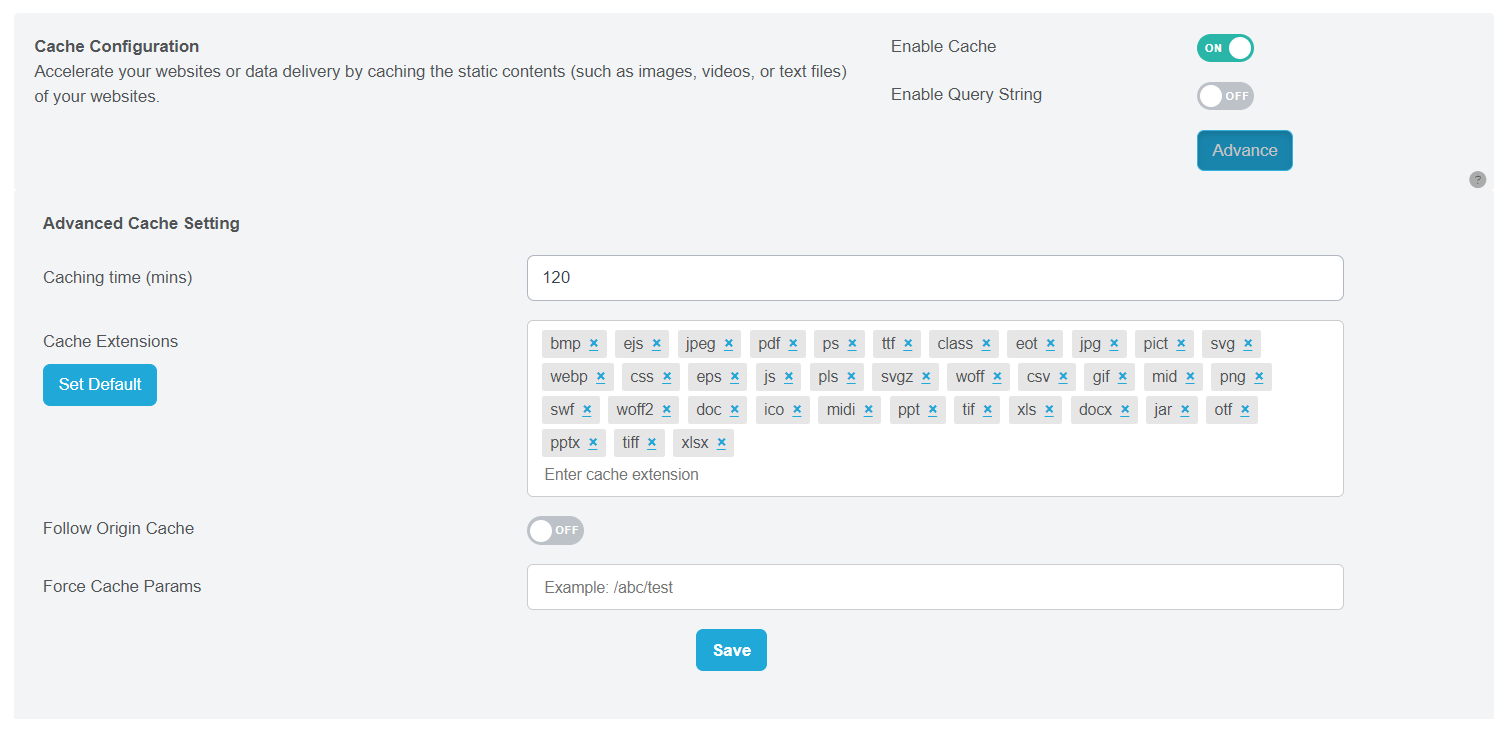 Figure 58
By following these steps, you’ll optimize the caching process, resulting in faster delivery of object content to users through Toffs CDN.
Setup Custom Cache
In this section, we will walk you through the steps to set up a “Custom Cache” for your HTTP requests. Custom Cache allows you to tailor cache properties for specific resources in the TOFFS edge network, enabling you to control how long resources are cached.
Step 1: Accessing Custom Cache Configuration
Log in to your CDN account and navigate to the “Domains” section.
Select the desired domain and go to the “Configuration” tab.
Click on “Optimization” and then choose “Custom Cache”.
Step 2: Creating a New Custom Cache
To create a new custom cache, click on the “+Add” button.
 Figure 59
Step 3: Define the Rule Expression
In the “Name” field, enter a descriptive name for the custom cache.
Under the “When incoming requests match” section, you’ll define the rule expression. To do this, follow these steps:
- Use the “Field” drop-down list to choose an HTTP property. Refer to the “Available Fields” section for the list of options.
- For each incoming request, the value of the selected HTTP property will be compared to the value you specify in the “Value” field using the chosen Operator.
Step 4: Configuring Cache Actions
Under the “Then” section, you can configure the cache actions based on the matching rule:
- Select either “Bypass”, “Default” or “Ignore Query String” for the action to be performed.
- In “TTL - Time-to-Live”, enter the duration for caching the resource based on one or more response status codes received from the origin server.
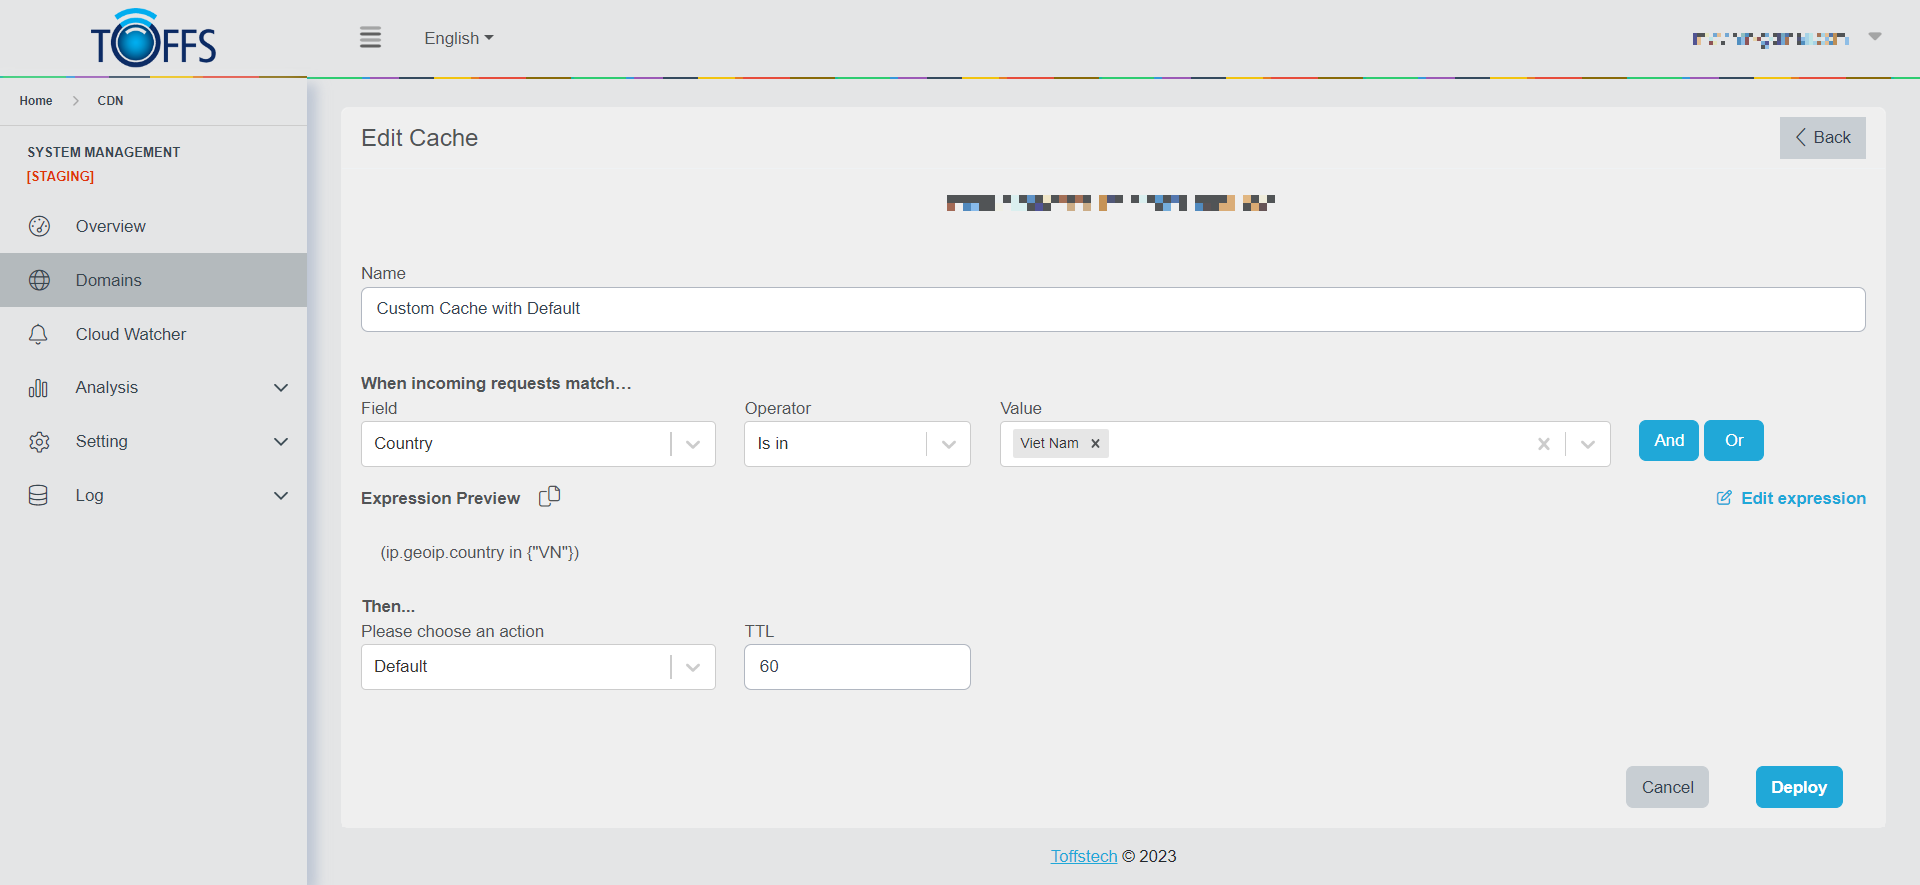 Figure 60
Step 5: Saving and Deploying the Rule
Once you have set up the custom cache rule, you can save and deploy it by selecting the “Deploy” option.
If you are not ready to deploy the rule immediately, you can select “Save as Draft” to keep it for later deployment.
Additional Tips:
- Use the “And”/”Or” button to combine multiple conditions when setting up the configuration.
- The “Expression Preview” section displays the expression based on your settings. You can also click on the “Edit expression” button to make changes if needed.
- You have the option to set the priority for each item in the “Custom Cache” section. The priority order will be: Custom Cache > Cache Configuration.
You have successfully set up a custom cache to customize cache properties for your HTTP requests. With this feature, you can efficiently manage caching and optimize the performance of your CDN.
Please contact Toffs Security Operation Center for assistance if you encounter any issues.