Secure Sockets Layer
Secure Sockets Layer
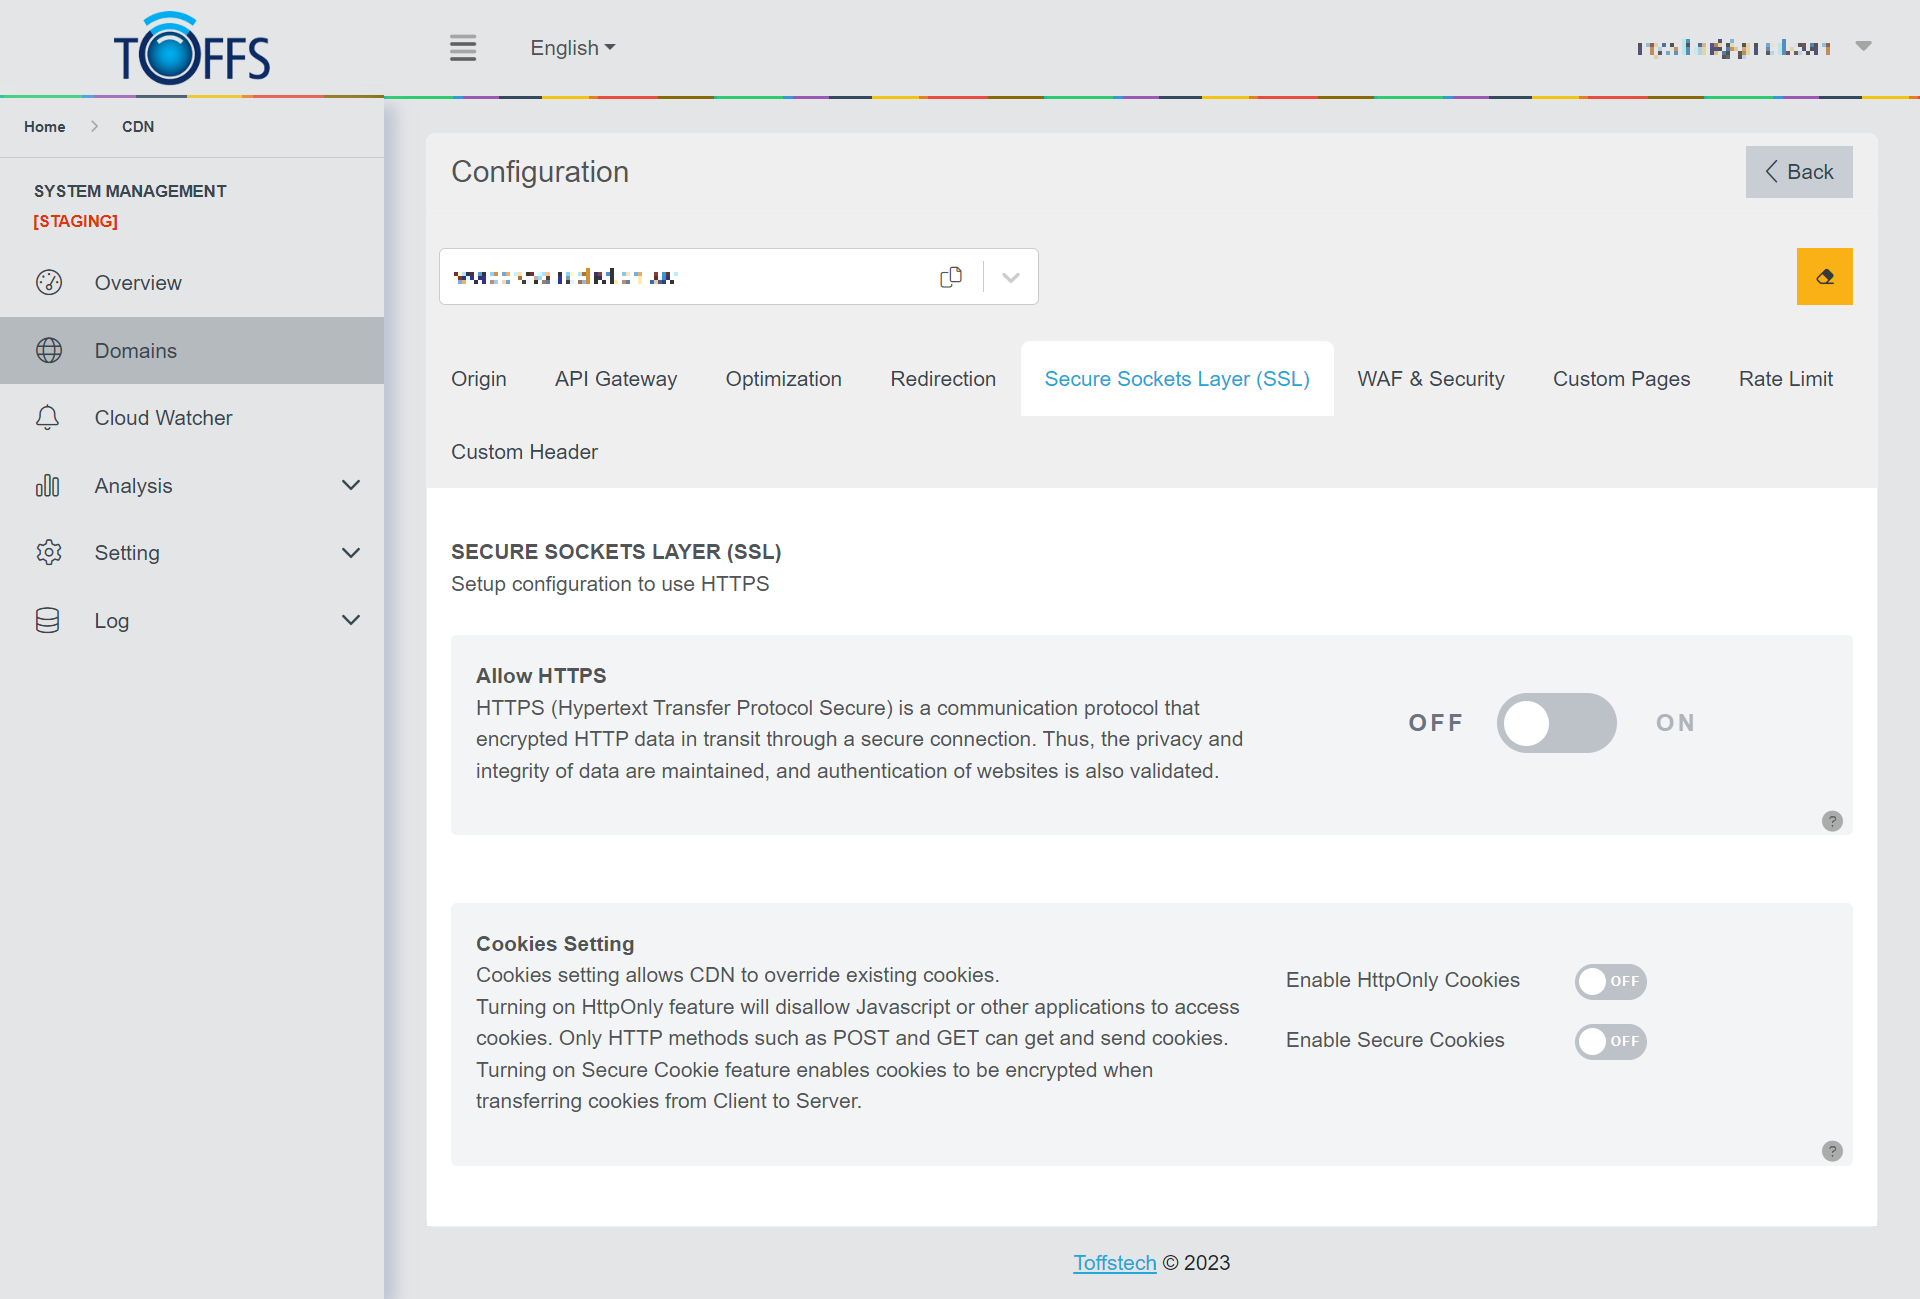 Figure 67
This is the “SSL Certificates” page under the “Configuration” page. (Only Enterprise users will have SSL Certificates - Wild Card & SAN & SNI Certificates).
Allow HTTPS: HTTPS employs SSL / TLS to encrypt network communication. Its primary functions are authenticating the website, safeguarding data privacy and integrity, preventing eavesdropping, and defending against man-in-the-middle attacks.
Note:
-
Important: SSL Certificates can only be generated for Port 80 (HTTP) and Port 443 (HTTPS).
-
The system performs periodic SSL certificate checks at 00:00 Singapore time, looking for certificates with Failure, Pending, and Expired statuses. This check is applicable to SSL certificates generated from C4.
[Starting from version 5.0]
You now have the option to create Free SSL certificates based on Let’s Encrypt, which are valid for three months. These certificates are available for domains pointed to Toffs CDN. Toffs CDN will automatically renew the SSL certificates seven days before their expiration. For more information, refer to SSL Management.
Force HTTPS: If your website has an SSL certificate installed (secure socket layer certificate), you can automatically redirect visitors to the secure (HTTPS) version of your site, ensuring a secure connection. All content should load via HTTPS, indicating a secure site.
Set TLS Protocols: The minimum TLS version setting specifies the required TLS version a visitor must support to connect to your domain using TLS.
Set Default Cipher: A cipher suite comprises algorithms that enhance network connection security.
Set HSTS: HSTS restricts web browsers to access web servers solely over HTTPS.
Set HSTS Per URL: During development, the dev team identified that enabling HSTS did not affect all URLs of certain websites. To address this, supporters need to enable HSTS Per URL to affect all URLs of those websites.
**Max Age: **The total time that Set HSTS affects the website (measured in seconds).
Upgrade HTTP to HTTPS: This feature automatically upgrades all insecure resource requests from their pages to secure variants.
Cookies Setting: An HTTP cookie (also known as a web cookie or browser cookie) is a small piece of data that a server sends to the user’s web browser. The browser may store it and send it back with the next request to the same server.
We hope this tutorial provides you with a better understanding of the “SSL Certificates” page and its features.
Generating Free SSL Certificate with Toffs CDN
Follow these steps to generate a Free SSL Certificate:
Step 1: Go to the Secure Sockets Layer (SSL) page and enable Allow HTTPS by toggling the switch.
 Figure 68
Upon enabling Allow HTTPS, the Secure Sockets Layer (SSL) page will display all its features.
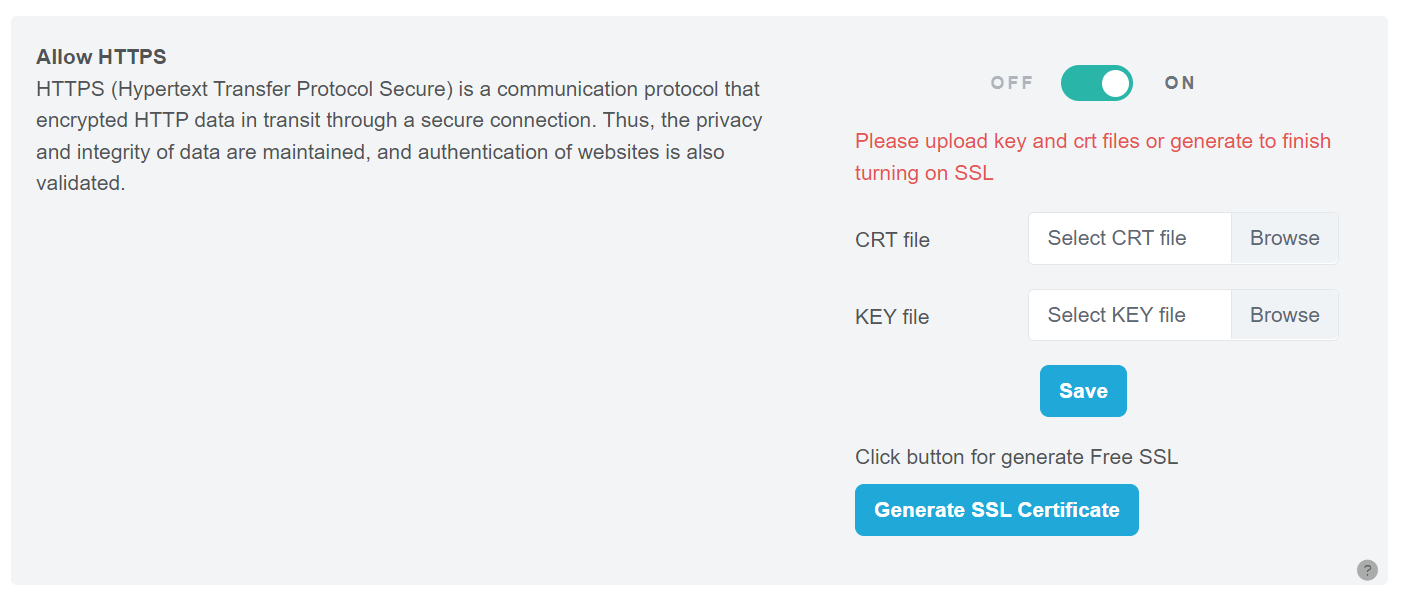 Figure 69
Step 2: Click the “Generate SSL Certificate” button.
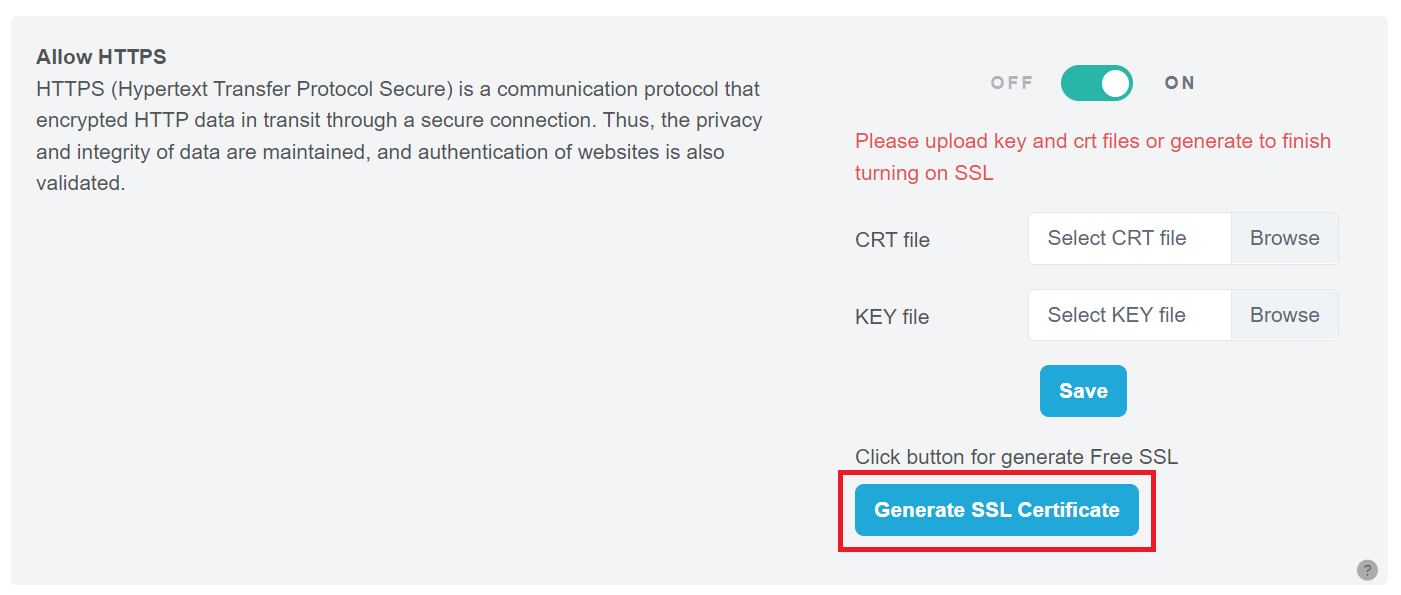 Figure 70
Important Notes:
- The SSL certificate issued by Let’s Encrypt is valid for 3 months and will be automatically renewed for free every 3 months.
- Toffs CDN will automatically renew the SSL certificate 7 days before it expires.
- Generating SSL Certificates is only allowed for Port 80 (HTTP) and Port 443 (HTTPS).
Upon successful generation, the system will provide details of the free SSL certificate, including SSL Subject, SSL Issuer, Expiry Date, and Status.
When generating successfully, the system will show details of the free SSL certificates including SSL Subject, SSL Issuer, Expired Date, Status.
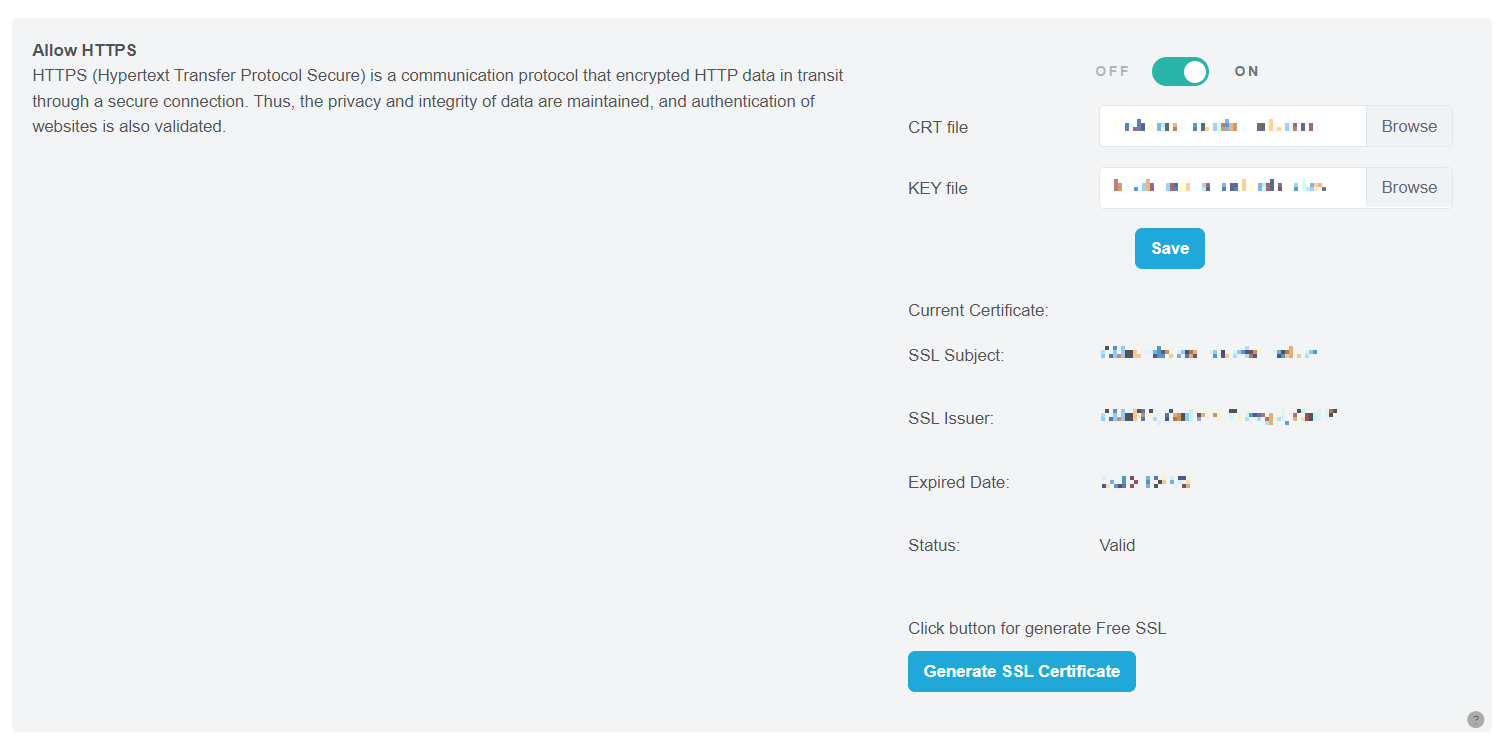 Figure 71
By following these simple steps, you can easily obtain a Free SSL Certificate for your website and ensure secure connections with your users.
Uploading your SSL Certificate
Follow these steps to upload your Free SSL Certificate:
Step 1: Enable HTTPS Go to the Secure Sockets Layer (SSL) page. Toggle on the “Allow HTTPS” option.
 Figure 72
Once enabled, the full features of the Secure Sockets Layer (SSL) page will be displayed.
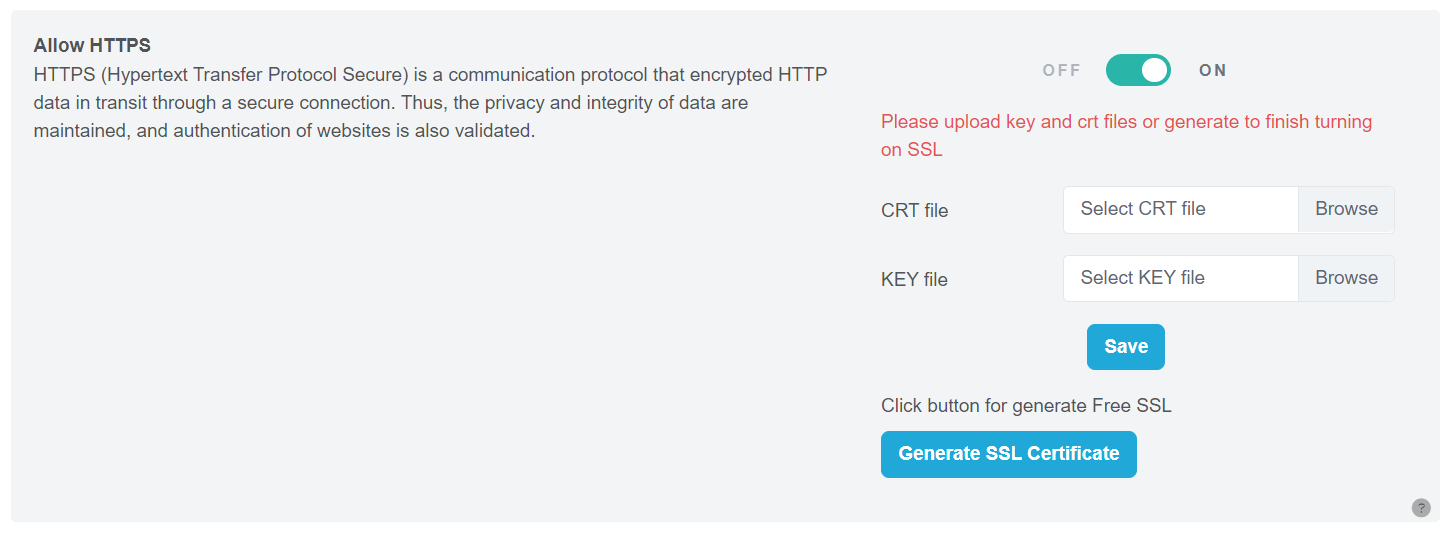 Figure 73
Step 2: Upload CRT and KEY Files Click the “Browse” button to select and upload your CRT and KEY files. Make sure that the certificate includes both the CRT and KEY files.
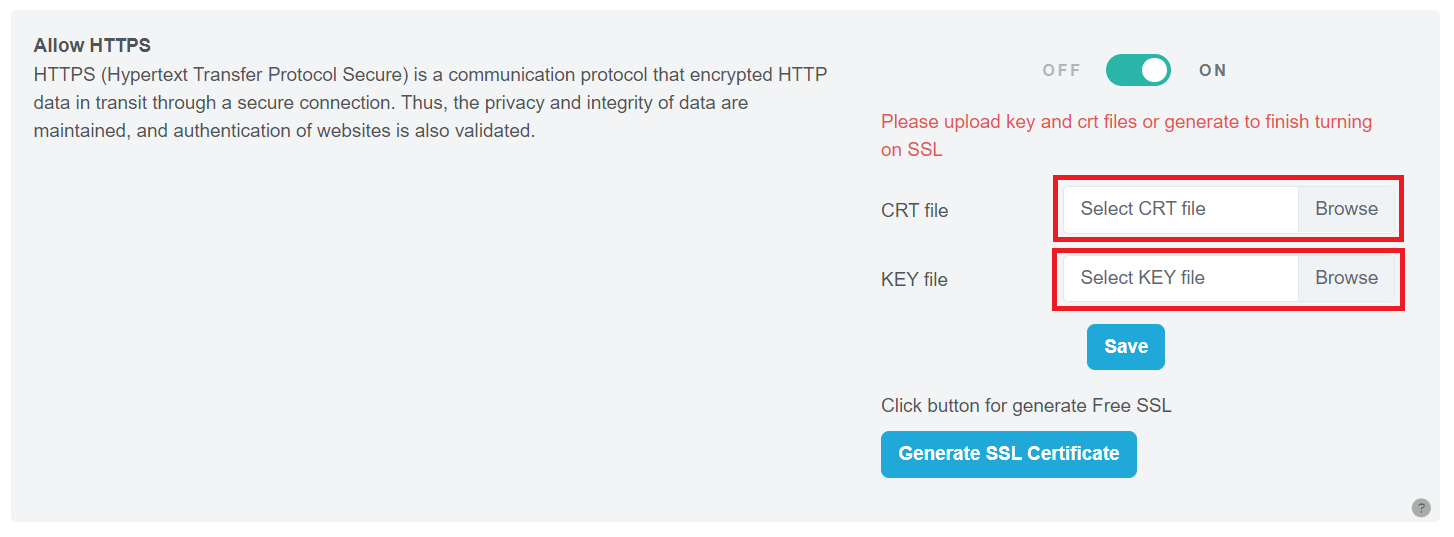 Figure 74
Step 3: Save Your Changes Click the “Save” button to complete the uploading process.
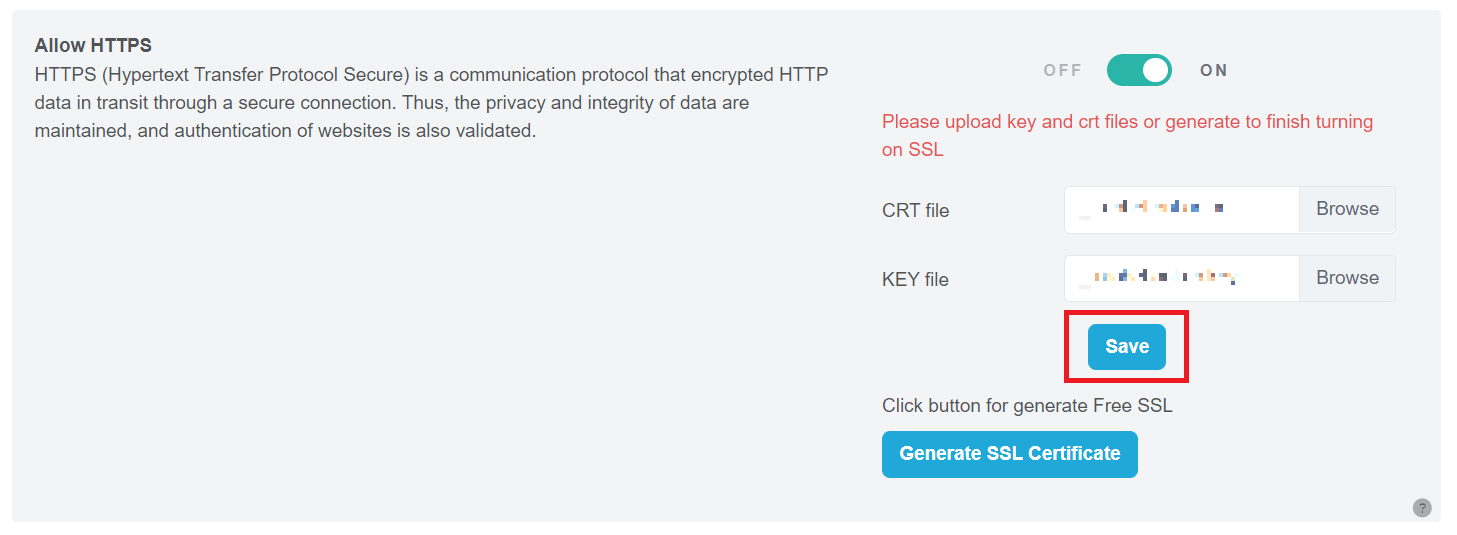 Figure 75
By following these steps, you will successfully upload your SSL Certificate.
Using Mutual Authentication
Mutual authentication, also known as two-way authentication or mutual SSL authentication, is a security process that occurs between two entities, typically a client and a server, to establish trust and verify each other’s identities. In traditional client-server interactions, only the server is authenticated by the client. However, mutual authentication adds an extra layer of security by allowing the server to authenticate the client as well.
Here’s how the mutual authentication process typically works:
-
Client initiates a connection: The client sends a request to the server, indicating its intention to establish a secure connection.
-
Server presents its digital certificate: The server responds by sending its digital certificate to the client. The digital certificate contains the server’s public key, which is used for encryption, as well as other identifying information.
-
Client verifies the server’s certificate: The client checks the authenticity of the server’s digital certificate. This verification involves validating the certificate’s integrity, verifying its signature using a trusted certificate authority (CA), and ensuring it hasn’t expired or been revoked.
-
Client sends its digital certificate (optional): In some cases, the client may also present its digital certificate to the server for authentication purposes. This step is not always required, depending on the specific authentication requirements.
-
Server verifies the client’s certificate (optional): If the client provides its digital certificate, the server verifies its authenticity using a similar process as in step 3. This allows the server to ensure that the client is who it claims to be.
-
Secure connection established: Once both entities have verified each other’s certificates, they have mutual trust, and a secure connection is established. This connection enables encrypted communication between the client and the server, protecting the confidentiality and integrity of the data exchanged.
Mutual authentication adds an extra layer of security to the communication process by preventing unauthorized entities from impersonating either the client or the server. It is commonly used in scenarios where strong security measures are required, such as online banking, e-commerce, and secure enterprise systems.
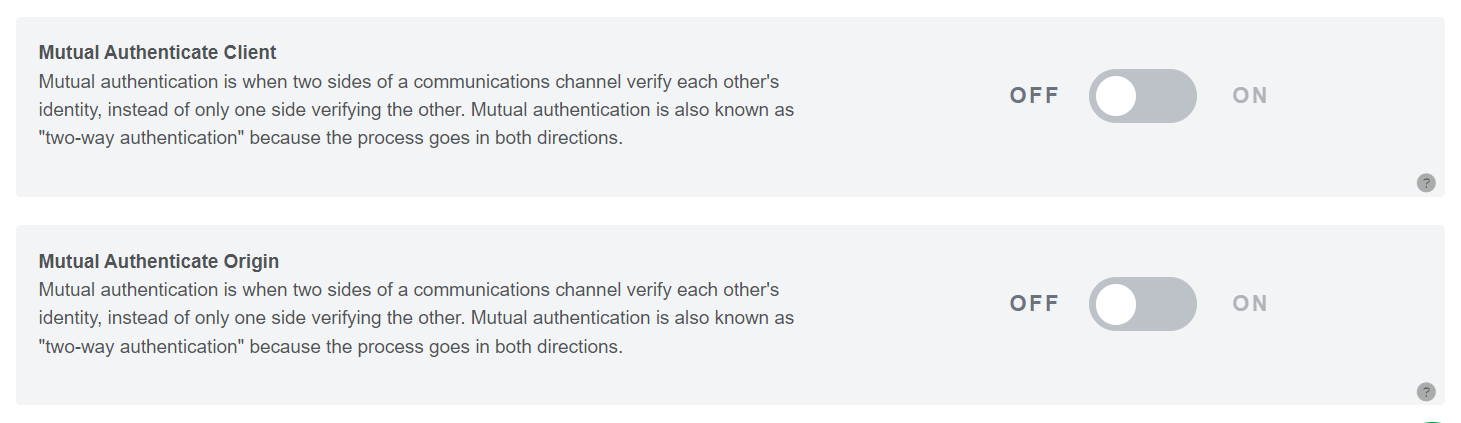
Mutual Authenticate Client

To use, upload the CA CRT file then click the Submit button.
Mutual Authenticate Origin
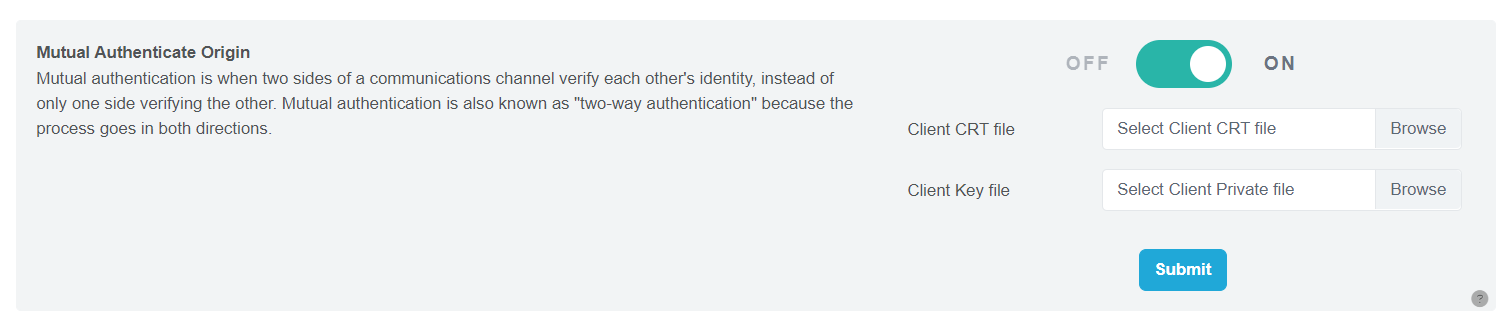
To use, upload the Client CRT file and the Client Private file then click the Submit button.
How to generate files?
In Ubuntu, you can run this commandline to create the above files:
openssl genrsa -des3 -out ca.key 4096
openssl req -new -x509 -days 730 -key ca.key -out ca.crt
openssl genrsa -out client.key 4096
openssl req -new -key client.key -out client.csr
openssl x509 -req -days 730 -in client.csr -CA ca.crt -CAkey ca.key -set_serial 01 -out client.crt
Verify again to ensure CA and Client CRT files match together:
openssl verify -CAfile ca.crt client.crt
Enable Force HTTPS
If your website has a secure socket layer certificate (SSL) installed, you have the option to automatically redirect your visitors to the secured (HTTPS) version of your site, ensuring a safe and encrypted connection.
By enabling Force HTTPS, all contents on your site will load via HTTPS, and your website will be displayed as secure.
 Figure 76
To activate or deactivate Force HTTPS, simply click the toggle button to turn it on or off, respectively. Enjoy enhanced security and peace of mind for your website visitors.
Set TLS Protocols
TLS (Transport Layer Security) plays a crucial role in safeguarding websites by protecting data from theft, manipulation, and spoofing. To ensure the highest level of security, it is essential to set the appropriate TLS protocols. The minimum TLS version setting dictates the minimum TLS version that a visitor must support to establish a secure connection with your domain.
 Figure 77
Important Update: As of March 31, 2022, Google, Microsoft, Apple, and Mozilla have officially stopped supporting TLS 1.0 and 1.1. Additionally, Google Chrome, starting from 2021, no longer allows websites using TLS 1.0 and 1.1, which means pages relying on these outdated protocols will fail to load.
Key TLS Versions: TLS 1.2: TLS 1.2 introduces the use of more secure hash algorithms like SHA-256, bolstering the overall security of the connection. This version also addresses potential security vulnerabilities related to ciphers with cryptographic weaknesses.
TLS 1.3: TLS 1.3 further enhances security by reducing the size of cipher suites used for encryption. This improvement significantly reduces latency compared to TLS 1.2, resulting in faster and more secure connections.
 Figure 78
By keeping your TLS protocols up-to-date, you can ensure a secure browsing experience for your visitors and protect sensitive data from potential threats. Now let’s proceed with the tutorial on setting up TLS protocols to bolster your website’s security.
Set Default Cipher
Ciphers are algorithms, more specifically they are a set of steps for performing a cryptographic function – it can be encryption, decryption, hashing or digital signatures. Set Default Cipher: A cipher suite is a set of algorithms that help secure a network connection.
To set the default cipher, follow these steps:
Step 1: Enable Set Default Cipher
Locate and click on the toggle to enable the Set Default Cipher option.
 Figure 79
Step 2: Access the Advanced Cipher List
Click on the “Advance” button to view the detailed Cipher List.
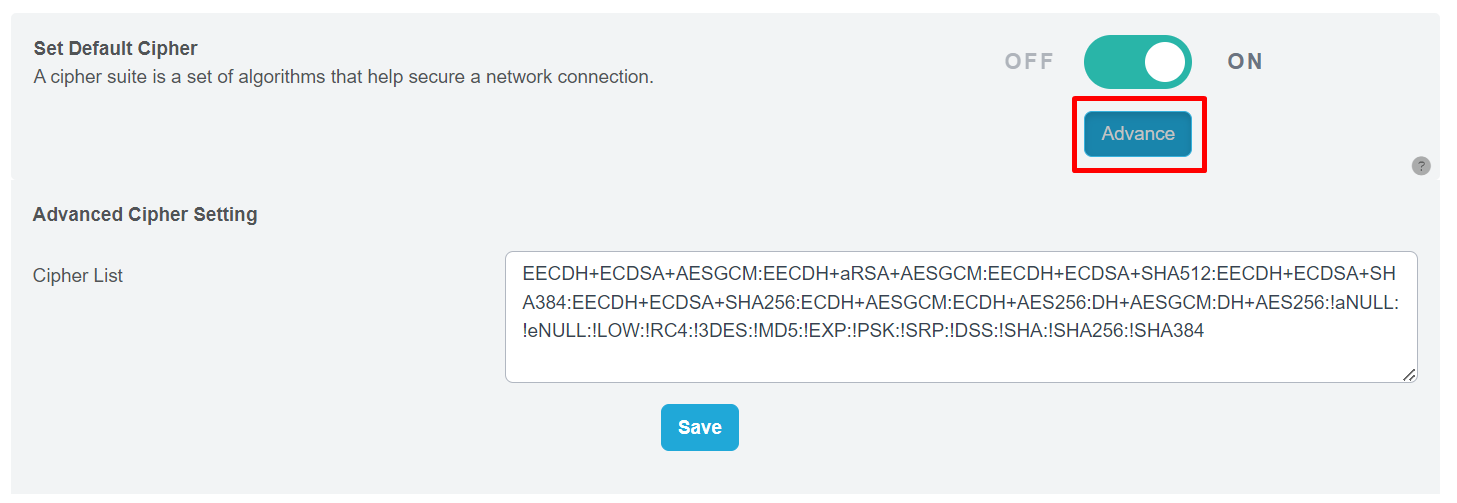 Figure 80
Step 3: Update Cipher List (Optional)
If you wish to update the Cipher List with new data, enter the relevant information in the provided box.
Step 4: Save Changes
After making any desired updates, click on the “Save” button to finalize the process.
TLS 1.2 recommended cipher list: TLS_ECDHE_ECDSA_WITH_AES_128_GCM_SHA256 TLS_ECDHE_ECDSA_WITH_AES_256_GCM_SHA384 TLS_ECDHE_ECDSA_WITH_AES_128_CBC_SHA256 TLS_ECDHE_ECDSA_WITH_AES_256_CBC_SHA384 TLS_ECDHE_RSA_WITH_AES_128_GCM_SHA256 TLS_ECDHE_RSA_WITH_AES_256_GCM_SHA384 TLS_ECDHE_RSA_WITH_AES_128_CBC_SHA256 TLS_ECDHE_RSA_WITH_AES_256_CBC_SHA384 TLS_ECDHE_RSA_WITH_AES_128_CBC_SHA256 TLS_ECDHE_RSA_WITH_AES_256_CBC_SHA384 TLS_DHE_RSA_WITH_AES_128_GCM_SHA256 TLS_DHE_RSA_WITH_AES_256_GCM_SHA384 TLS_DHE_RSA_WITH_AES_128_CBC_SHA TLS_DHE_RSA_WITH_AES_256_CBC_SHA TLS_DHE_RSA_WITH_AES_128_CBC_SHA256 TLS_DHE_RSA_WITH_AES_256_CBC_SHA256 TLS_ECDHE_ECDSA_WITH_CHACHA20_POLY1305_SHA256 TLS_ECDHE_ECDSA_WITH_CHACHA20_POLY1305 TLS_ECDHE_RSA_WITH_CHACHA20_POLY1305_SHA256 TLS_ECDHE_RSA_WITH_CHACHA20_POLY1305
Browser support TLS1.2 Internet Explorer Version 11 and above Google Chrome Version 29 and above Mozilla Firefox Version 27 and above Apple Safari Version 7 and above
TLS 1.3 recommended cipher list: TLS_AES_256_GCM_SHA384 TLS_CHACHA20_POLY1305_SHA256 TLS_AES_128_GCM_SHA256 TLS_AES_128_CCM_8_SHA256 TLS_AES_128_CCM_SHA256 Browser support TLS1.3 Google Chrome – Version 67+ Mozilla Firefox – Version 61+ Apple – Mac OS 10.3 & iOS 11
Set HSTS
Set HSTS: HSTS restricts web browsers to access web servers solely over HTTPS. HSTS protection against HTTP downgrade attacks (SSL stripping attacks) by requiring all traffic to utilize HTTPS. It rewrites requests that do not point to encrypted sources. Mixed content defense. HSTS automatically upgrades fetches to HTTPS in situations where a domain has mixed content.
The HTTP Strict-Transport-Security response header informs browsers that the site should only be accessed using HTTPS, and that any future attempts to access it using HTTP should automatically be converted to HTTPS.
To set HSTS for your website, follow these simple steps:
Step 1: Enable HSTS
Locate the toggle button to enable HSTS in your website’s settings.
 Figure 81
Step 2: Configure Advanced HSTS Settings (Optional)
For finer control over HSTS, click on the “Advance” button.
 Figure 82
This will open up the Advanced HSTS Setting part.
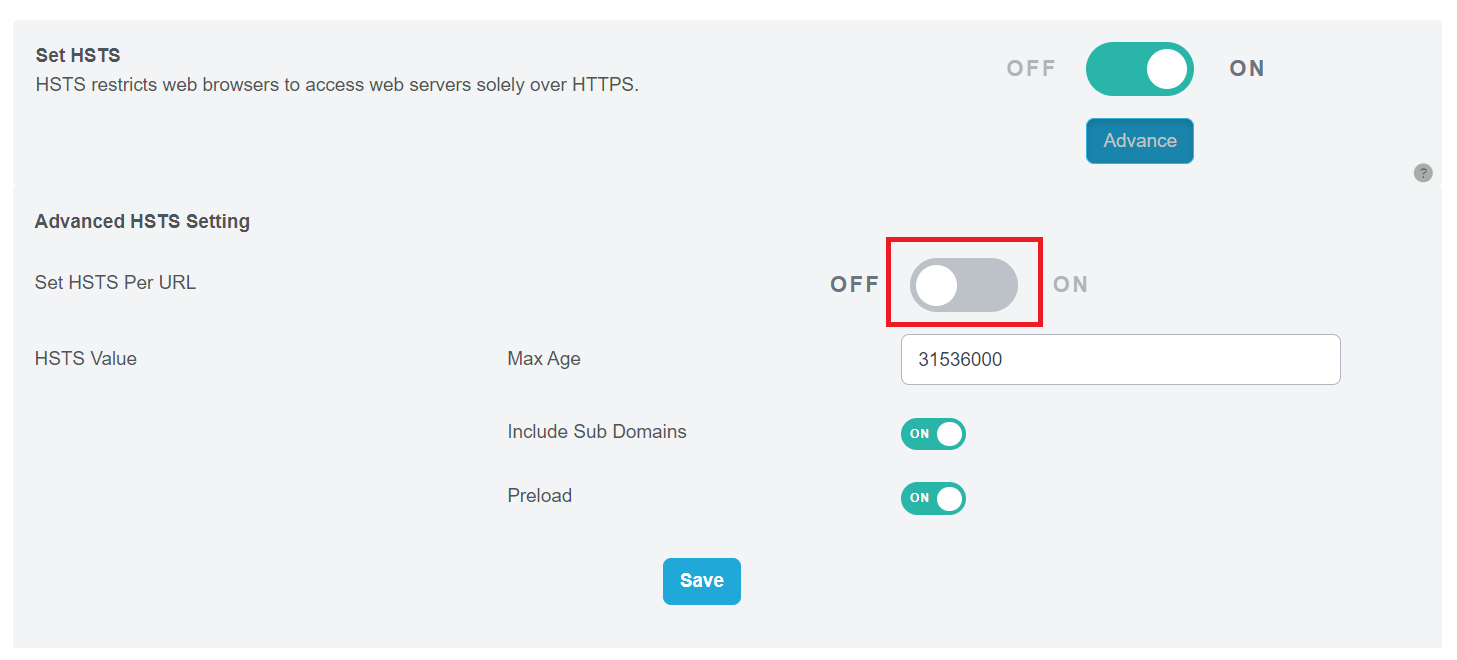 Figure 83
Step 3: Set HSTS Values
Determine the HSTS Value, which is the maximum duration for which the website should be exclusively accessed via HTTPS. Commonly, this value is set to 31,536,000 seconds (equivalent to 365 days).
Decide whether to include subdomains under the HSTS protection. Ensure that all relevant subdomains have SSL certificates in place, as they will also be directed to use HTTPS.
Consider enabling HSTS Preload, which provides additional protection during the first visit to the website by the browser. With HSTS preload enabled, you can be confident in the security right from the start.
Step 4: Save your Configuration
Once you have set the desired HSTS values and options, click the “Save” button to implement the changes.
By following these steps, you have successfully set up HSTS for your website, enhancing its security and safeguarding visitors against potential security risks related to insecure HTTP connections. Remember to review and update your HSTS settings periodically to align with your website’s security requirements.
Upgrade HTTP to HTTPS
Upgrade HTTP to HTTPS: This feature automatically upgrades all insecure resource requests from their pages to secure variants.
To activate or deactivate this feature, simply click the toggle switch to turn it on or off.
 Figure 84
Cookies Setting
Cookies Setting: An HTTP cookie (also known as web cookie or browser cookie) is a small piece of data that a server sends to the user’s web browser. The browser may store it and send it back with the next request to the same server.
 Figure 85
HttpOnly Cookies is a tag added to a browser cookie that prevents client side scripts from accessing data, this is a gate to prevent the specialized cookies from being accessed by others than the server. The http only cookies could help mitigate the risk of client side scripts accessing the protected cookies making the cookies more secure.
HttpOnly can prevent the Cross-site scripting(XSS) attacks which always aim at stealing session cookies.
Sample: Session cookies using the set cookies header:
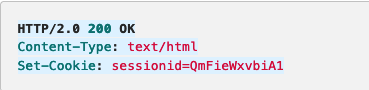 Figure 86
Protected by httpOnly
 Figure 87
Secure Cookies are used for declare that the cookie may only be transmitted using a secure connection(SSL/HTTPS).Therefore, the secure cookies only can set during an HTTPS connection.If the cookie is set but the connection is http, the browser will ignore the connection.Secure Cookies can prevent man-in-the-middle attack.
Sample:
 Figure 88
Please contact Toffs Security Operation Center for assistance if you encounter any issues.