Analysis
Analysis
The “Analysis” in CDN module is a powerful tool that provides valuable insights and data related to your website’s performance, security, and user activity. In this section, we will explore how to use three key features of the “Analysis” module: Realtime Report, WAF Report, and Download Report. These features will help you monitor and optimize your website effectively.
Prerequisites: Before proceeding with this tutorial, ensure the following:
- You have access to the “Analysis” module in TOFFS CDN.
- Your website is properly integrated with TOFFS CDN.
Realtime Report
Traffic Report
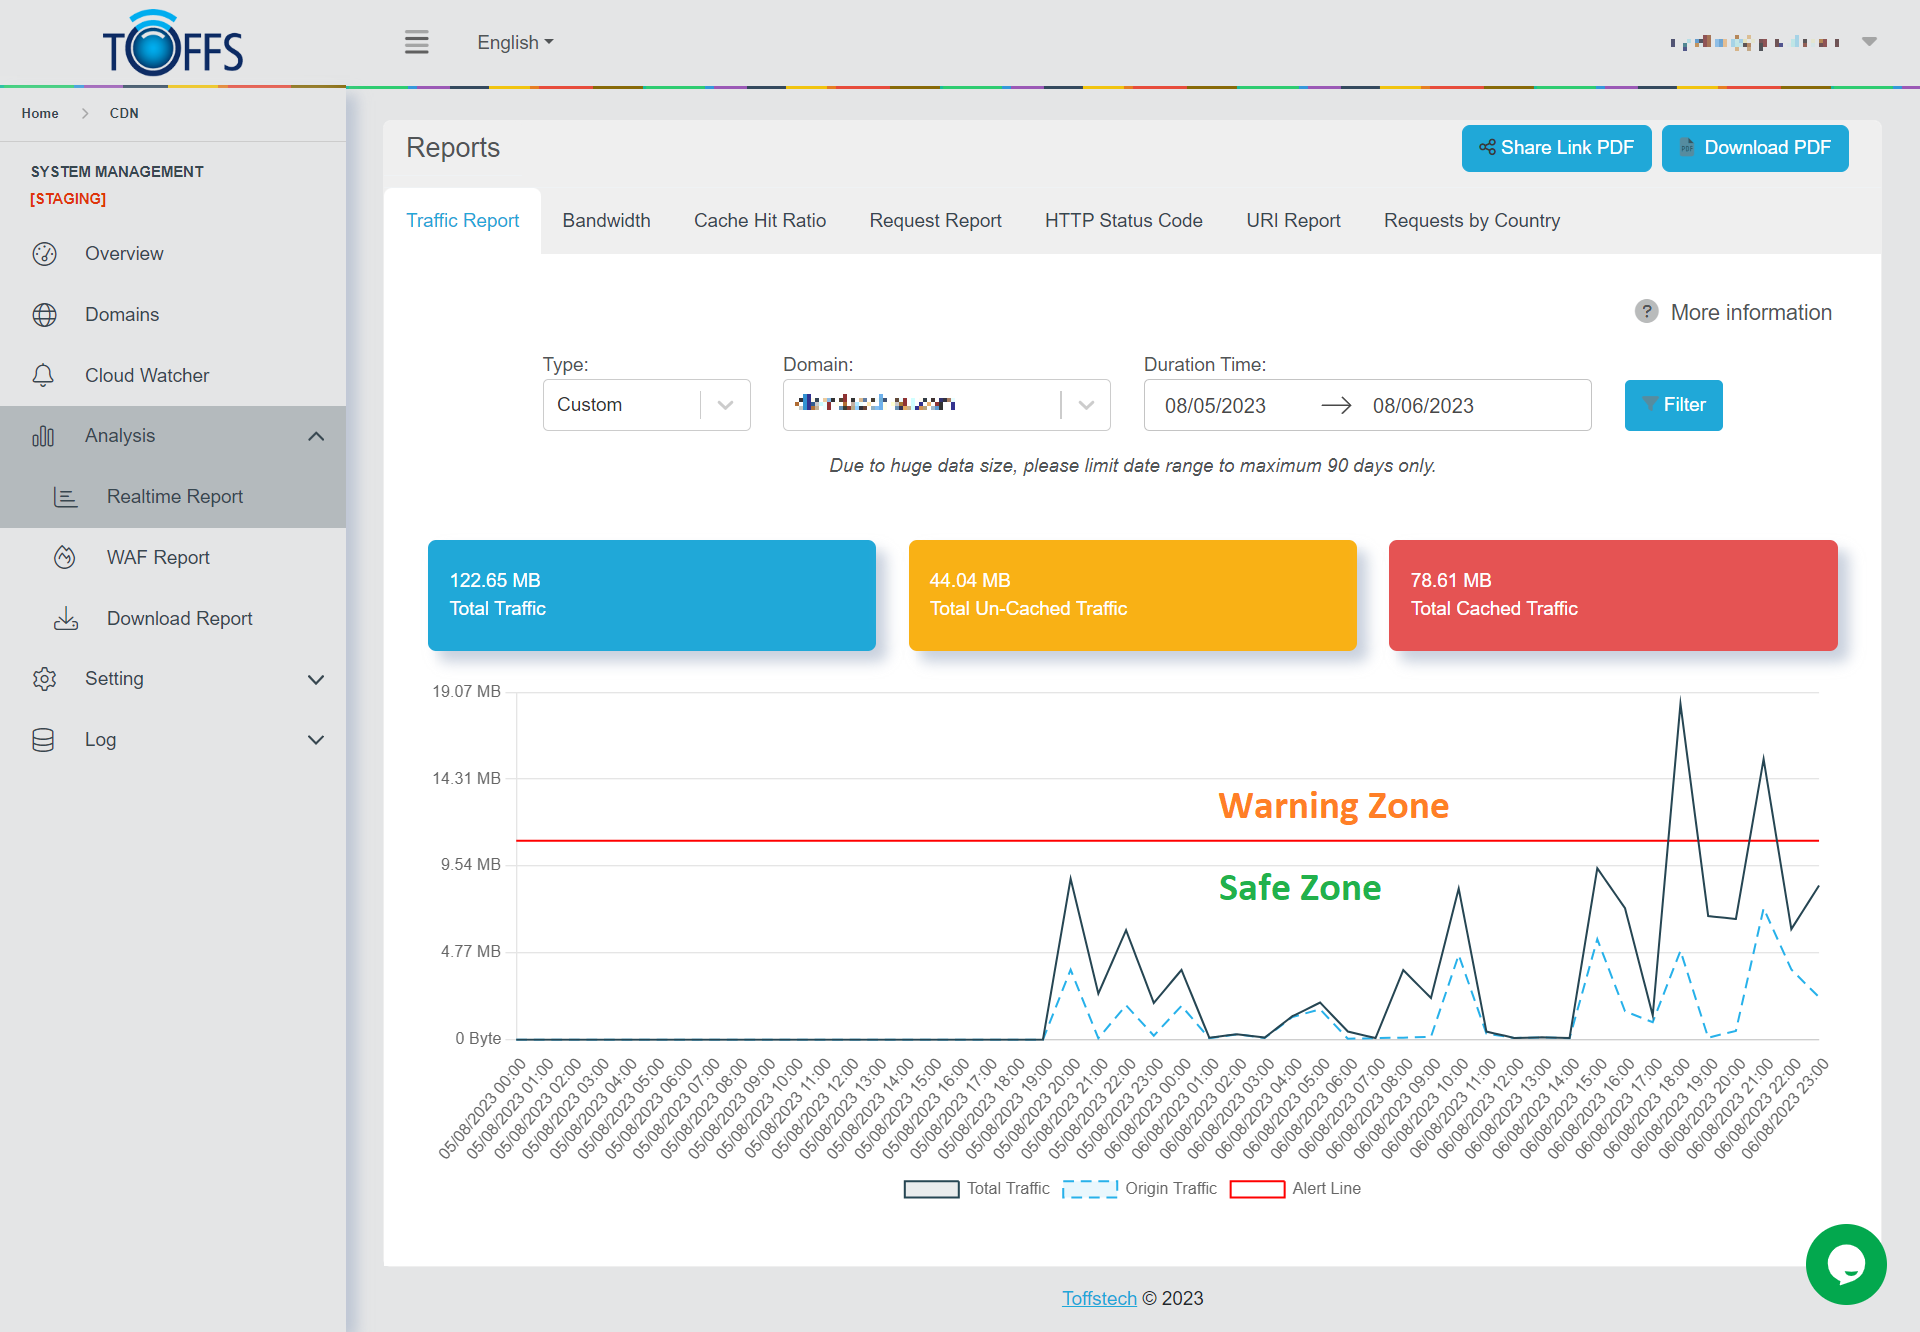
Figure 143
This page is the “Traffic Report” page under the “Realtime Report” page
This page allows you to monitor the TOTAL TRAFFIC for your selected domain using an interactive graph. You can view traffic data for different time intervals, such as an hour, a day, a week, a month, or customize your preferred timeframe.
You have the flexibility to choose the desired time period and explore the total traffic for your domain. The graph presents the following breakdown:
- The blue portion represents the TOTAL traffic for the specific hour, day, week, month, or custom timeframe of the domain.
- The yellow portion indicates the total UNCACHED traffic during the specified hour, day, week, month, or custom timeframe of the domain.
- The red portion represents the total CACHED traffic for the given hour, day, week, month, or custom timeframe of the domain.
Tips for Utilizing TOFFS Technologies’ CDN Traffic Report Feature:
- The Traffic Report feature in TOFFS Technologies’ CDN provides valuable insights to enhance online asset performance and security.
- Identify the Warning Zone: Monitor increased traffic levels approaching or exceeding predefined thresholds to proactively address potential issues and prevent disruptions.
- Recognize the Safe Zone: Identify periods of optimal performance and stability to ensure efficient and consistent content delivery to end-users.
- Use Cloud Watcher for Proactive Notifications: Integrate the Cloud Watcher tool to set up customized alerts and receive real-time email notifications about potential issues, allowing prompt action and effective measures.
To get more information about Cloud Watcher, click here.
Bandwidth
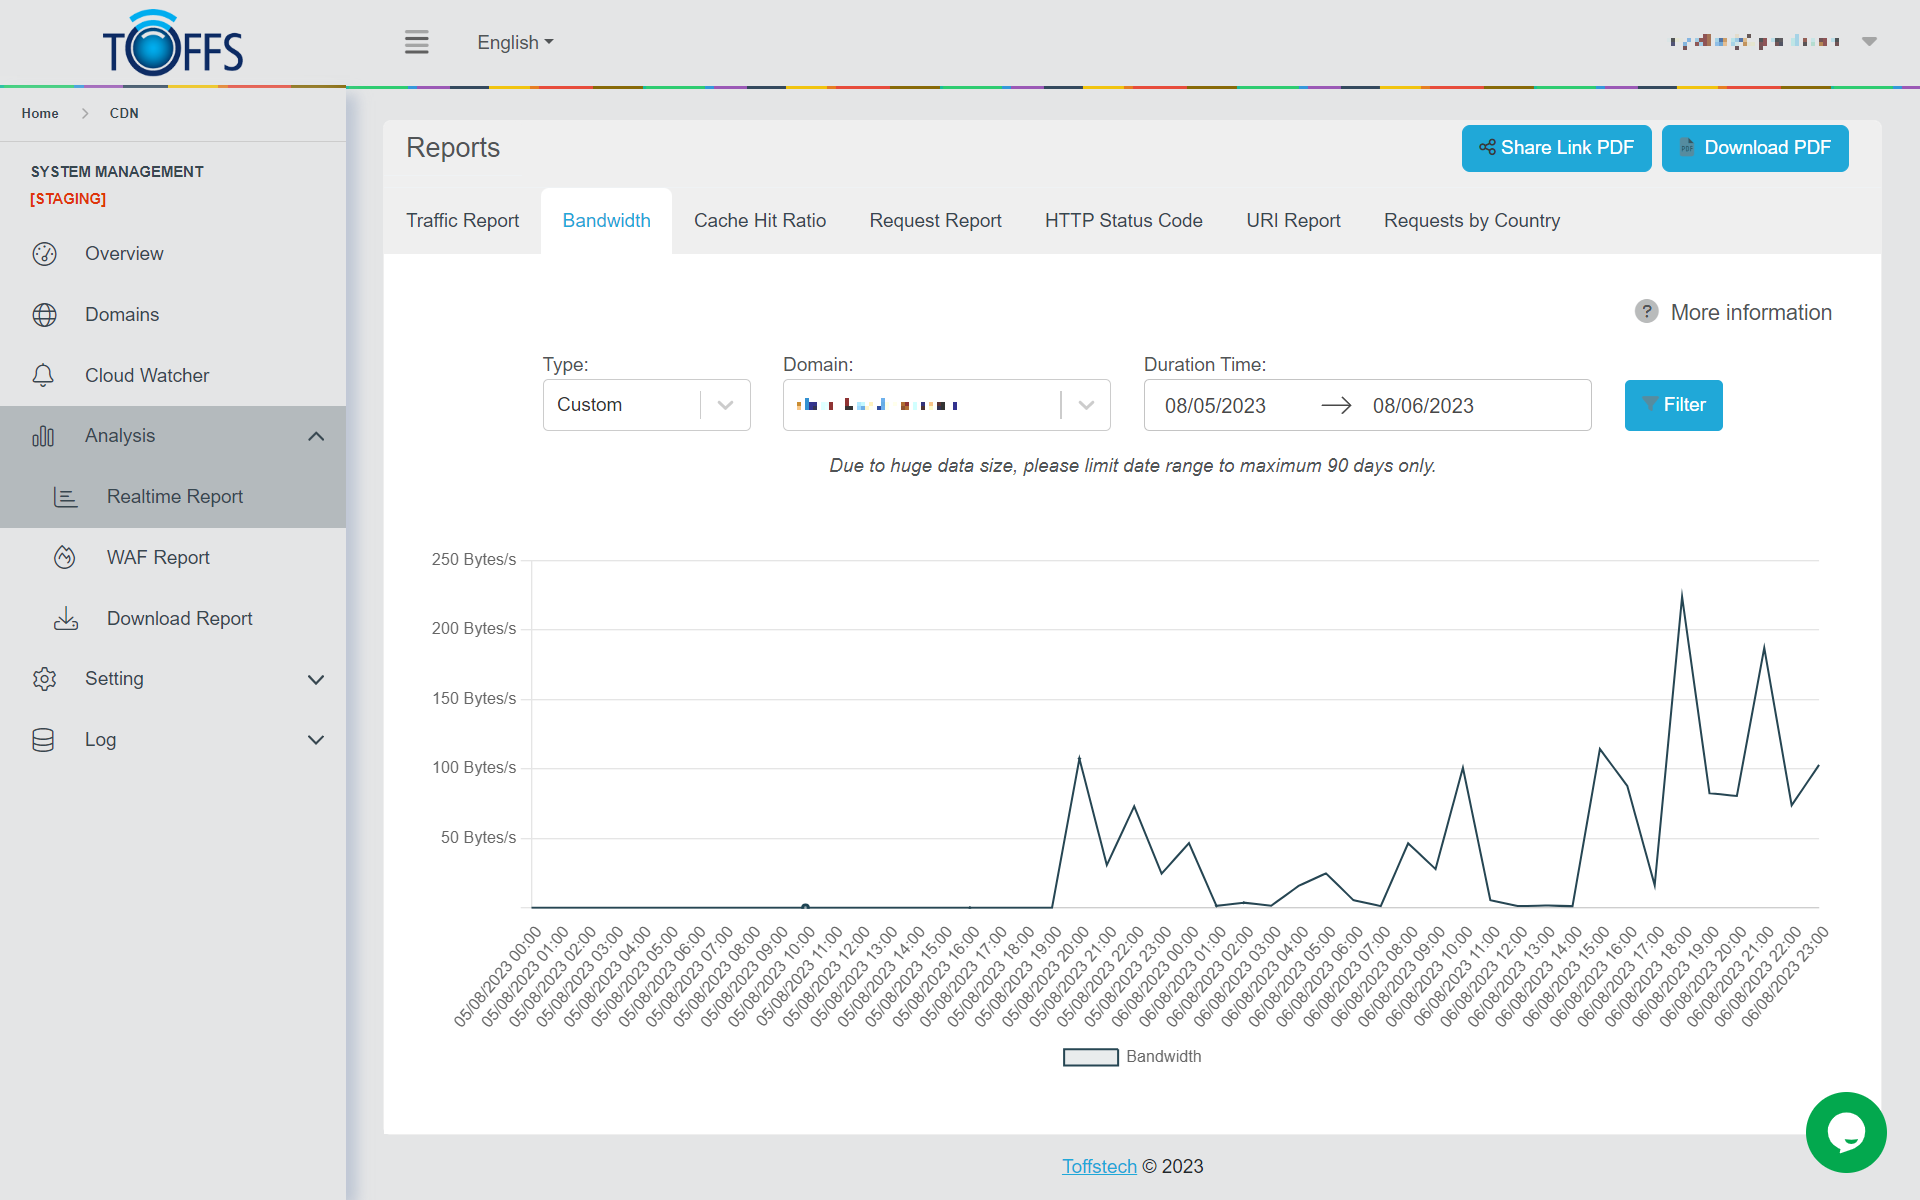
Figure 144
This page is the “Bandwidth Report”, which provides crucial insights into your content delivery network’s data usage. The report showcases the bandwidth consumption in Bytes per second (Bytes/s) and offers a comprehensive breakdown of time intervals, including Hourly, Daily, Weekly, Monthly, and Custom Time ranges.
Once you have chosen your desired timeframe, the Bandwidth Report will present your data in a user-friendly graphical format. You will typically see a line graph or bar chart that displays the bandwidth usage over time. The x-axis represents the time period (e.g., hours, days, weeks, or months), while the y-axis shows the corresponding bandwidth usage in Bytes/s.
Use the report’s insights to:
- Identify usage patterns: Spot peak traffic hours or days, allowing you to allocate resources effectively.
- Monitor growth trends: Track your CDN’s performance over time and ensure it aligns with your content delivery goals.
- Optimize CDN performance: Identify any anomalies or irregularities, allowing you to address potential issues promptly.
Cache Hit Radio
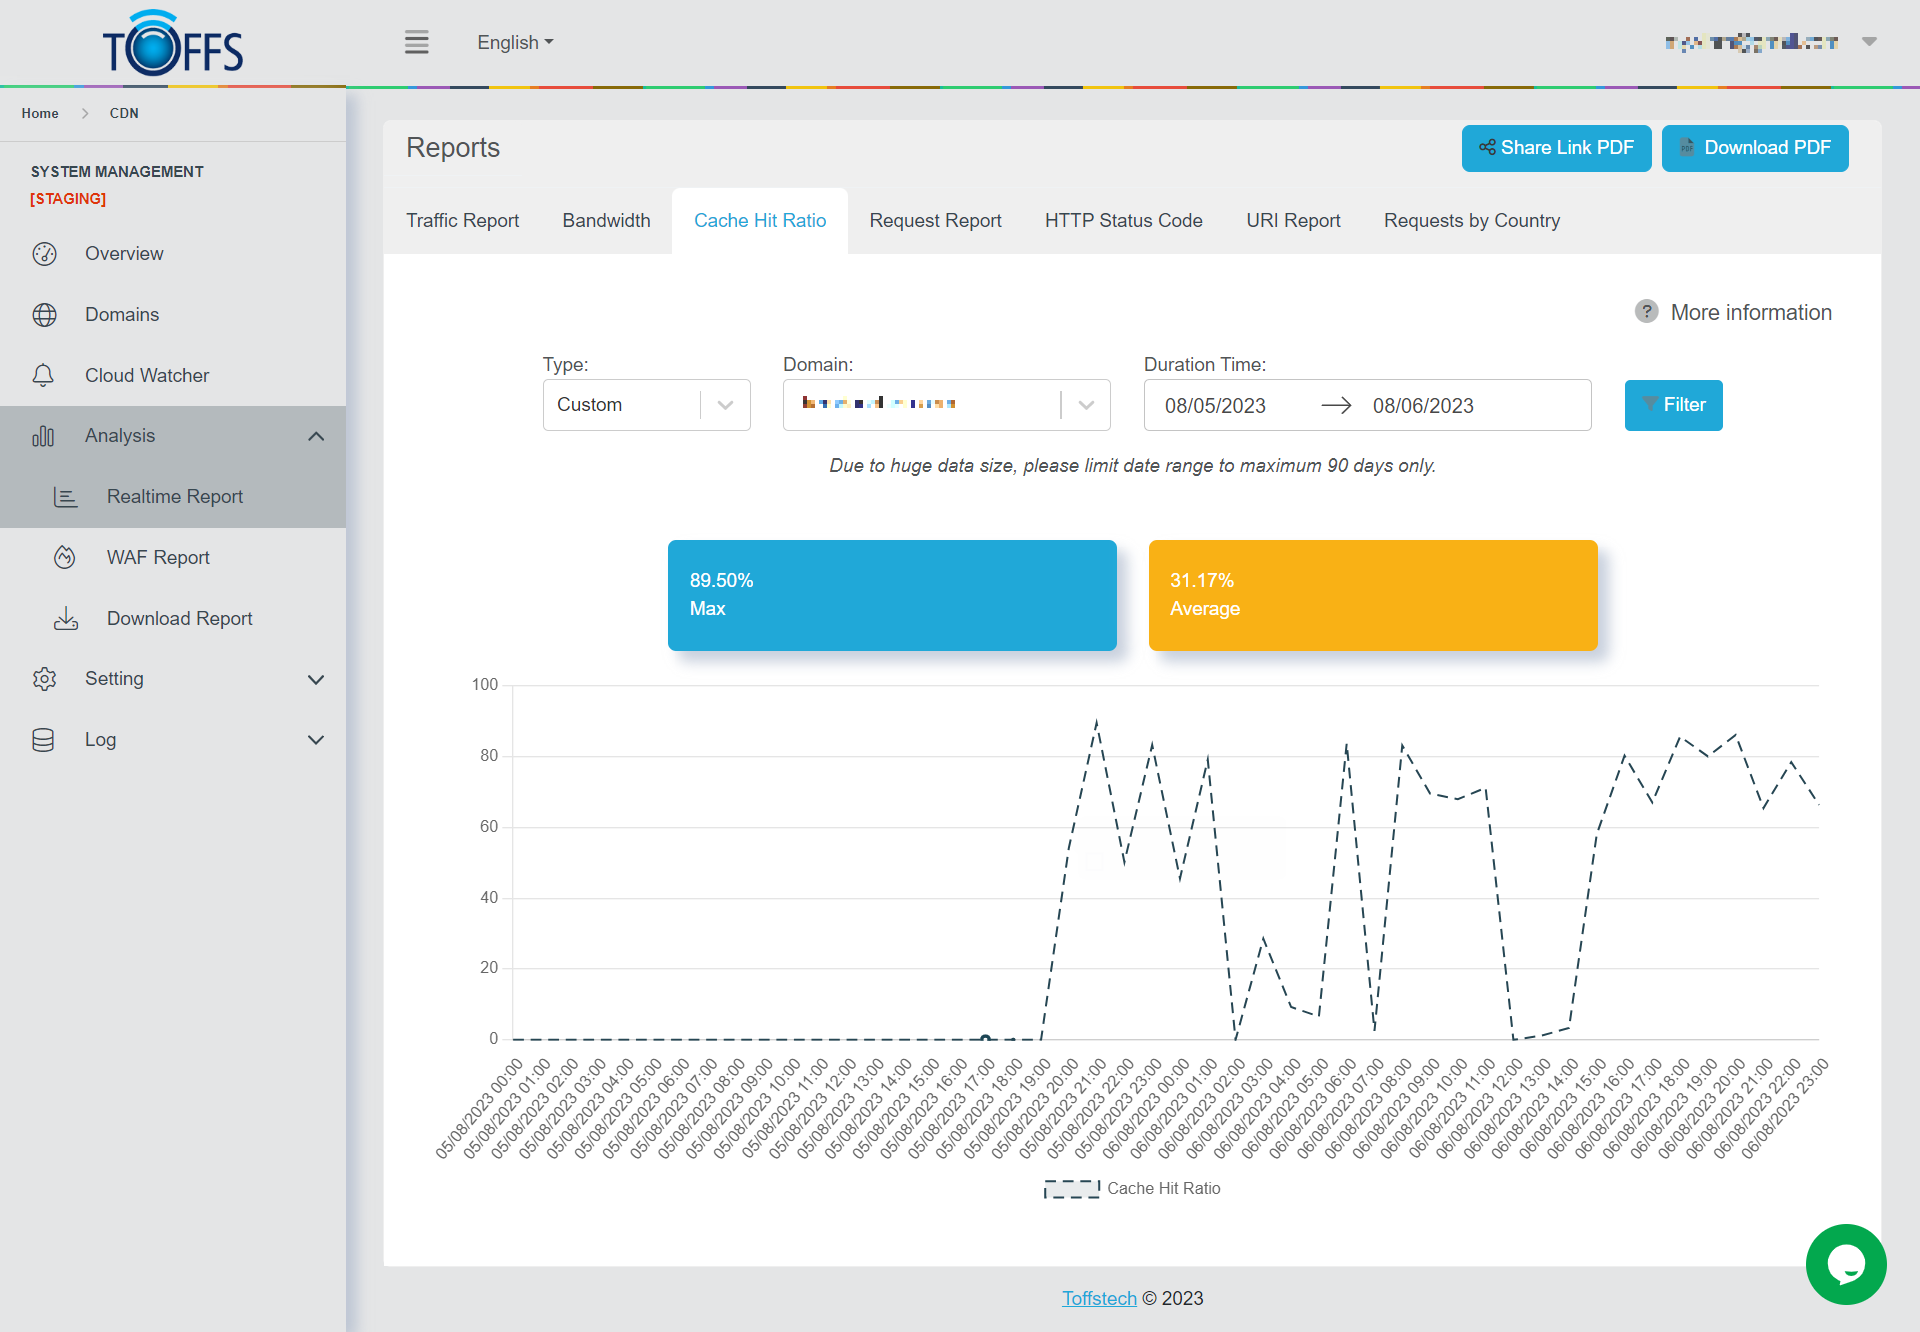
Figure 145
The “Cache Hit Radio” page is an integral part of the broader “Realtime Report” section, designed to provide you with real-time analytics regarding your domain’s caching performance. Within this dedicated page, you can access crucial data pertaining to the percentage of Cache Hits your domain experiences within specific time intervals or on particular dates.
Understanding the significance of Cache Hits is essential for optimizing your website’s performance. A Cache Hit occurs when a user’s request matches content that is already stored in the cache, resulting in faster loading times and reduced server load. Therefore, a higher Cache Hit percentage indicates a more effective caching mechanism, leading to improved user experiences and website responsiveness.
Maximum Cache Hit Percentage: This metric represents the highest percentage of Cache Hits recorded during the selected timeframe. Knowing the peak Cache Hit rate helps you identify the most successful periods of caching performance and allows you to replicate and maintain those favorable conditions.
Average Cache Hit Percentage: The average Cache Hit percentage, on the other hand, provides a broader overview of caching efficiency over the specified time or date range. It factors in variations and fluctuations, giving you a more comprehensive understanding of how well your caching strategy performs on average.
By analyzing these two essential metrics, you can make informed decisions to optimize your caching configuration, leading to enhanced website speed, reduced server load, and ultimately, a better user experience for your visitors.
Request Report
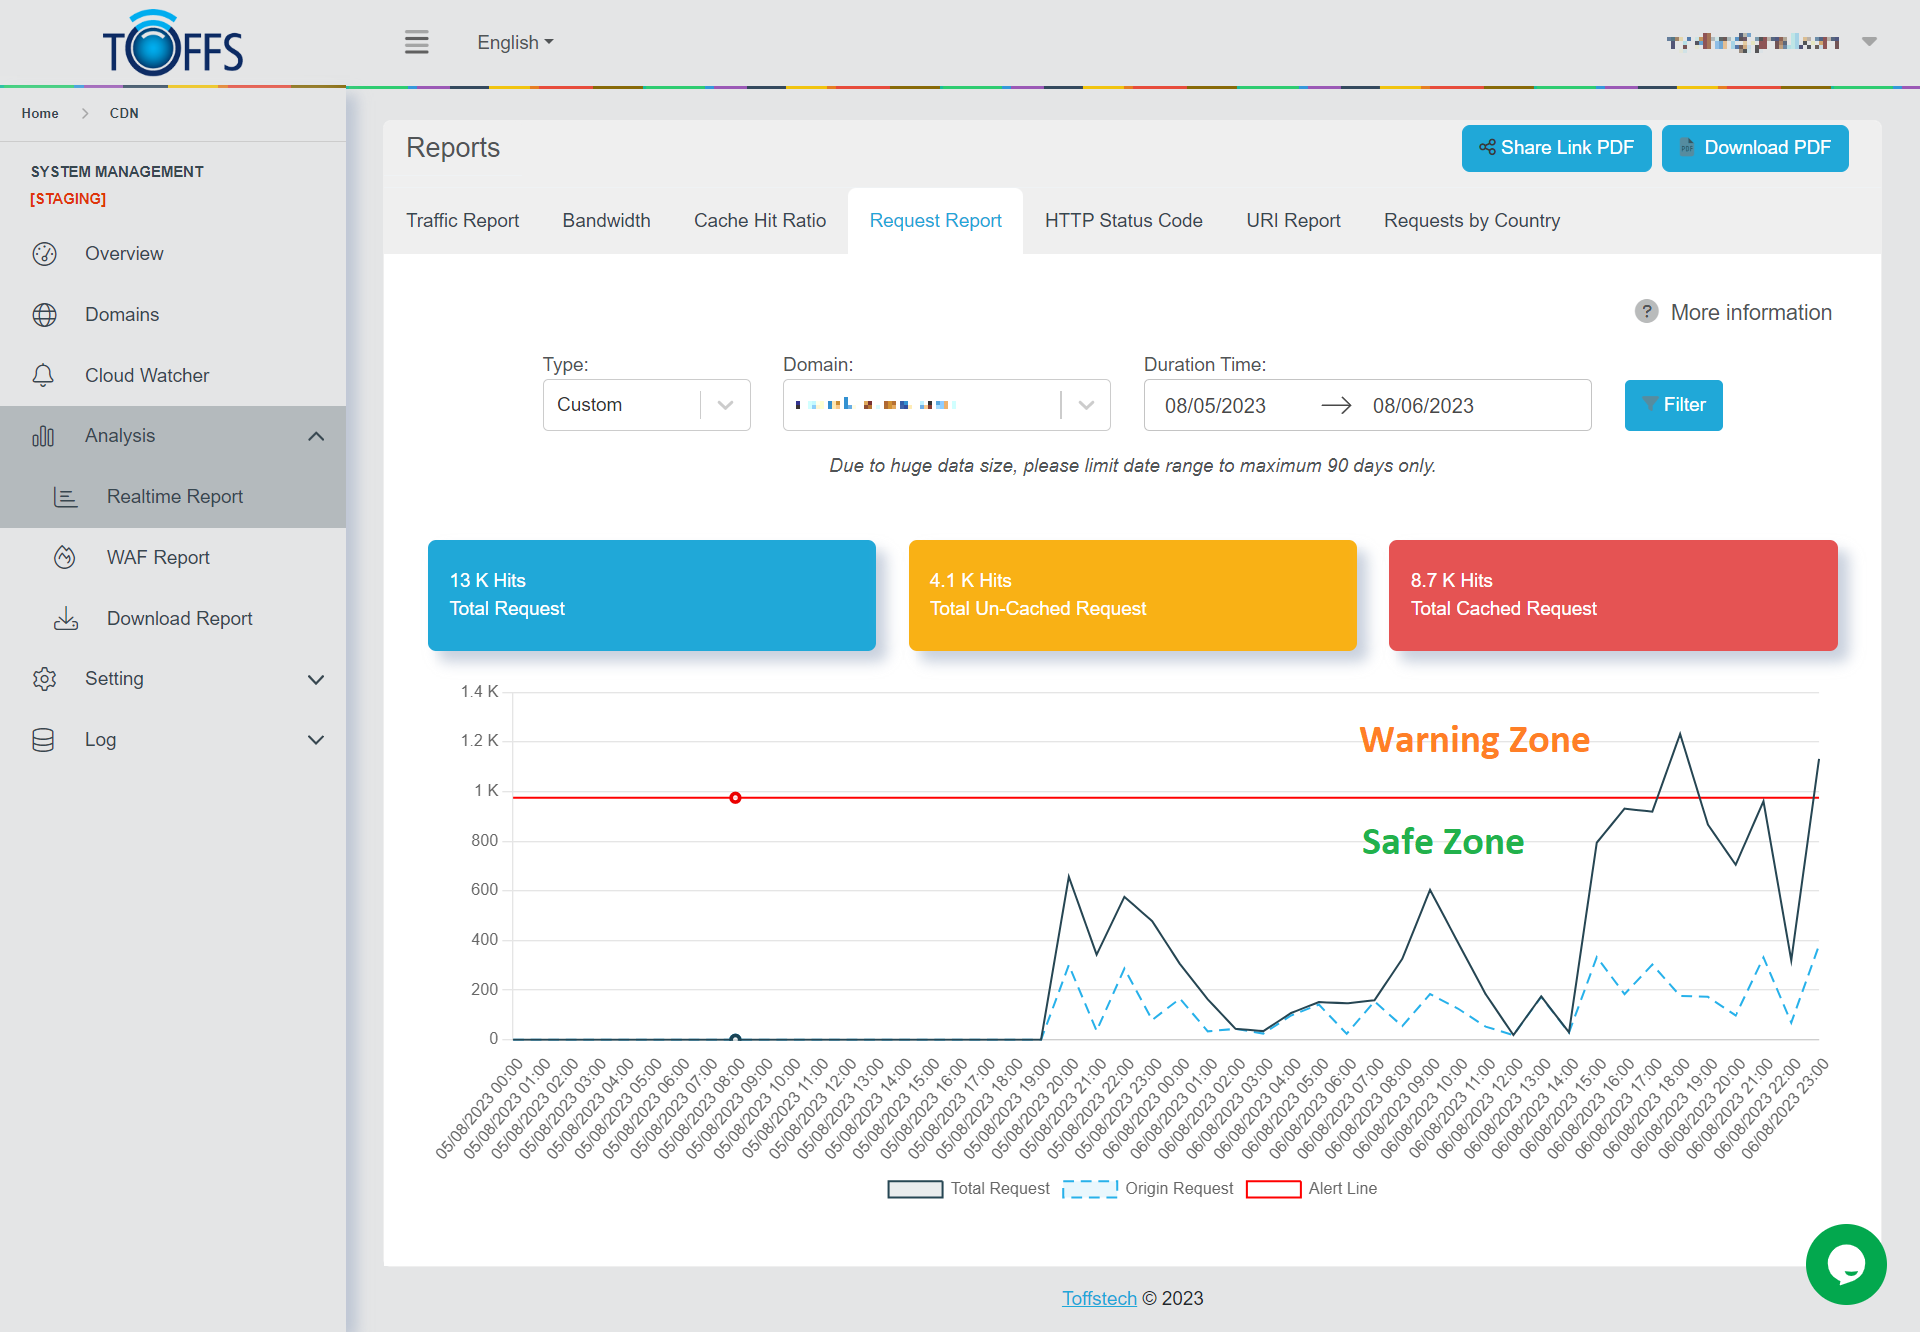
Figure 146
This is the “Request Report” page under the “Realtime Report” page. On this page, you have the ability to track the overall number of requests for your selected domain using an easily interpretable graph. The graph can display data for an hour, a day, a week, a month, or a custom time range.
You have the flexibility to choose both the time period and the specific domain you want to analyze. The graph is color-coded for better understanding:
- The blue section represents the TOTAL number of requests for the chosen hour, day, week, month, or custom time range for the selected domain.
- The yellow section corresponds to the total number of requests that were UN-CACHED during the chosen hour, day, week, month, or custom time range for the selected domain.
- The red section indicates the total number of requests that were CACHED during the chosen hour, day, week, month, or custom time range for the selected domain.
This graphical representation allows for a quick and comprehensive view of your domain’s request activities, enabling you to make informed decisions based on the provided data.
HTTP Status Code
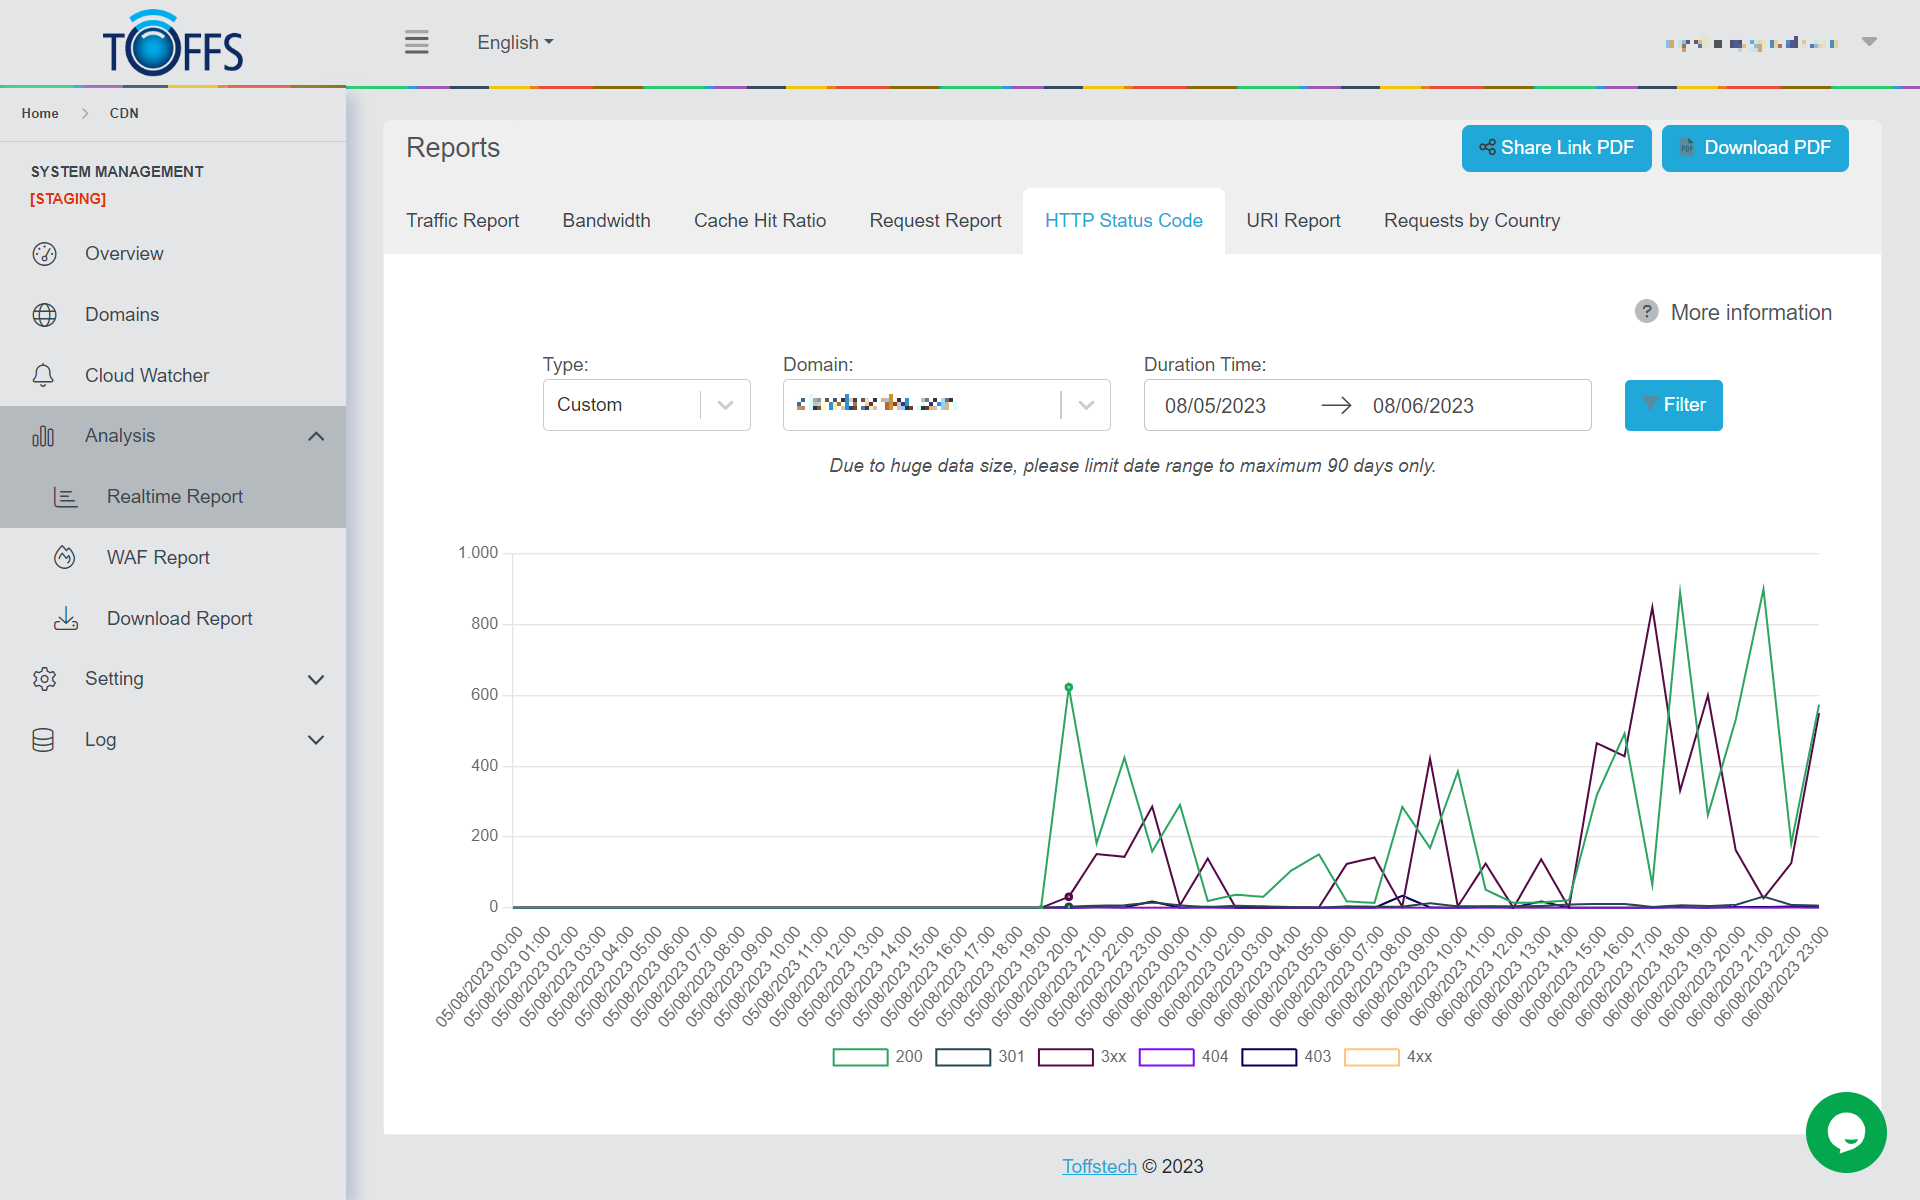
Figure 147
The “HTTP Status Code” page within the “Realtime Report” offers valuable insights into the world of HTTP status codes, assisting in the identification and resolution of issues related to web page loading and resource accessibility.
HTTP status codes serve as standardized response codes used by web servers to communicate with web browsers and clients. When you access a webpage or resource on the internet, the server will respond with a specific status code, indicating the outcome of the request. Each status code carries a particular meaning, helping developers and users to comprehend the situation at hand.
By understanding the specific HTTP status codes received, developers and website administrators can pinpoint the issue and take appropriate actions to rectify it. On this page, you have the flexibility to choose the desired period of time and view status codes specific to a particular domain. This real-time report empowers you to analyze website performance, troubleshoot errors, and enhance overall user experience.
The period of time can be chosen along with Status Codes of the domain you wish to view.
URI Report
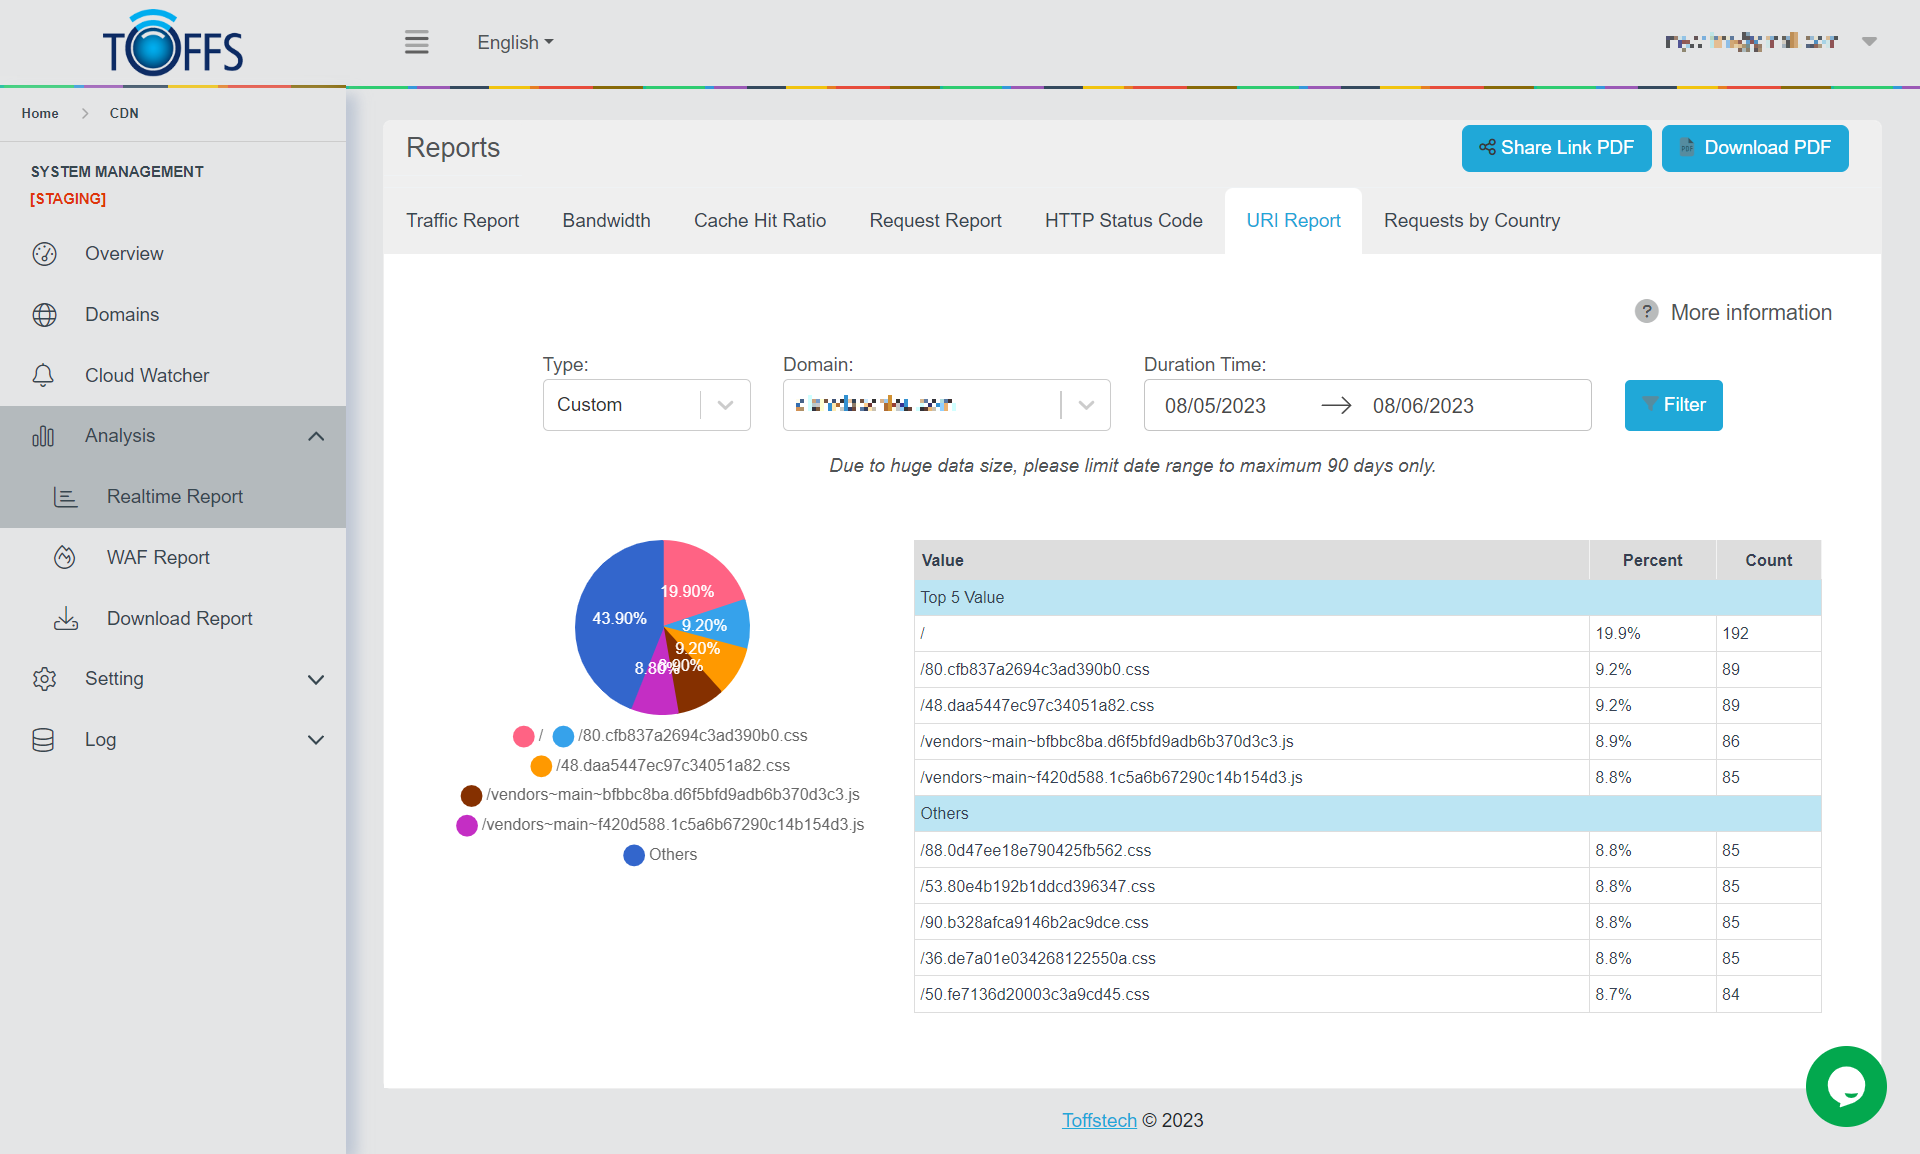
Figure 148
This is the “URI Report” page under the “Realtime Report” page.
URI stands for Uniform Resource Identifier. Uniform Resource Identifiers (URIs), which play a pivotal role in facilitating resource access across computer networks and the World Wide Web. The primary purpose of URIs is to establish a standardized method for other computers to retrieve resources.
Here, users have the flexibility to select a specific time period and domain of interest for analysis. Once the preferences are set, the corresponding URI reports will be generated and displayed below, providing valuable insights into resource utilization and accessibility.
Requests by Country

Figure 149
This is the “Request by Country” page under the “Realtime Report” page.
The “Request by Country” page provides essential information about the IP Address/hostname of the remote computer to which the connection is currently established. It serves as a valuable tool to monitor and analyze the connections to different remote systems.
- To tailor your analysis, you have the flexibility to select a specific period of time for which you want to view the data. Additionally, you can choose the domain you wish to focus on by adjusting the “Value” and “Count” parameters.
- Upon selecting your preferred time frame and domain criteria, the data pertaining to the Remote Address will be displayed in the form of a comprehensive report. The information will be presented in the two columns designated as “Value” and “Count”, providing you with a clear overview of the connection statistics for the chosen domain. This enables you to make informed decisions and gain insights into the network’s remote connections.
Download and Share Realtime Report
Our innovative feature enables you to effortlessly download or share the Realtime Report. Access valuable information such as Traffic Report, Cache Hit Ratio, Request Report, HTTP Status Code, URI Report, and Requests by Country with ease.”
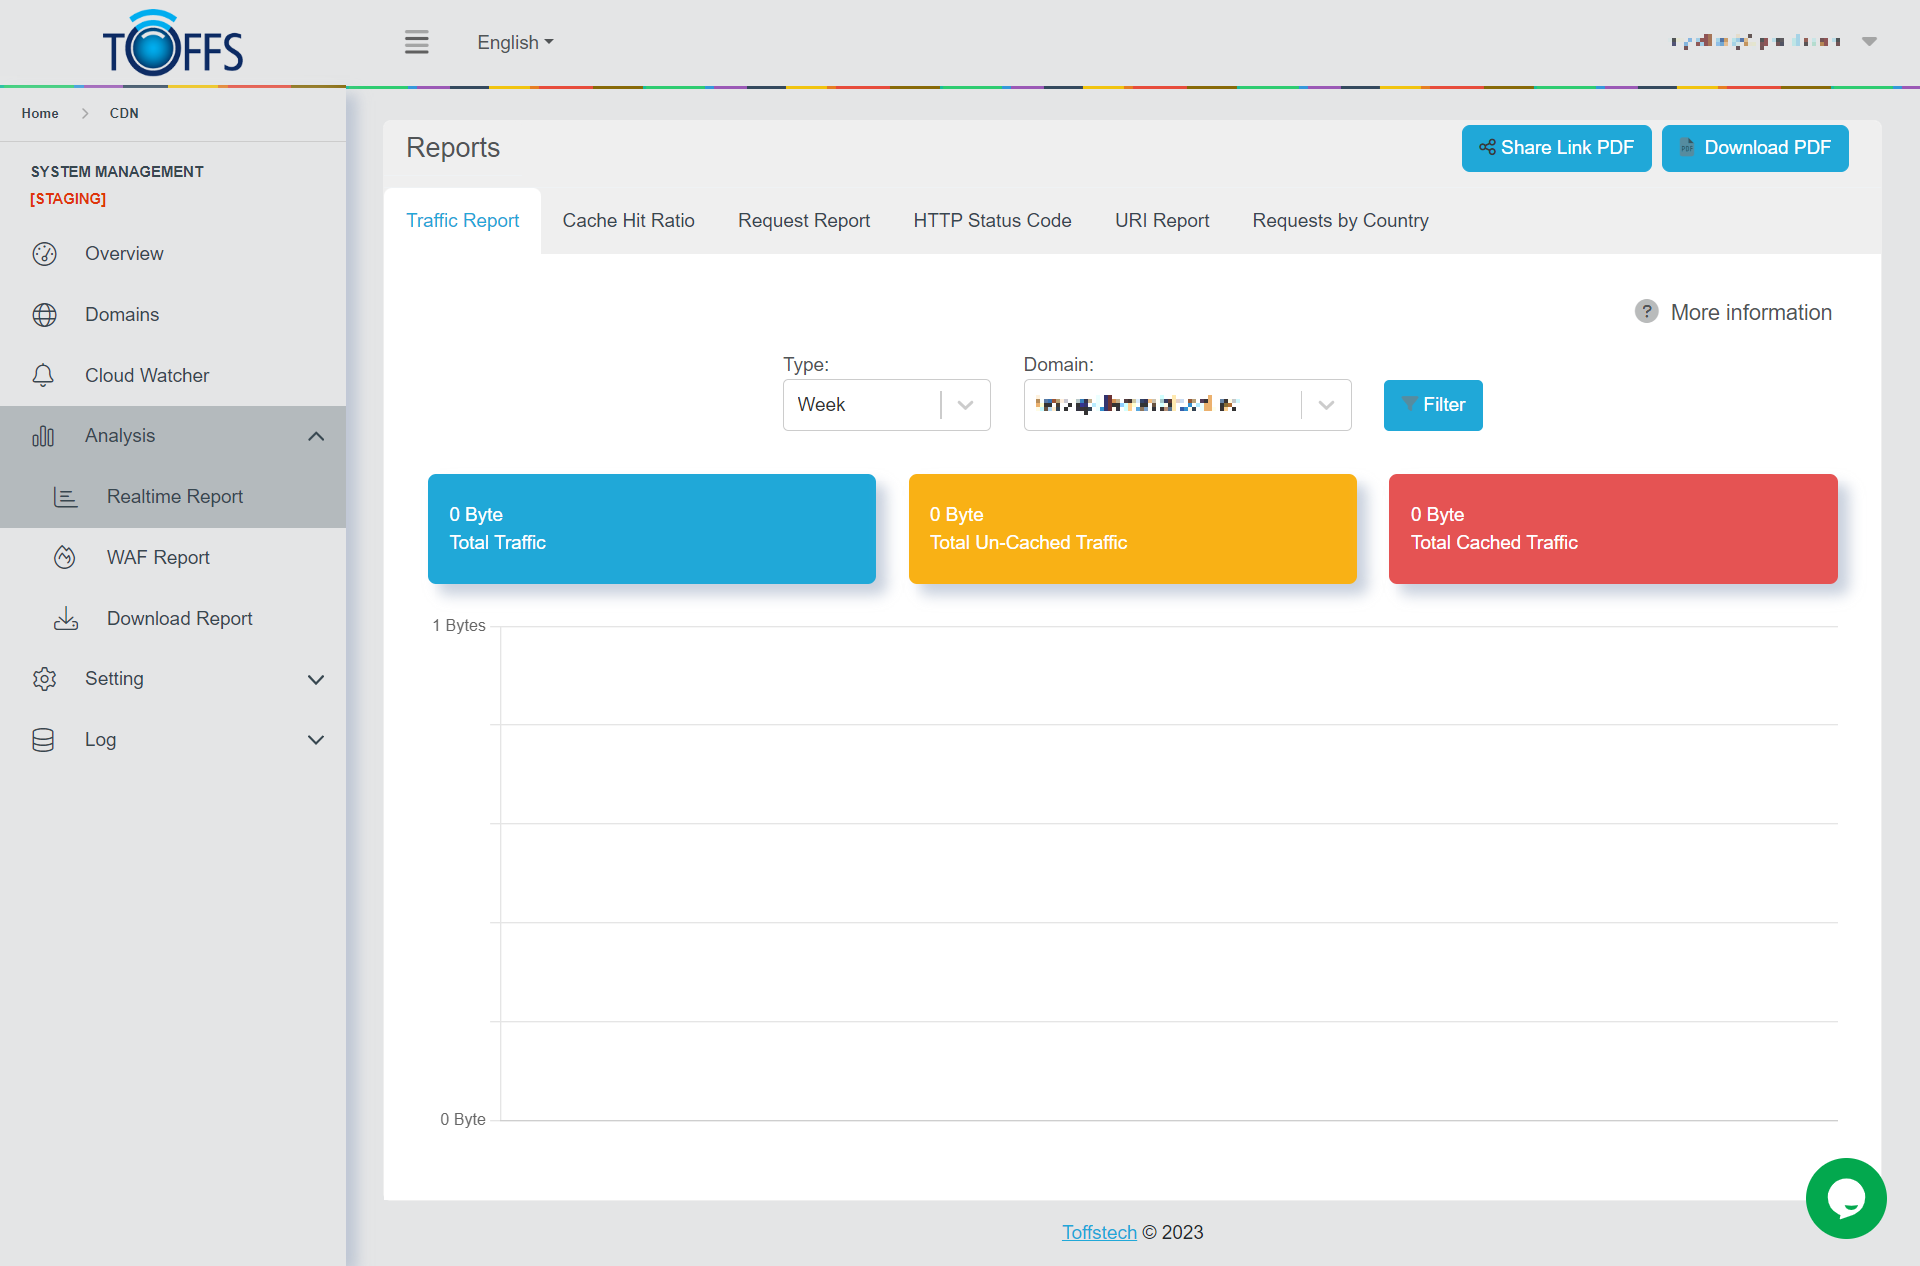
Figure 150
To access or distribute the Realtime Report, follow these steps:
Step 1: Choose the desired Time from the Type drop-down menu.
Step 2: Select the appropriate Domain from the Domain drop-down menu.
Step 3a: Click on the Download button.
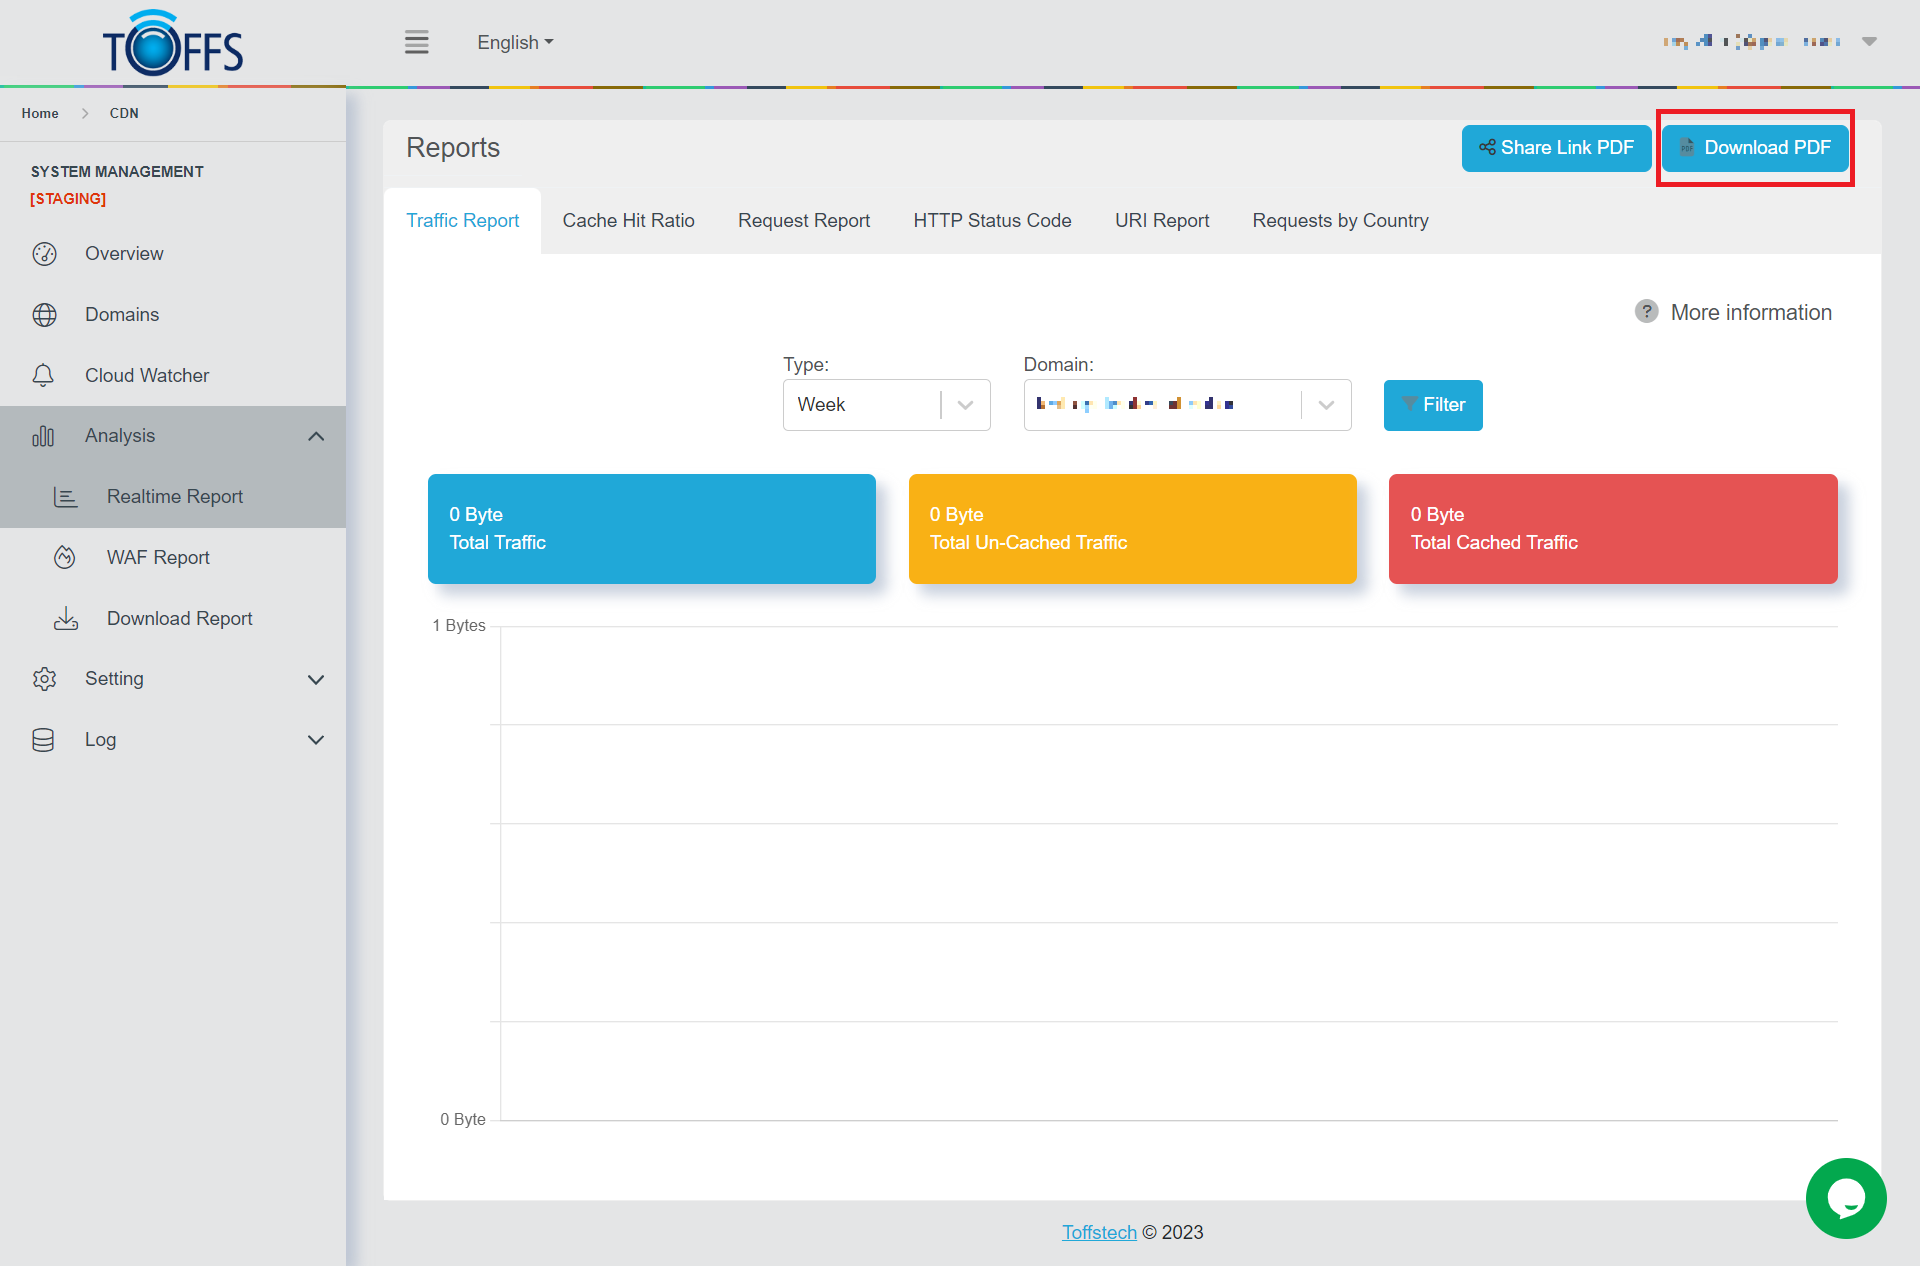
Figure 151
Step 3b: To share the report, click the Share Link PDF button.
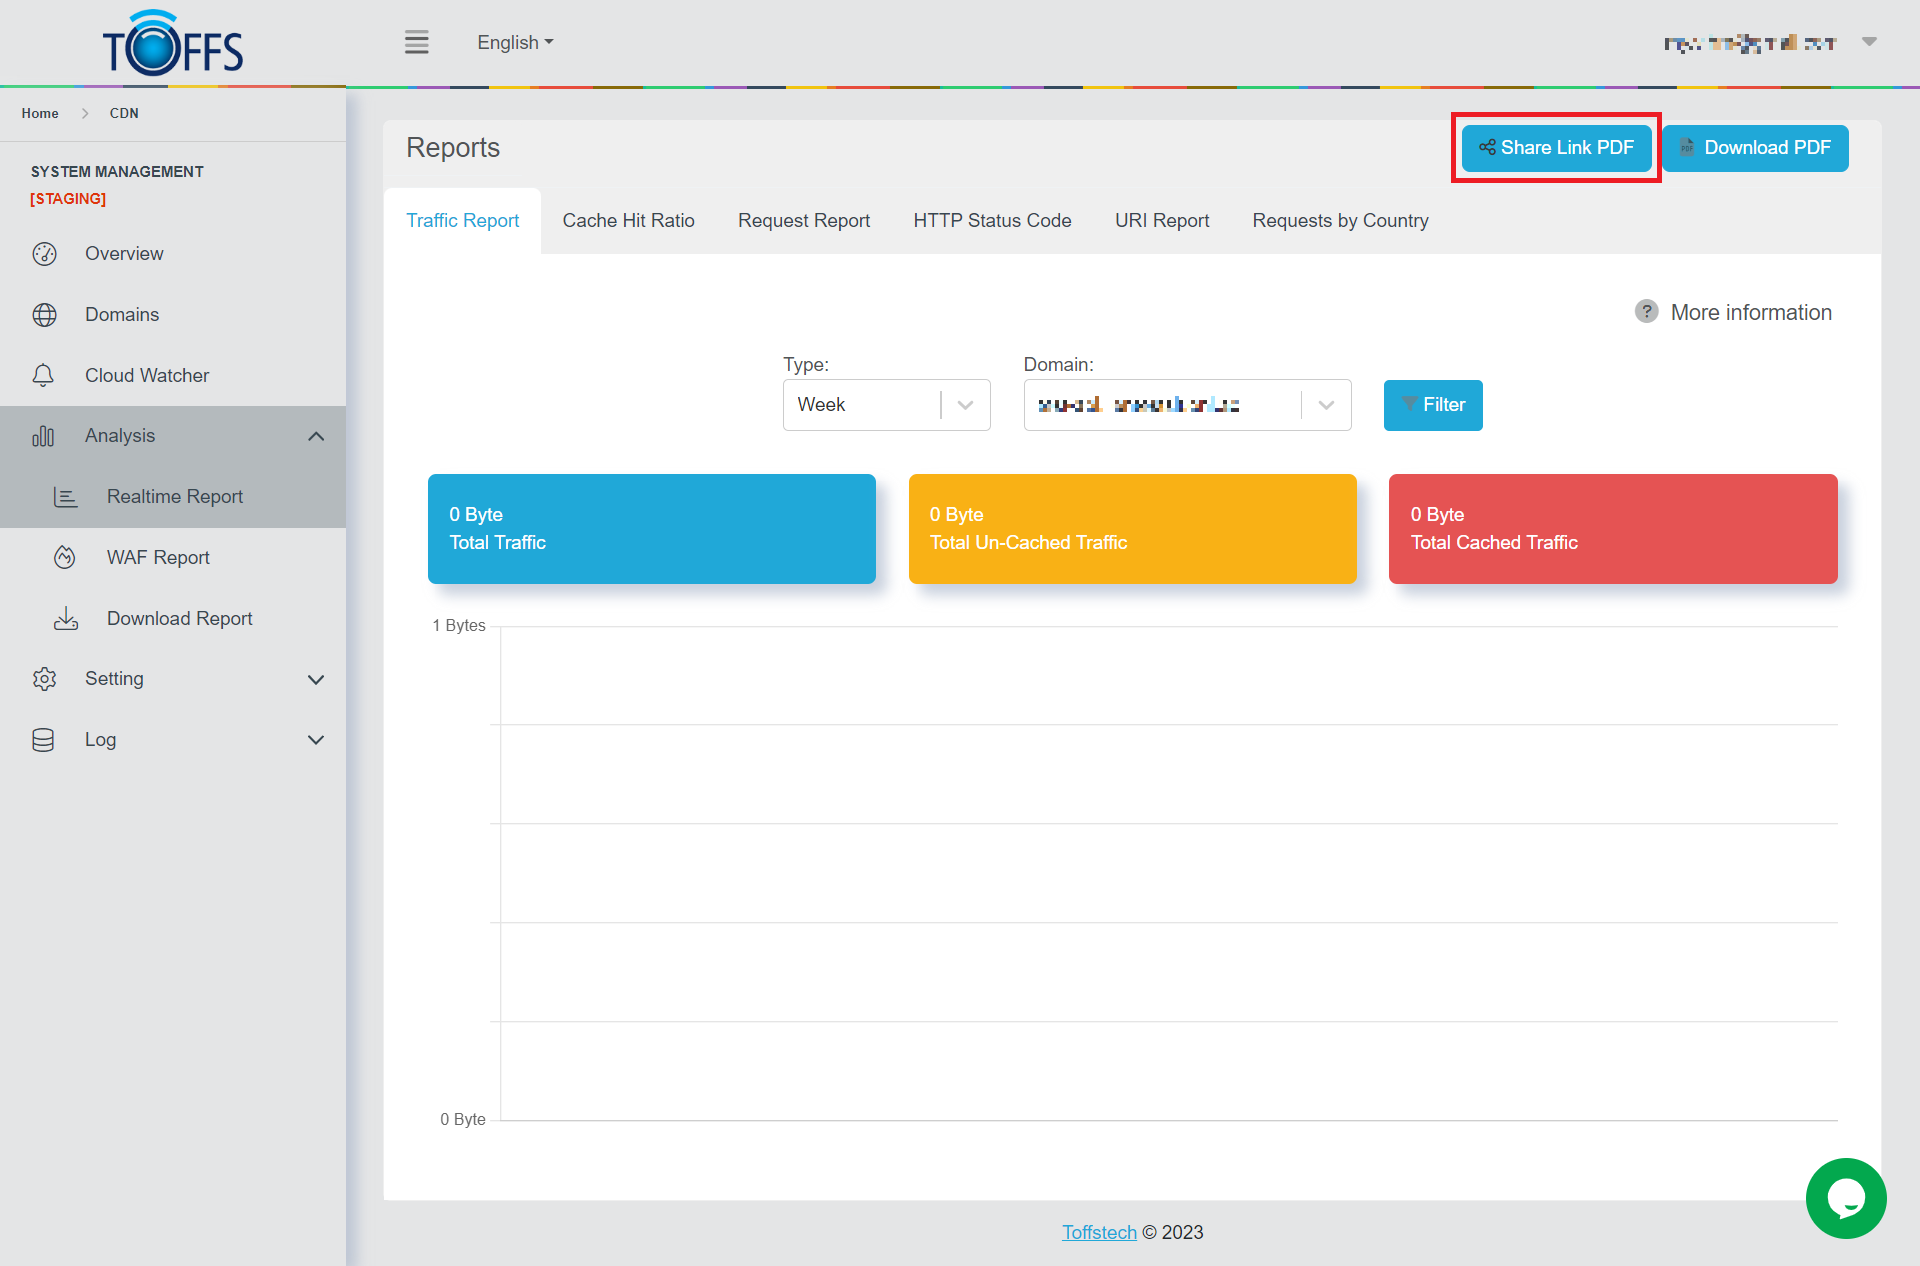
Figure 152
For public sharing, click the Copy symbol button to obtain the report’s sharing link. Please note that this link will remain valid for 7 days.
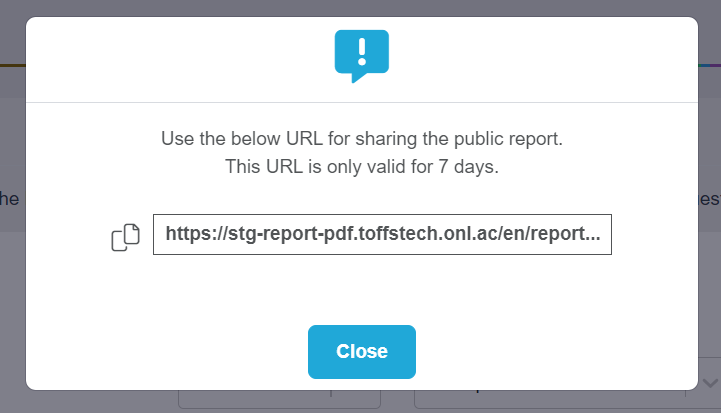
Figure 153
Within the share link, you can also find the option to download the report as a PDF. By clicking the “Download PDF” button, the system will automatically initiate the PDF file download.

Figure 154
WAF Report
HTTP Transactions
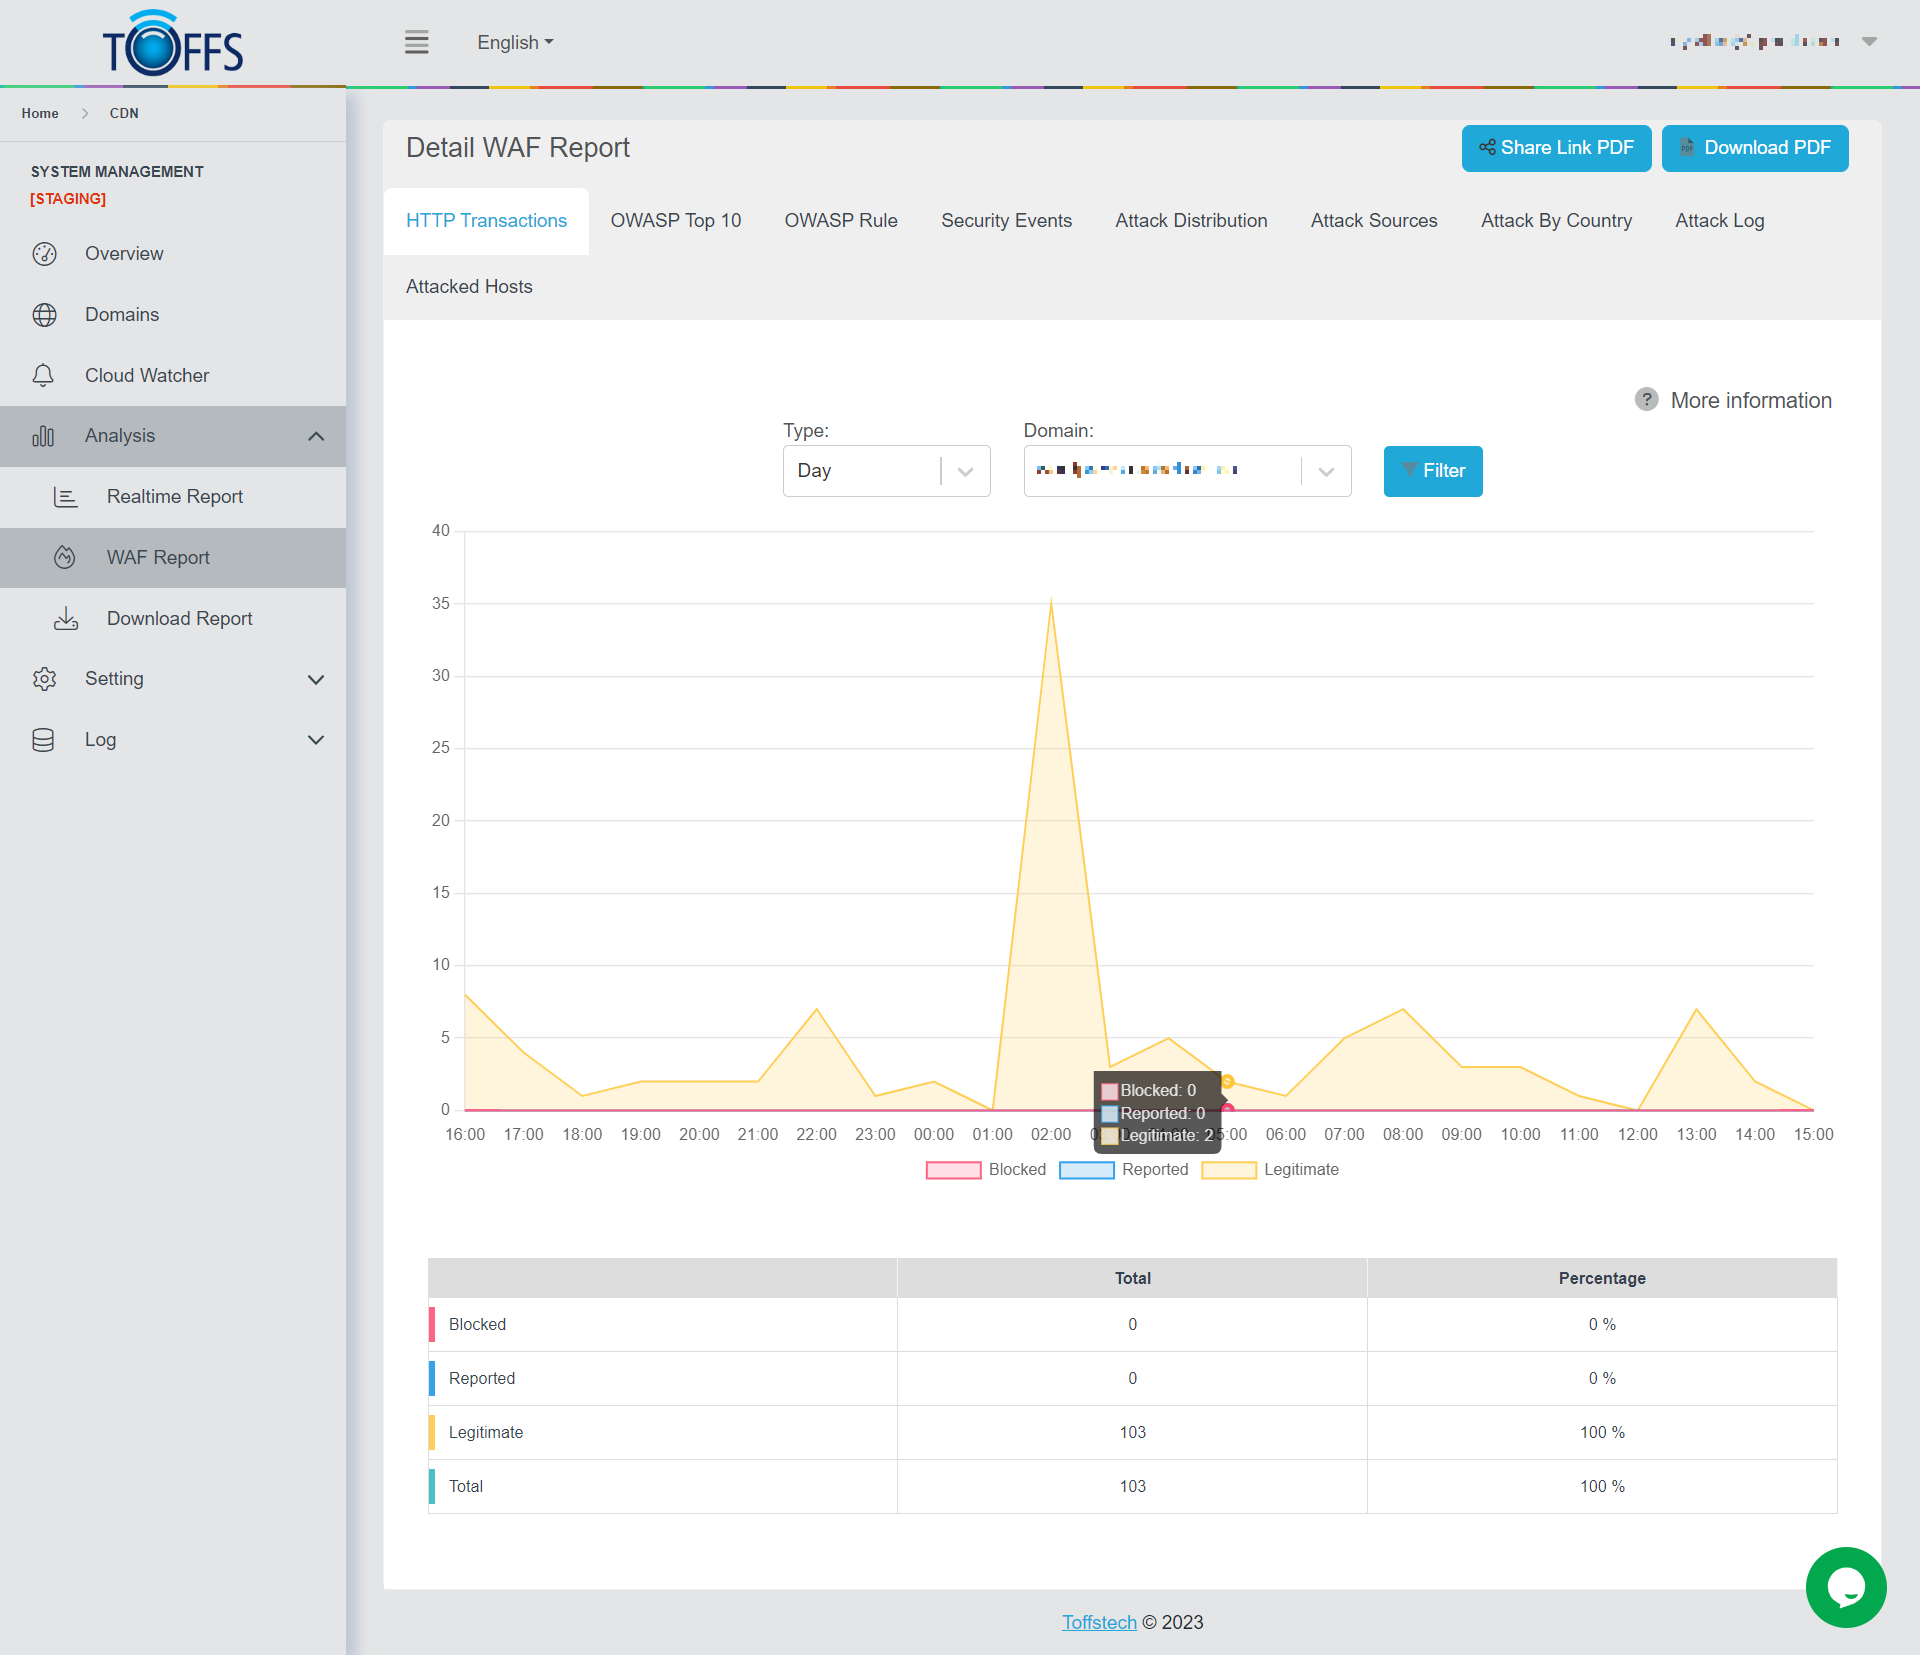
Figure 155
This is the “HTTP Transactions” page under the “WAF Report” page.
This page shows a graphical representation and a tabulated summary of HTTP Transactions categorized as Blocked, Reported, Legitimate, and Total, all sent to the chosen domain. You can view the data based on different time intervals such as Hourly, Daily, Weekly, Monthly, or a Custom range - these options are conveniently accessible in the drop-down menu.
The graph visually presents the count of each request type, while the table provides specific figures and percentages for each request category.
OWASP Top 10
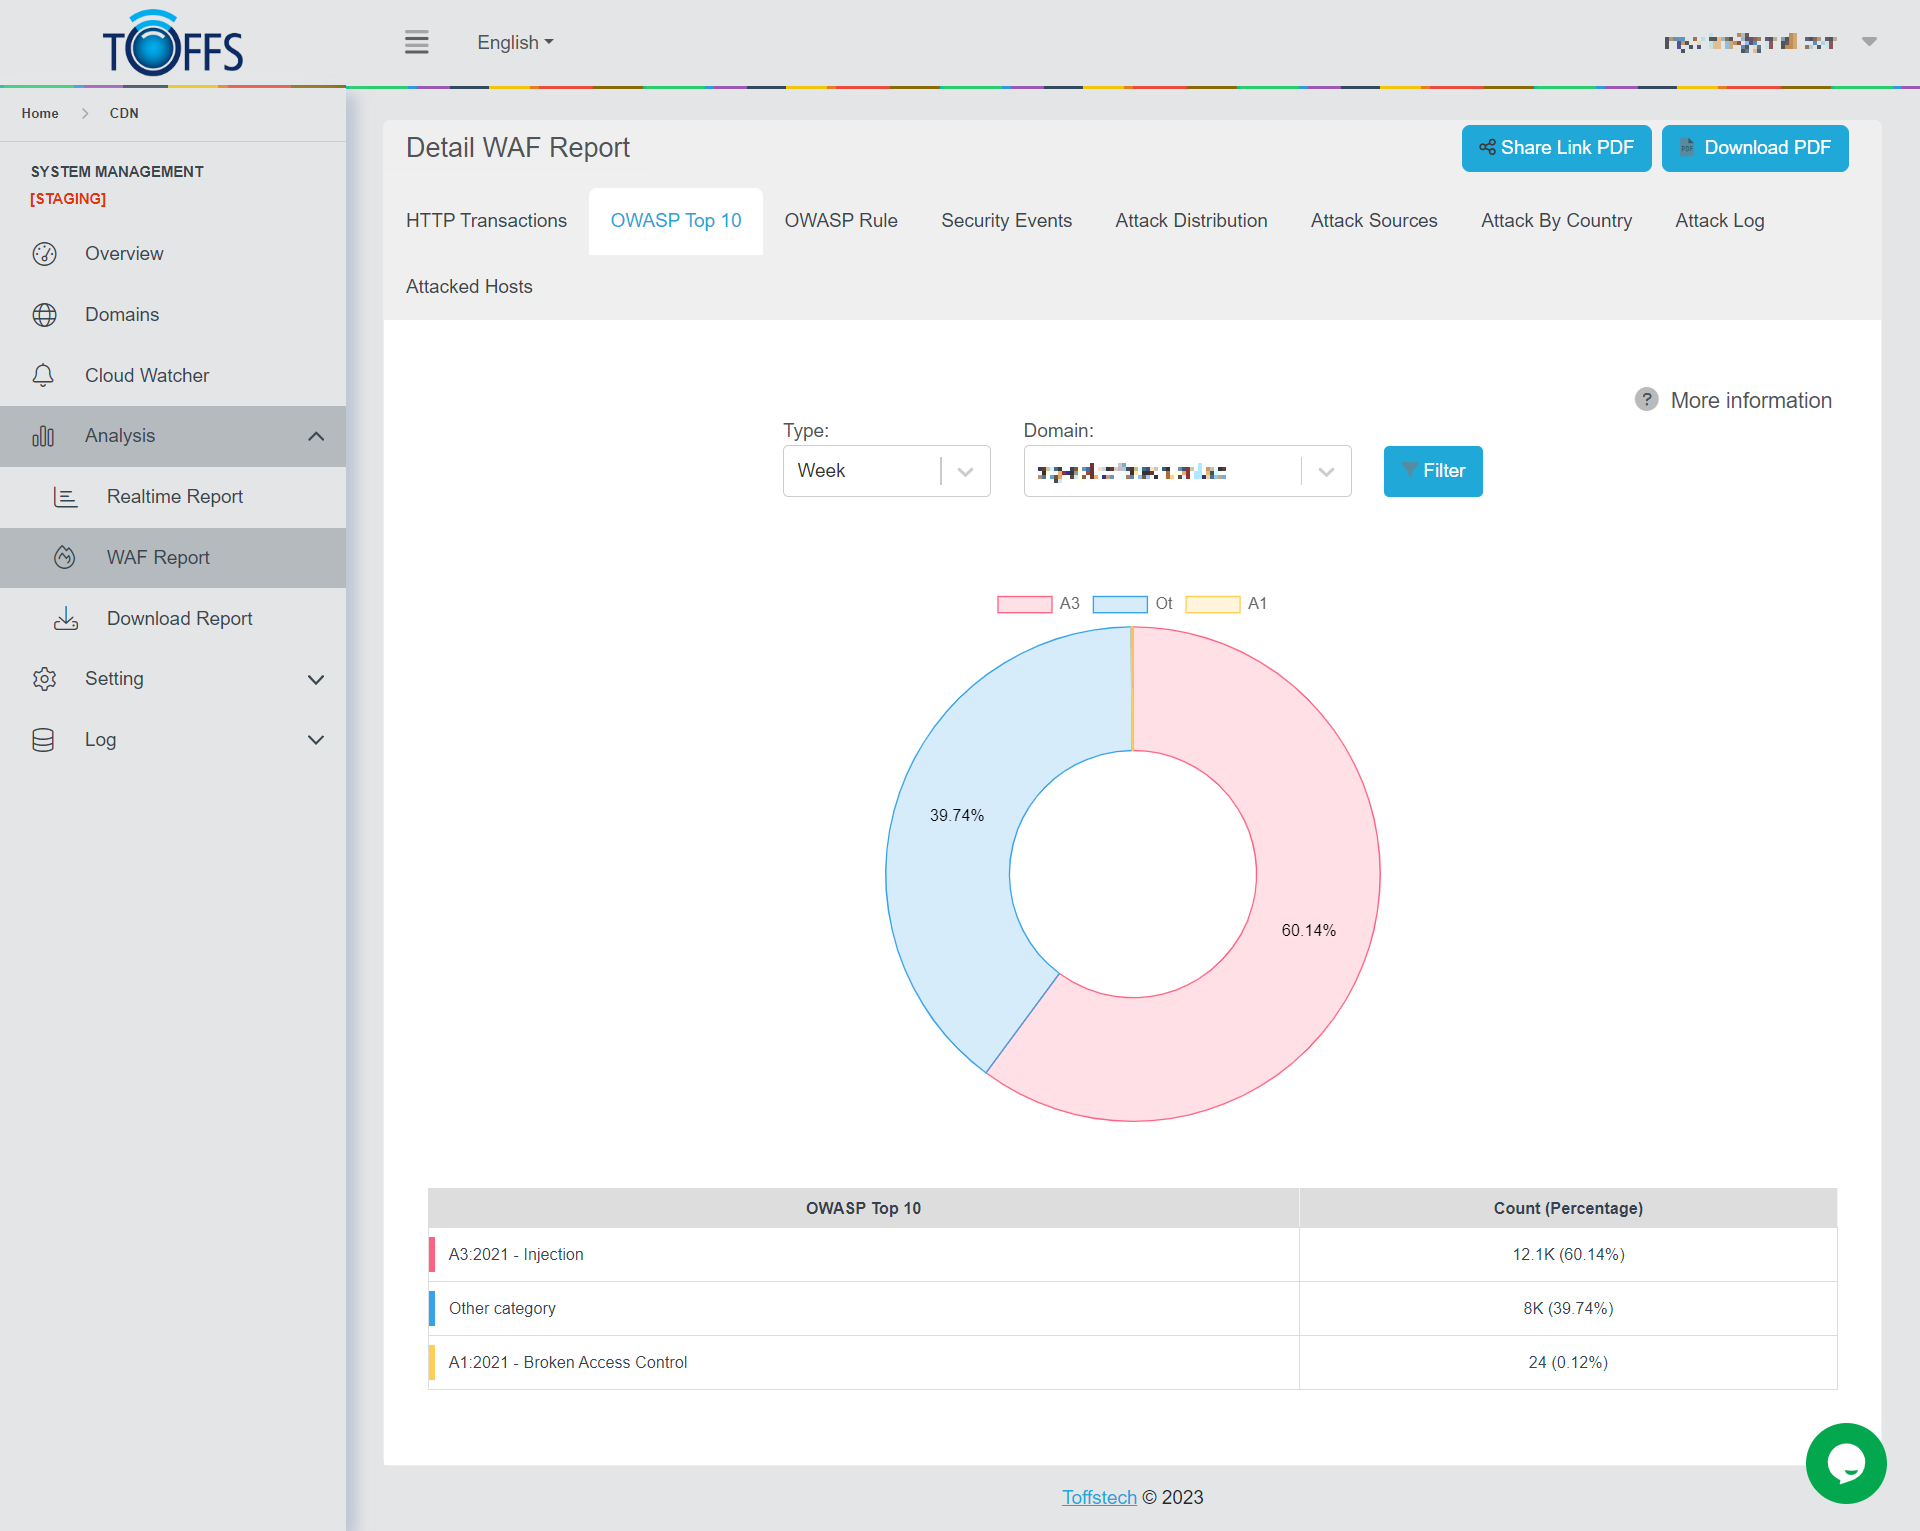
Figure 156
This is the “OWASP Top 10” page under the “WAF Report” page. This page displays a graph and table of attacks based on OWASP Top 10 by year (2013 - 2017 - 2021), sent to the selected domain by Hour/Day/Week/Month/Custom - options are available in the drop-down column. The graph shows the percentage of attack types. The table details the number and the percentage of attack types.
This version is using OWASP 2013, the next version is considering using OWASP 2021.
[From version 5.3] OWASP Top 10 has been using OWASP 2021.
OWASP Rule
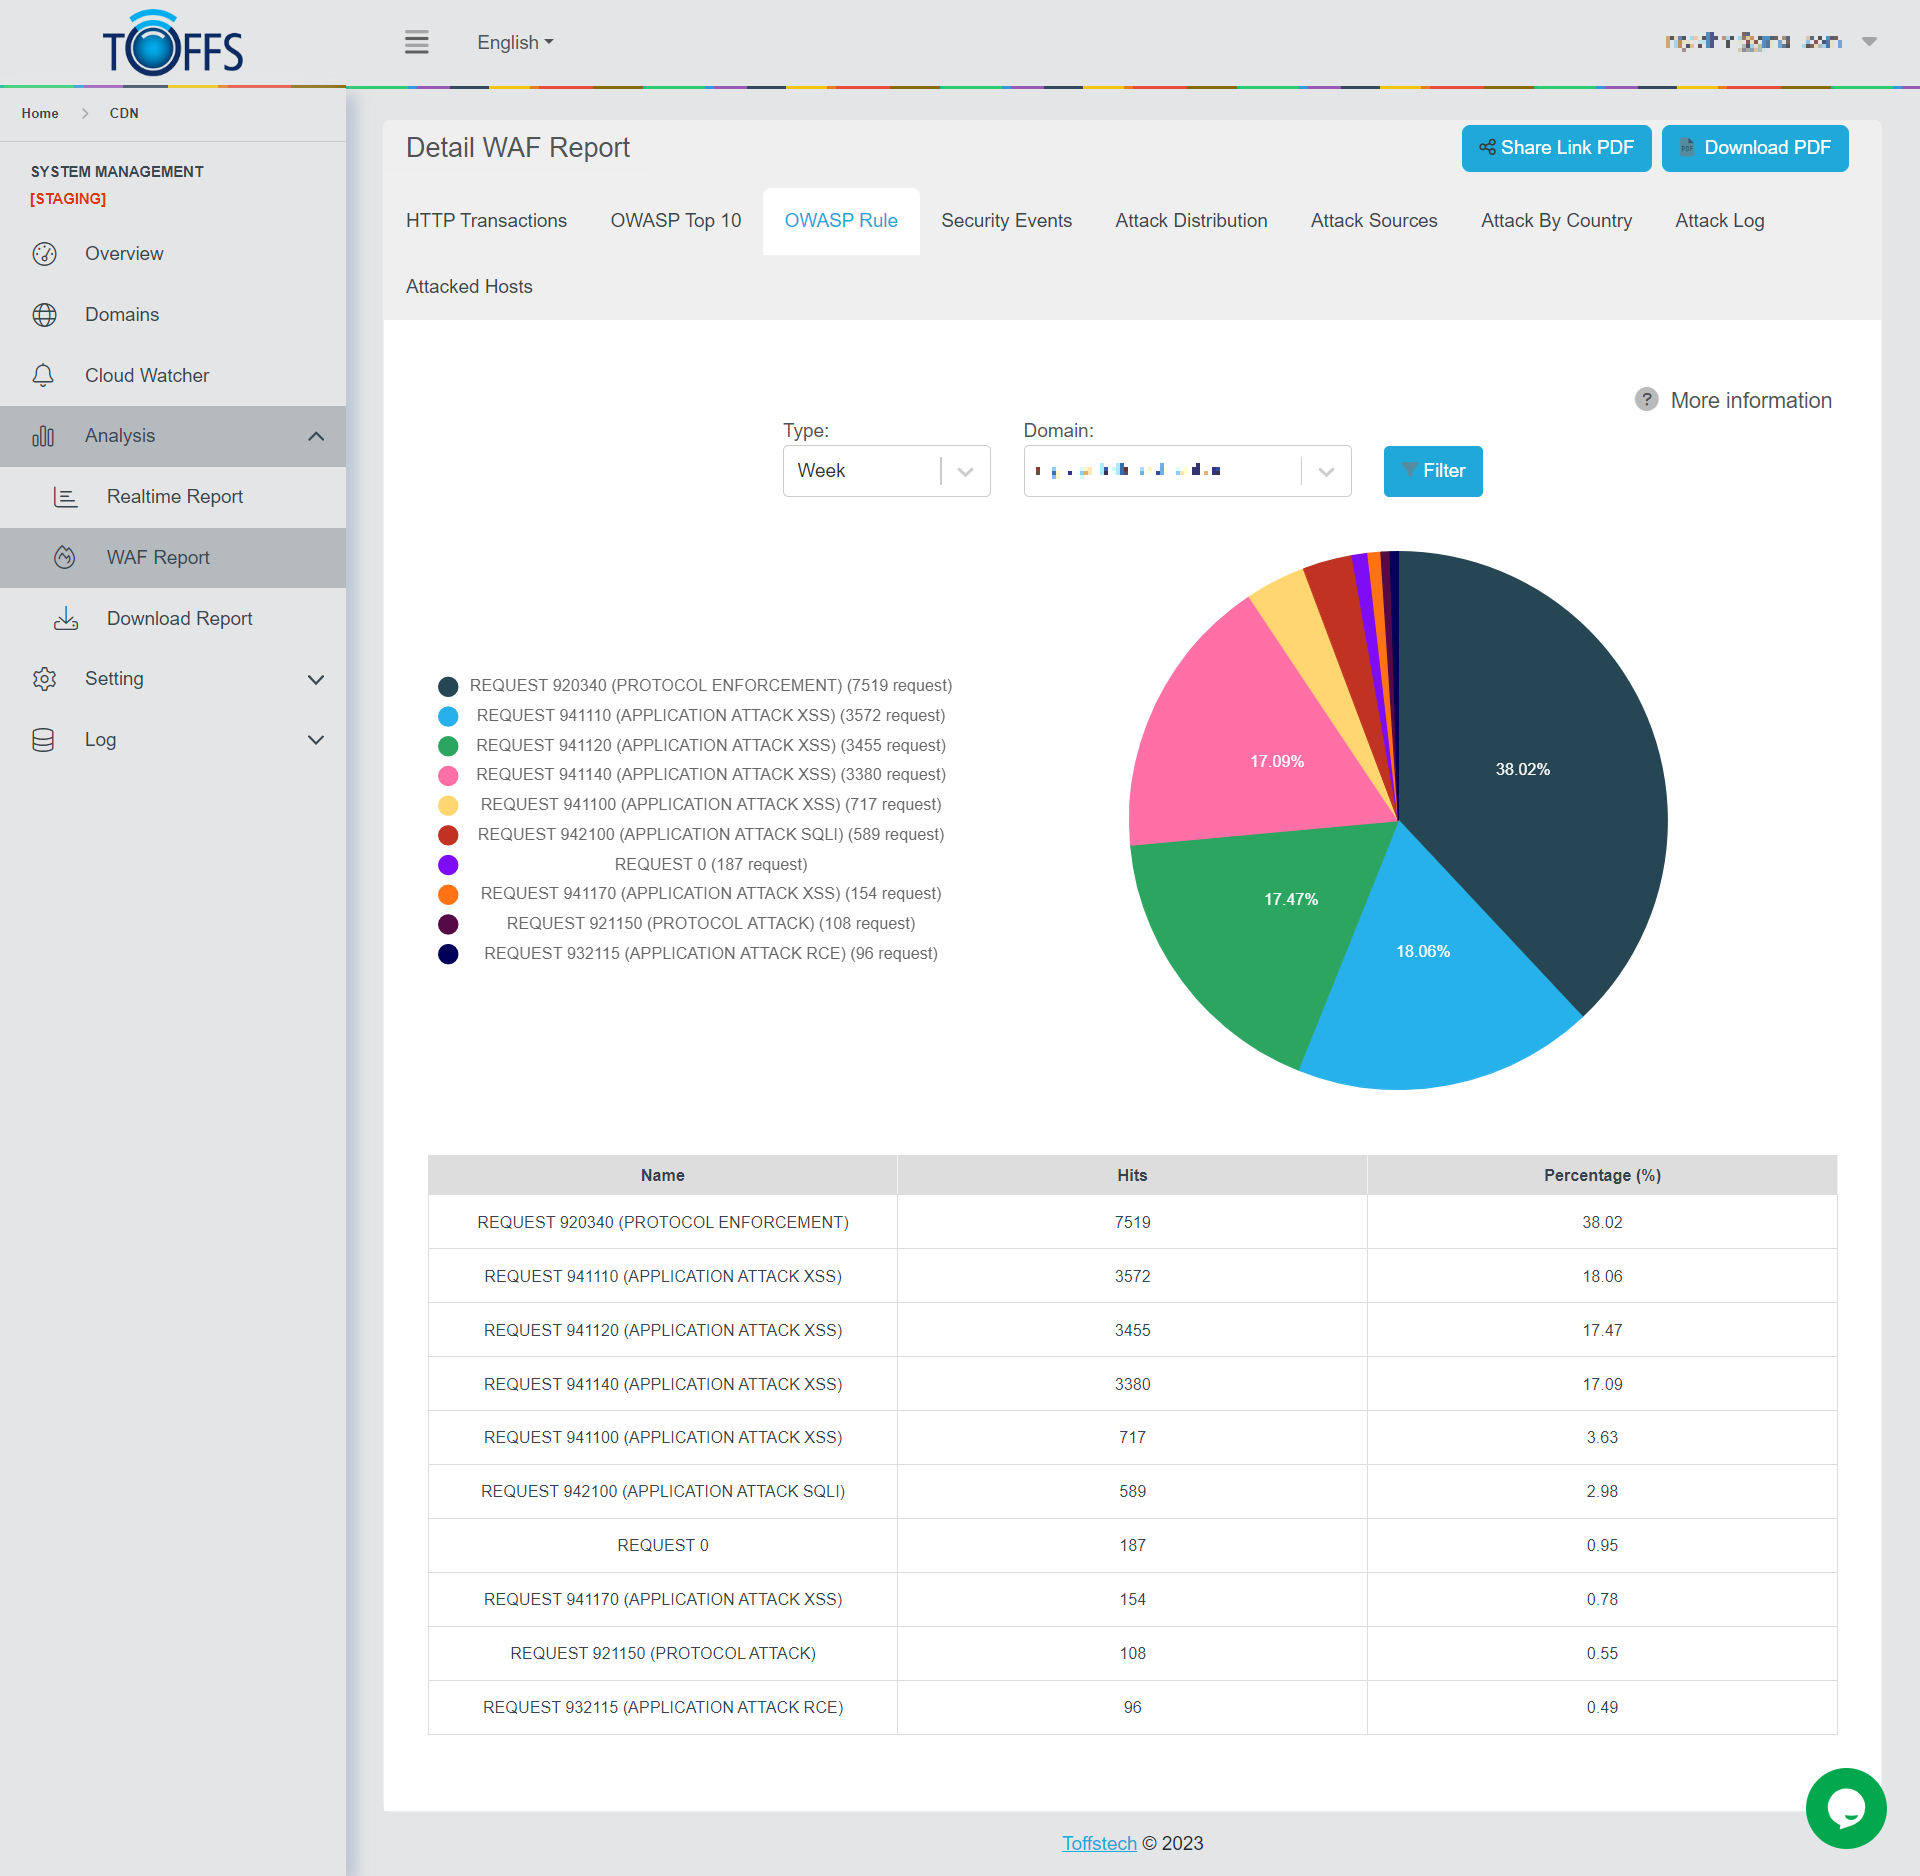
Figure 157
This is the “OWASP Rule” page under the “WAF Report” page.
This page displays a graph showing the percentage of attack types according to the OWASP Rule, sent to a selected domain by Hour/Day/Week/Month/Custom.
At the OWASP Rule list, users can click to a name in the list to hide or click again to show any of the types of OWASP Rules.
Security Events
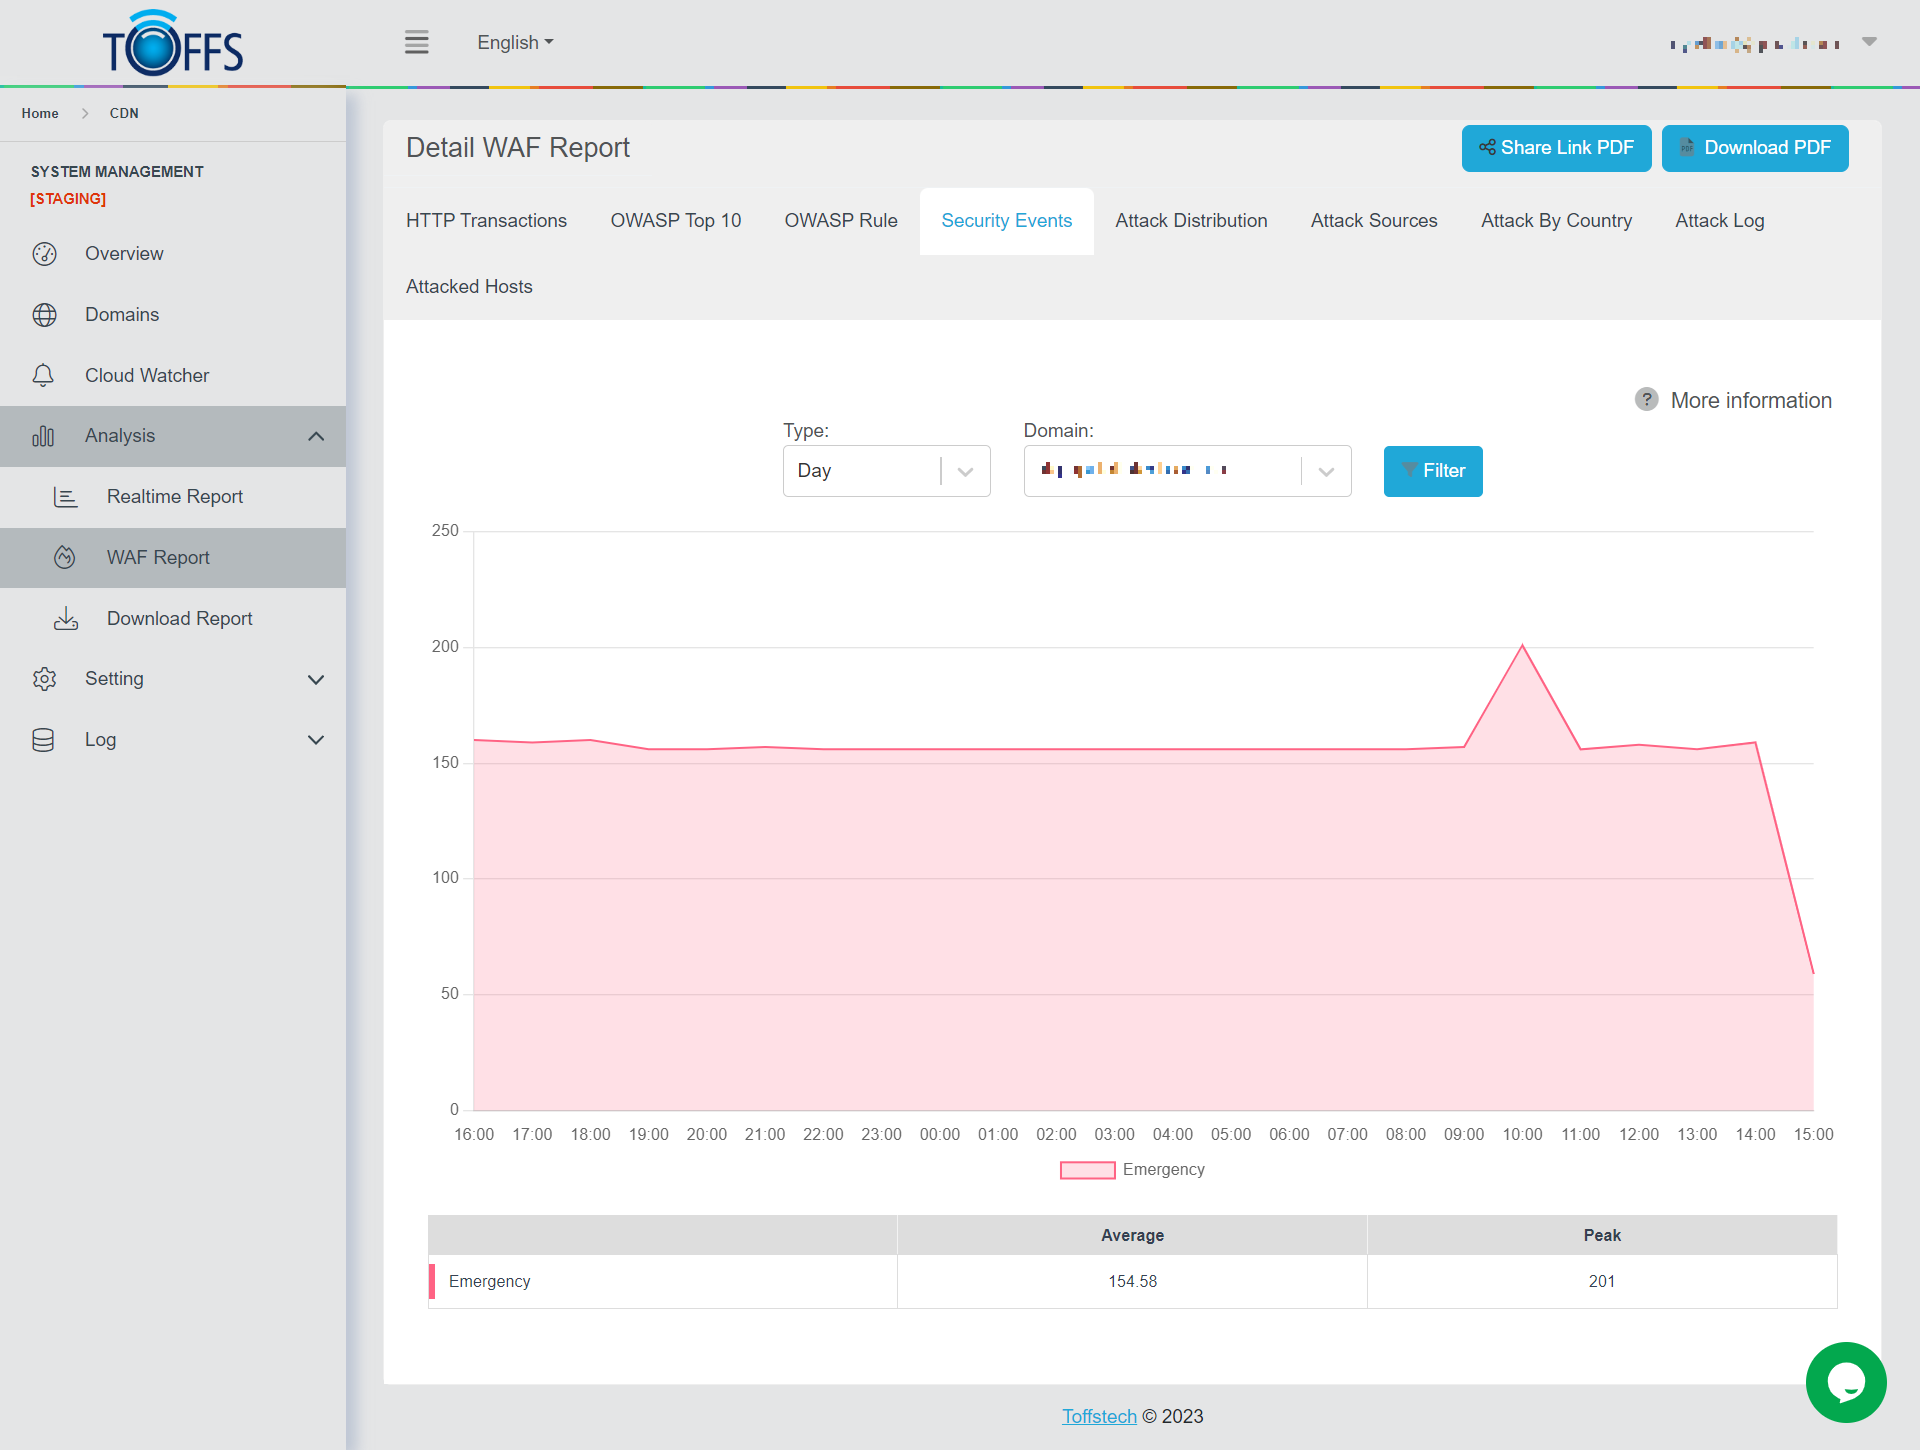
Figure 158
This is the “Security Events” page under the “WAF Report” page.
This page displays a graph and table of attacks based on Security Events sent to the selected domain by Hour/Day/Week/Month/Custom - options are available in the drop-down column. The graph shows the number of attacks by security level. The table shows the average and peak number of attacks for each security level. There are 7 levels of security:
0 - EMERGENCY: is generated from correlation of anomaly scoring data where there is an inbound attack and an outbound leakage.
1 - ALERT: is generated from correlation where there is an inbound attack and an outbound application level error.
2 - CRITICAL: Anomaly Score of 5. Is the highest severity level possible without correlation. It is normally generated by the web attack rules (40 level files).
3 - ERROR: Anomaly Score of 4. Is generated mostly from outbound leakage rules (50 level files).
4 - WARNING: Anomaly Score of 3. Is generated by malicious client rules (35 level files).
5 - NOTICE: cAnomaly Score of 2. Is generated by the Protocol policy and anomaly files.
6 - INFO
7 - DEBUG
Severity values in ModSecurity follow the numeric scale of syslog (where 0 is the most severe). The data above is used according to the OWASP ModSecurity Core Rule Set (CRS).
Attack Distribution

Figure 159
This is the “Attack Distribution” page under the “WAF Report” page.
This page presents a graph and table of attacks based on Distribution origin sent to the selected domain by Hour/Day/Week/Month/Custom - options are available in the drop-down column. The graph shows the percentage of attacks Blocked and Reported. The table details the number of attacks Blocked and Reported by Violation Type.
Attack Sources
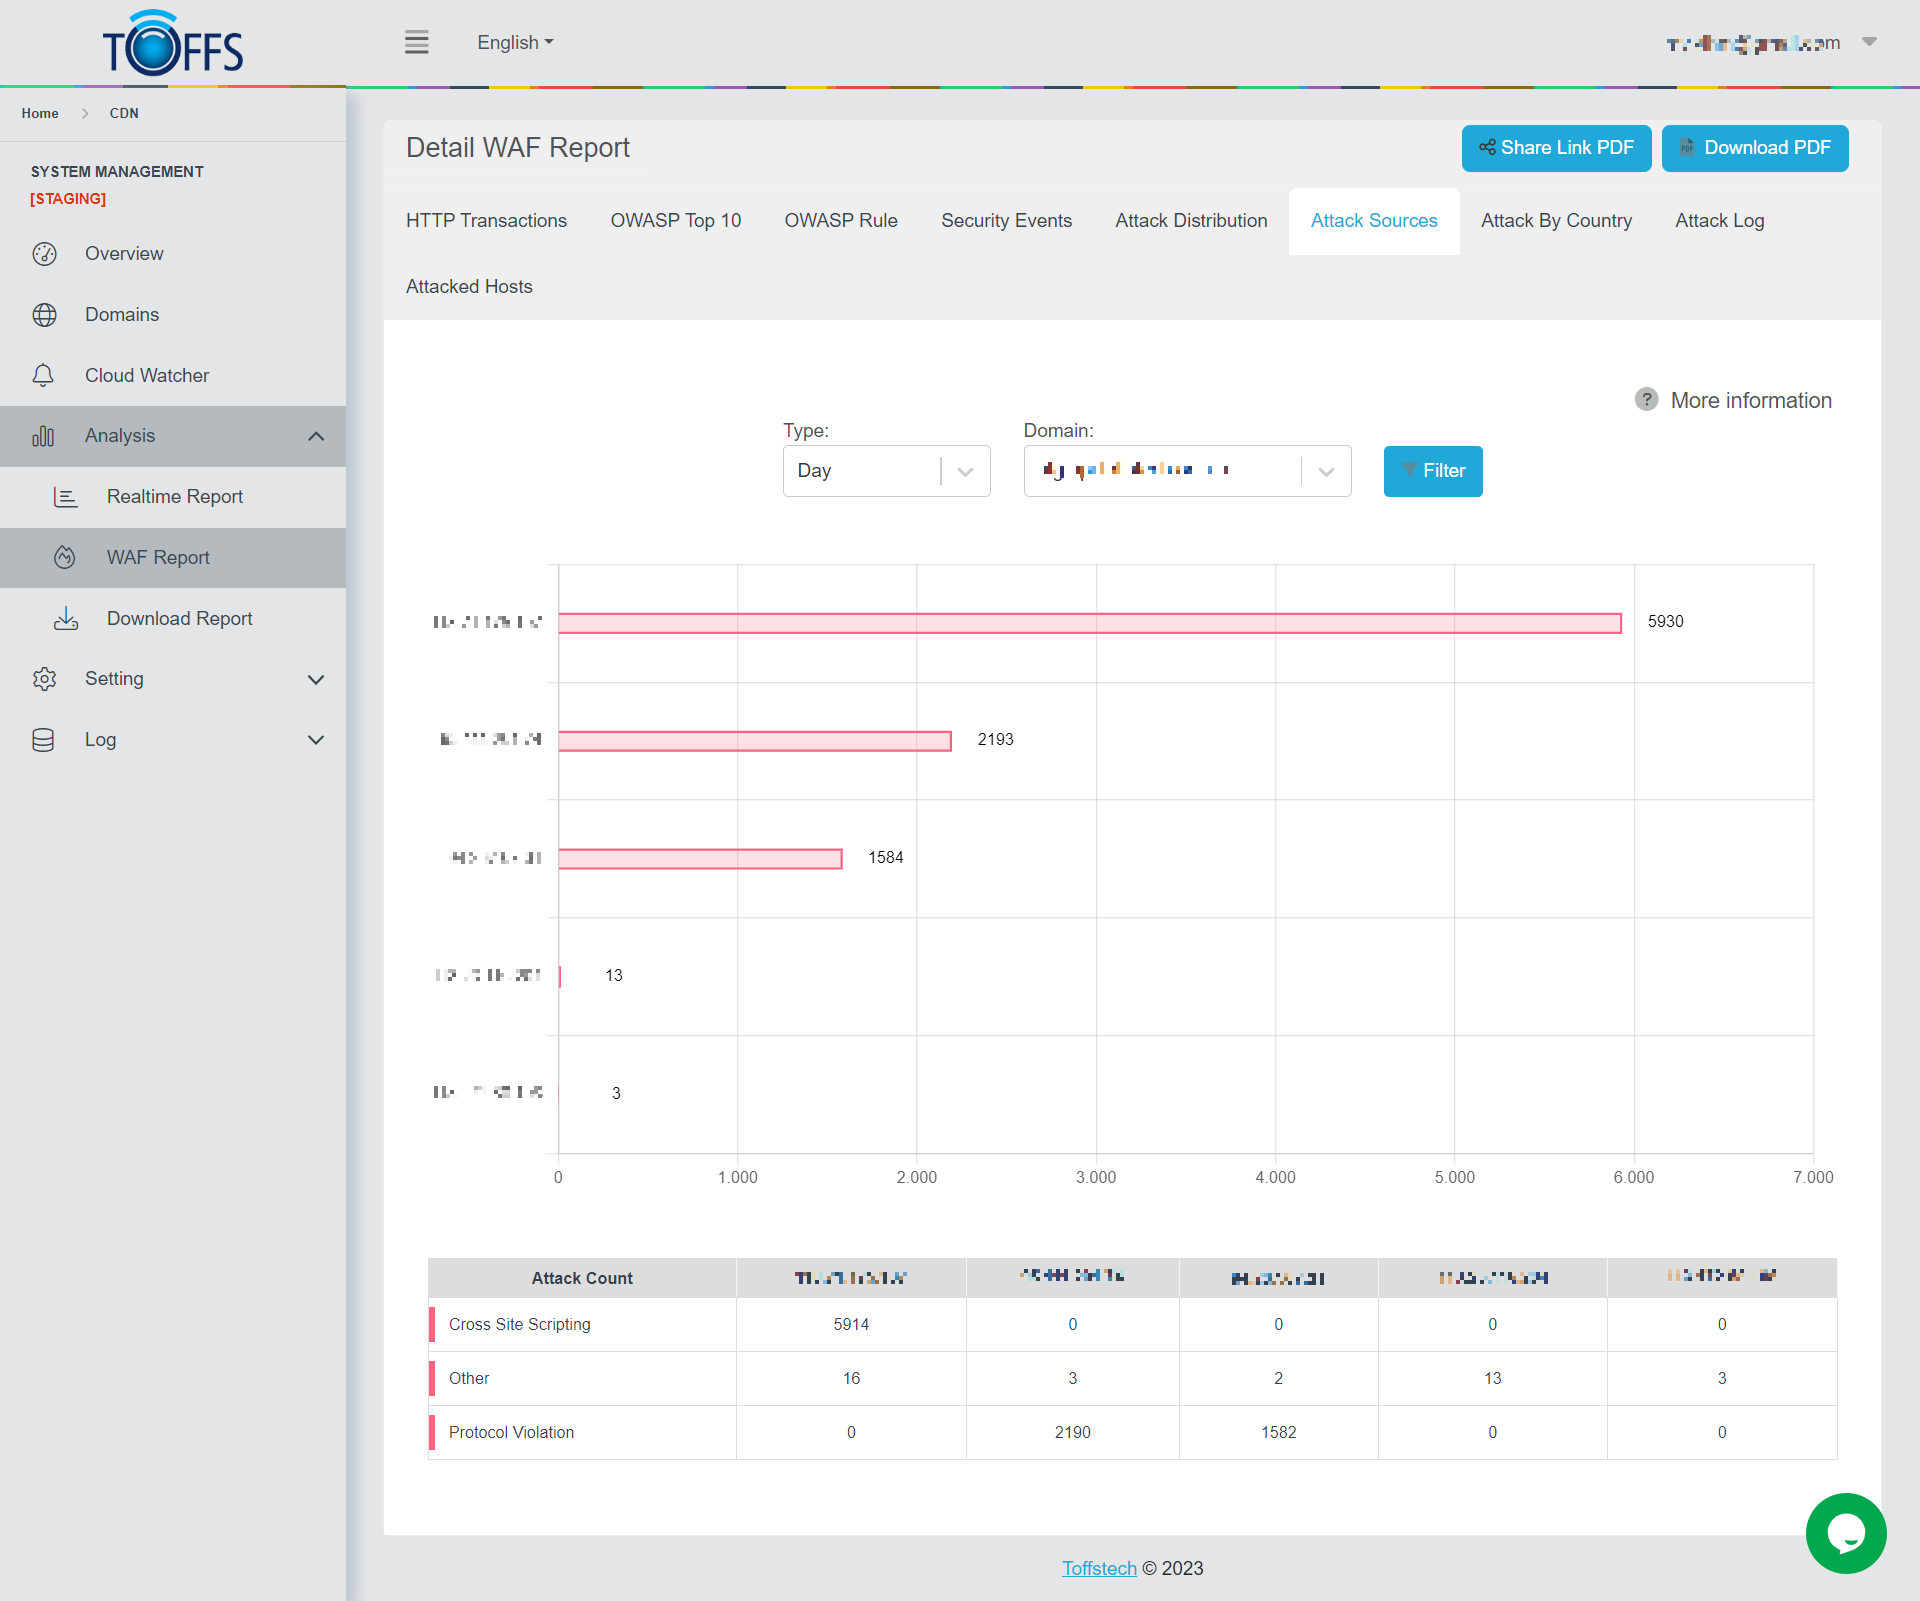
Figure 160
This is the “Attack Sources” page under the “WAF Report” page.
This page displays a graph and a table of attacks based on Sources origin sent to the selected domain by Hour/Day/Week/Month/Custom - options are available in the drop-down column. The graph shows the number of attacks coming from each IP. The table details the number of each attack type coming from that IP.
Attack By Country
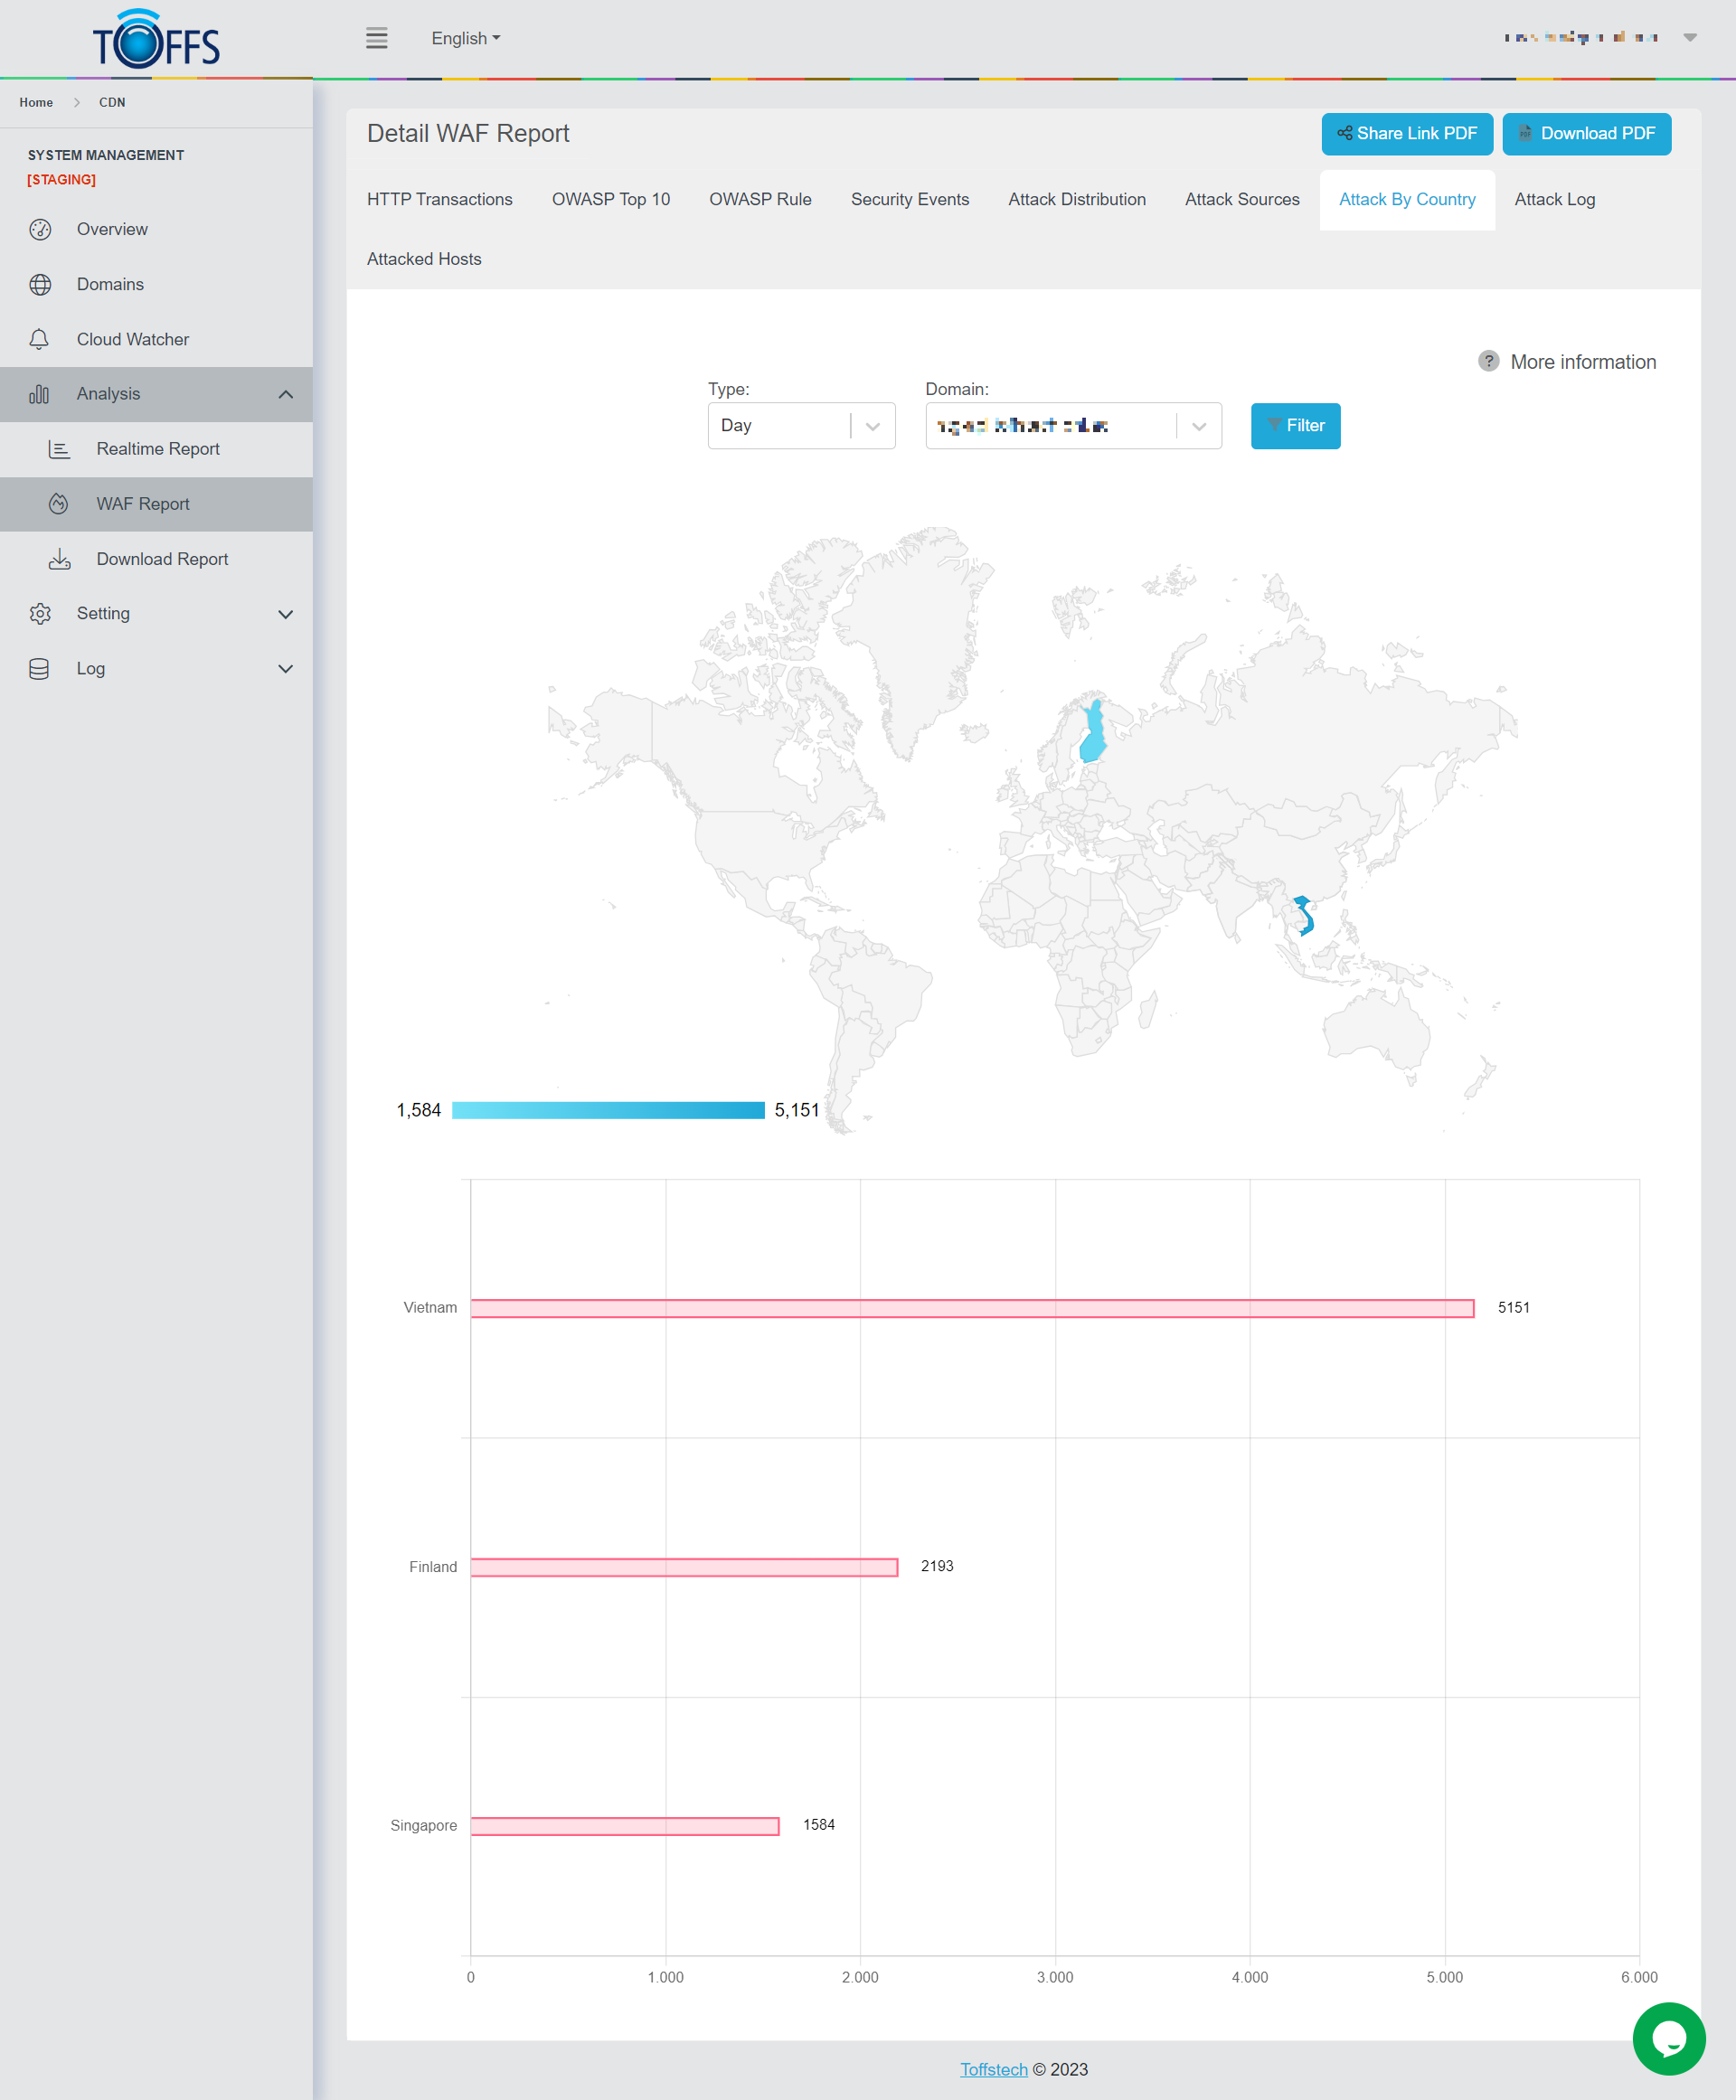
Figure 161
This is the “Attack By Country” page under the “WAF Report” page.
This page shows a detailed breakdown of the number of attacks based on Country origin sent to the selected domain by Hour/Day/Week/Month/Custom - options are available in the drop-down column.
Attack Log
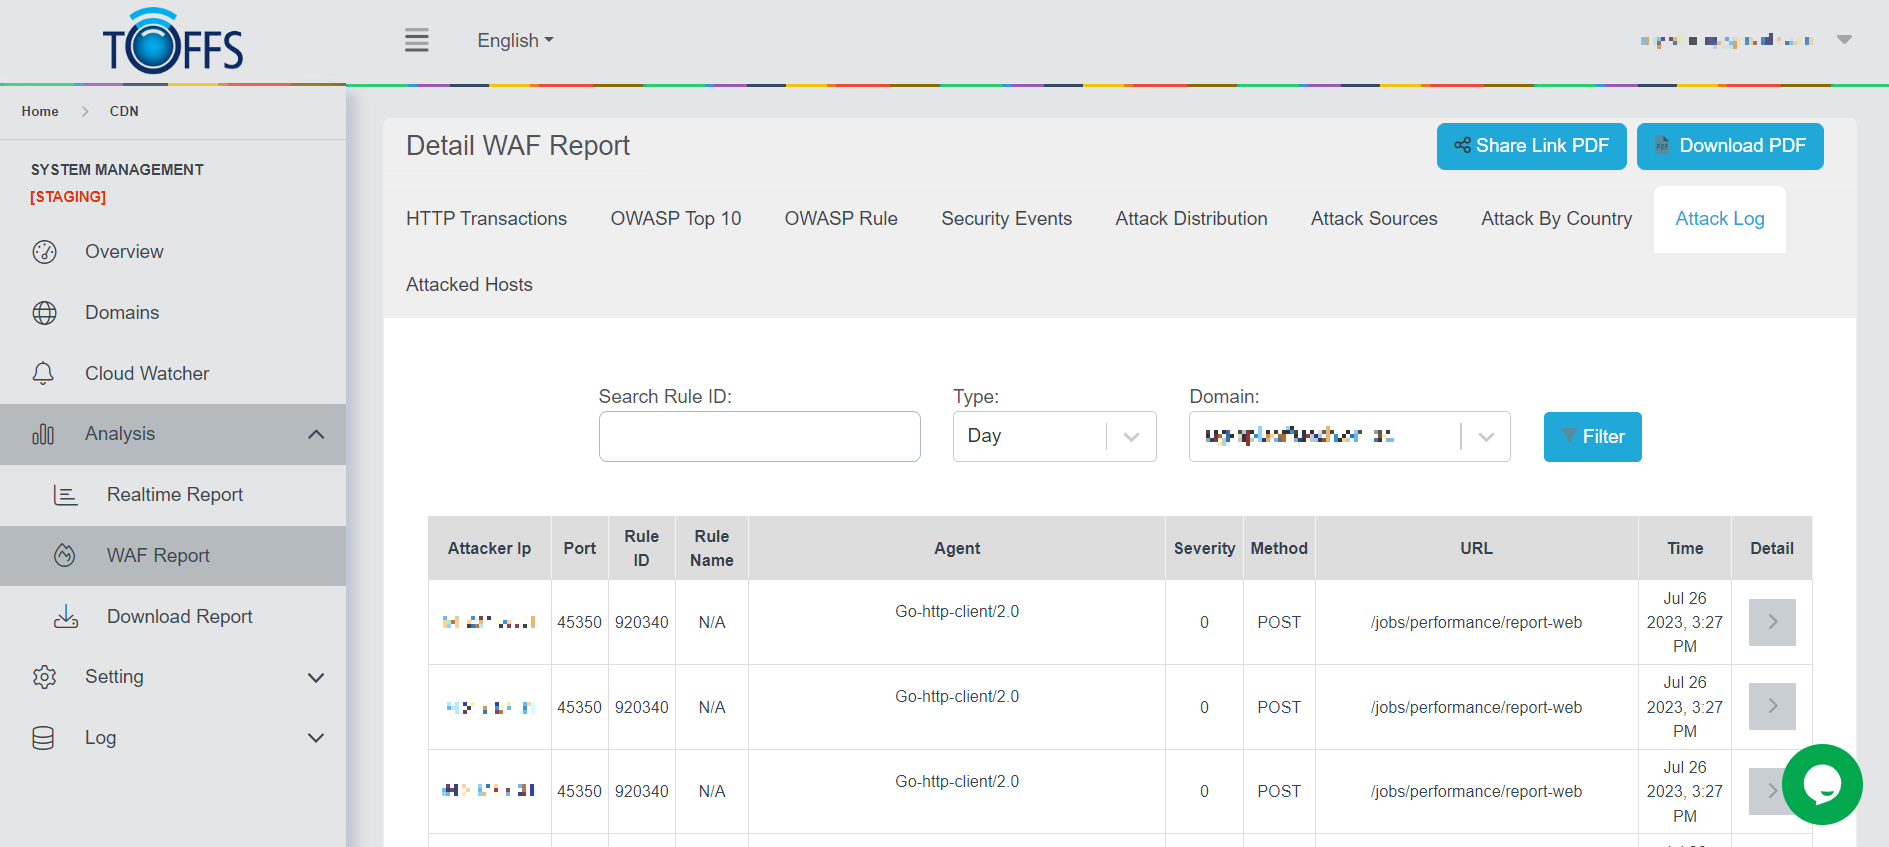
Figure 162
This is the “Attack Log” page under the “WAF Report” page.
This page shows a detailed breakdown of each attack to the selected domain by Hour/Day/Week/Month/Custom - options are available in the drop-down column. The information includes: Attacker IP, Port, Rule ID, Rule Name, Agent, Severity, Method, URL, Time and Detail.
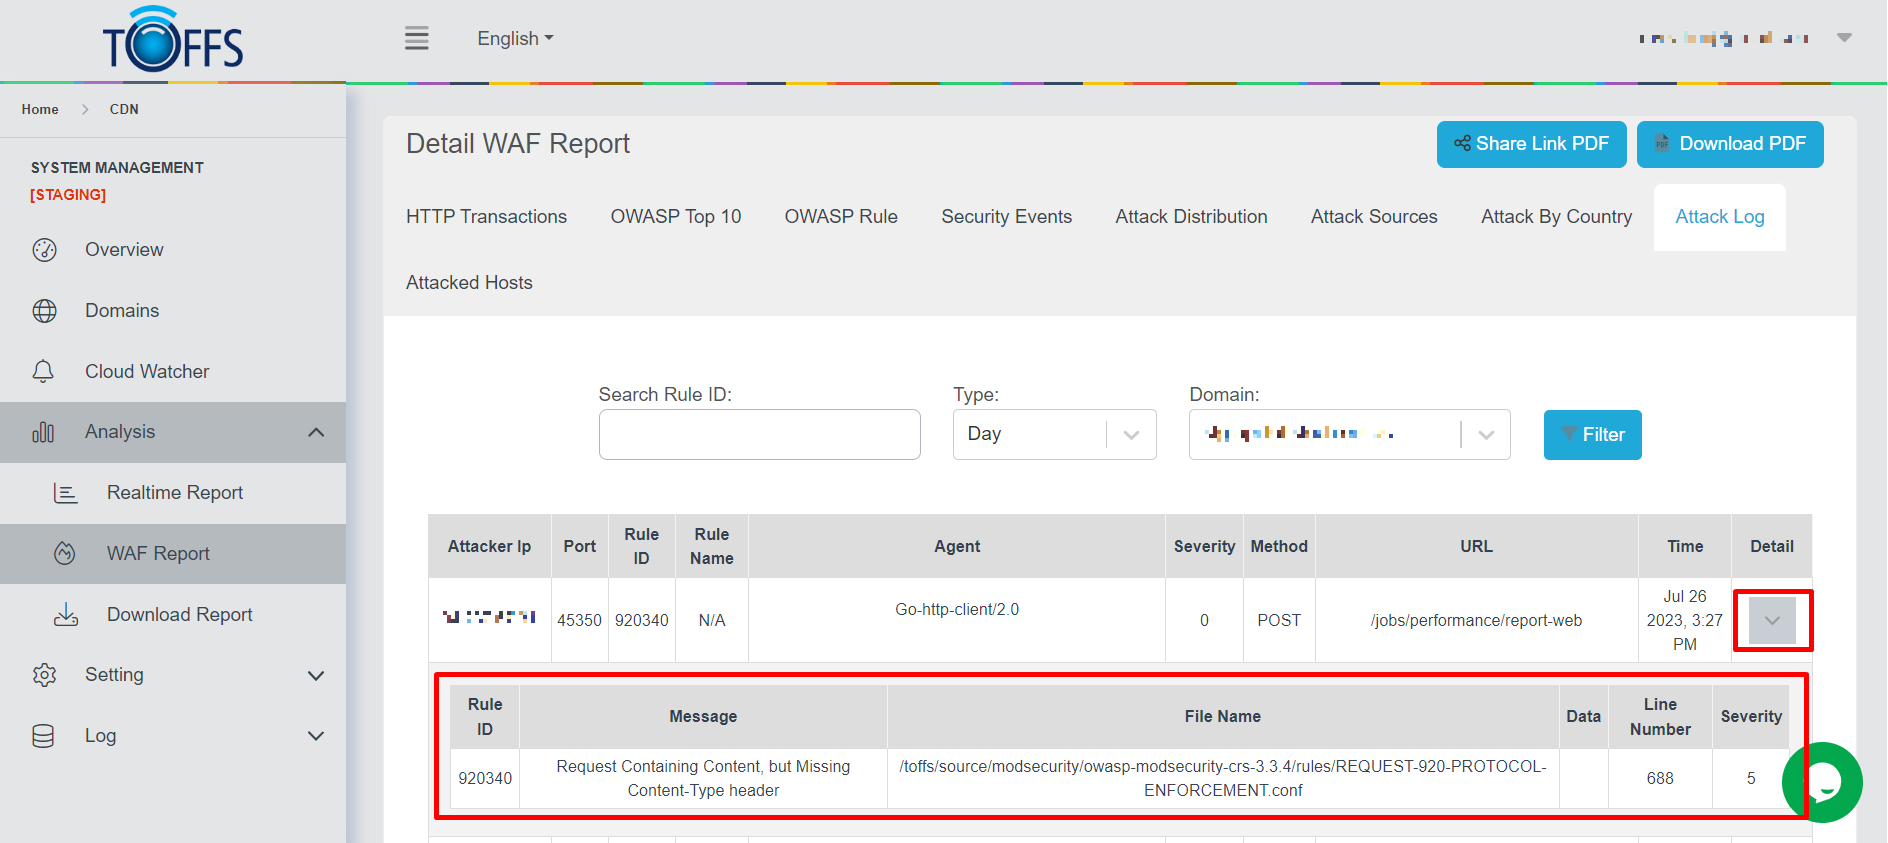
Figure 163
To view details, continue to click on the “Detail” icon to display more about Message, File Name, Data, Line Number, and Severity.
Attacked Hosts
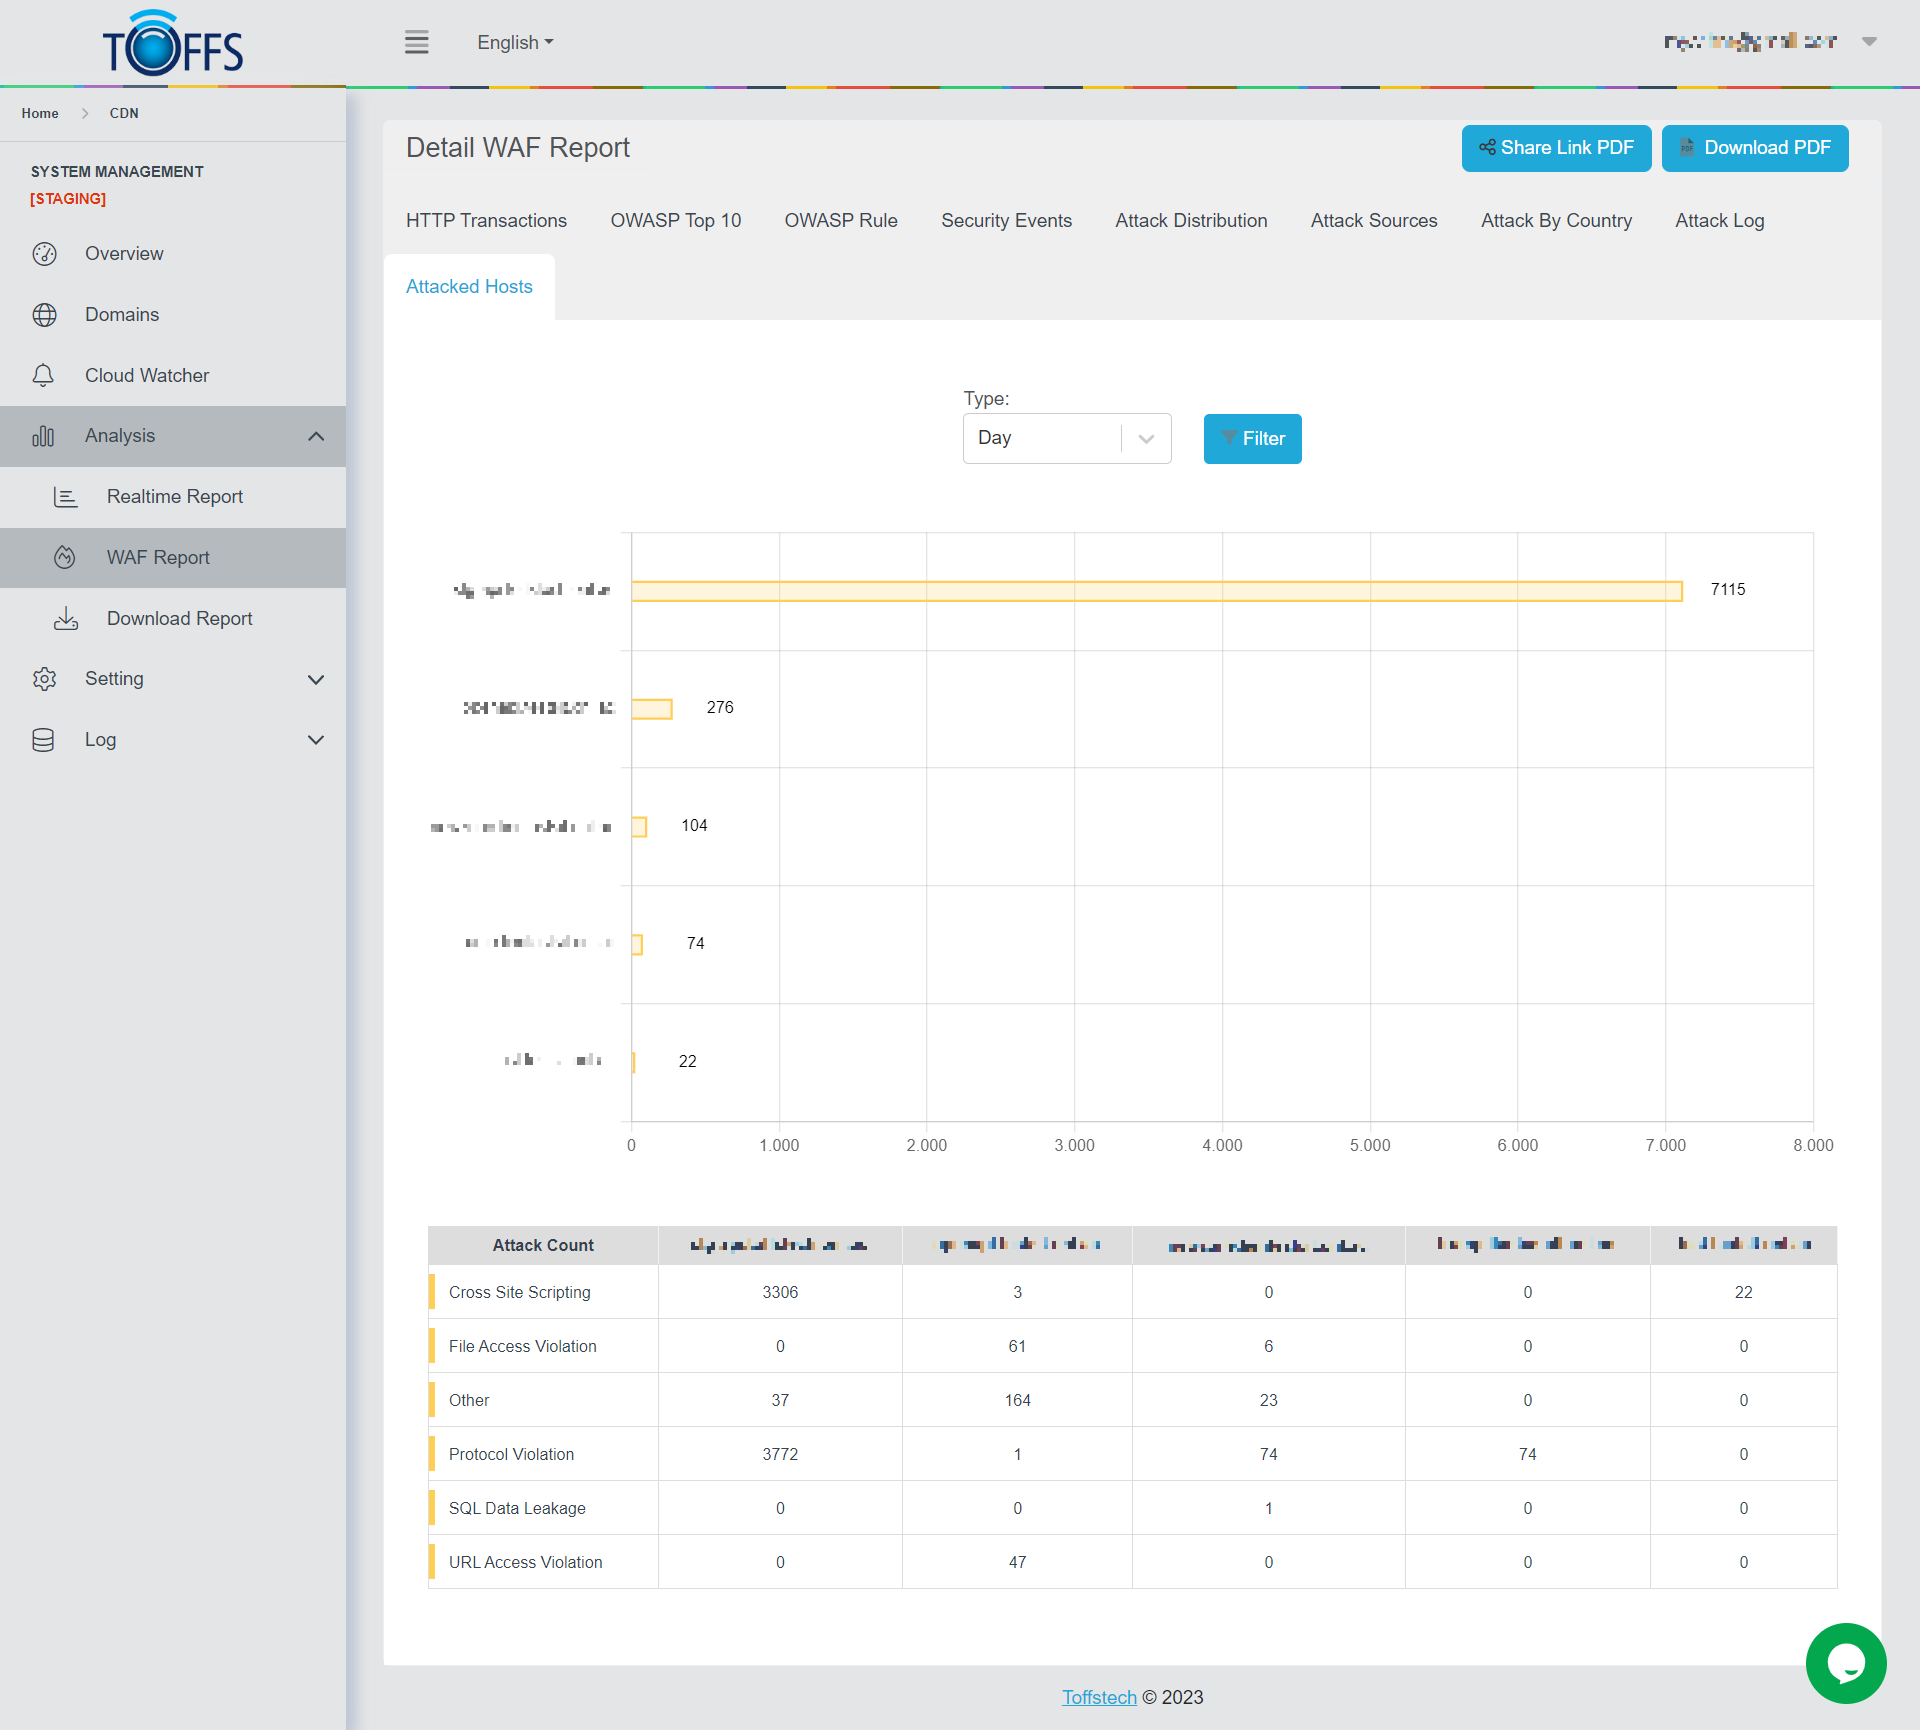
Figure 164
This is the “Attacked Hosts” page under the “WAF Report” page. This page shows a detailed breakdown of the number and the types of attacks to user’s domains that were detected and reported, the options are available in the drop-down column - Hour/Day/Week/Month/Custom.
Download and Share WAF Report
This function allows the user to download or share Realtime Report including Traffic Report, Cache Hit Ratio, Request Report, HTTP Status Code, URI Report and Requests by Country.
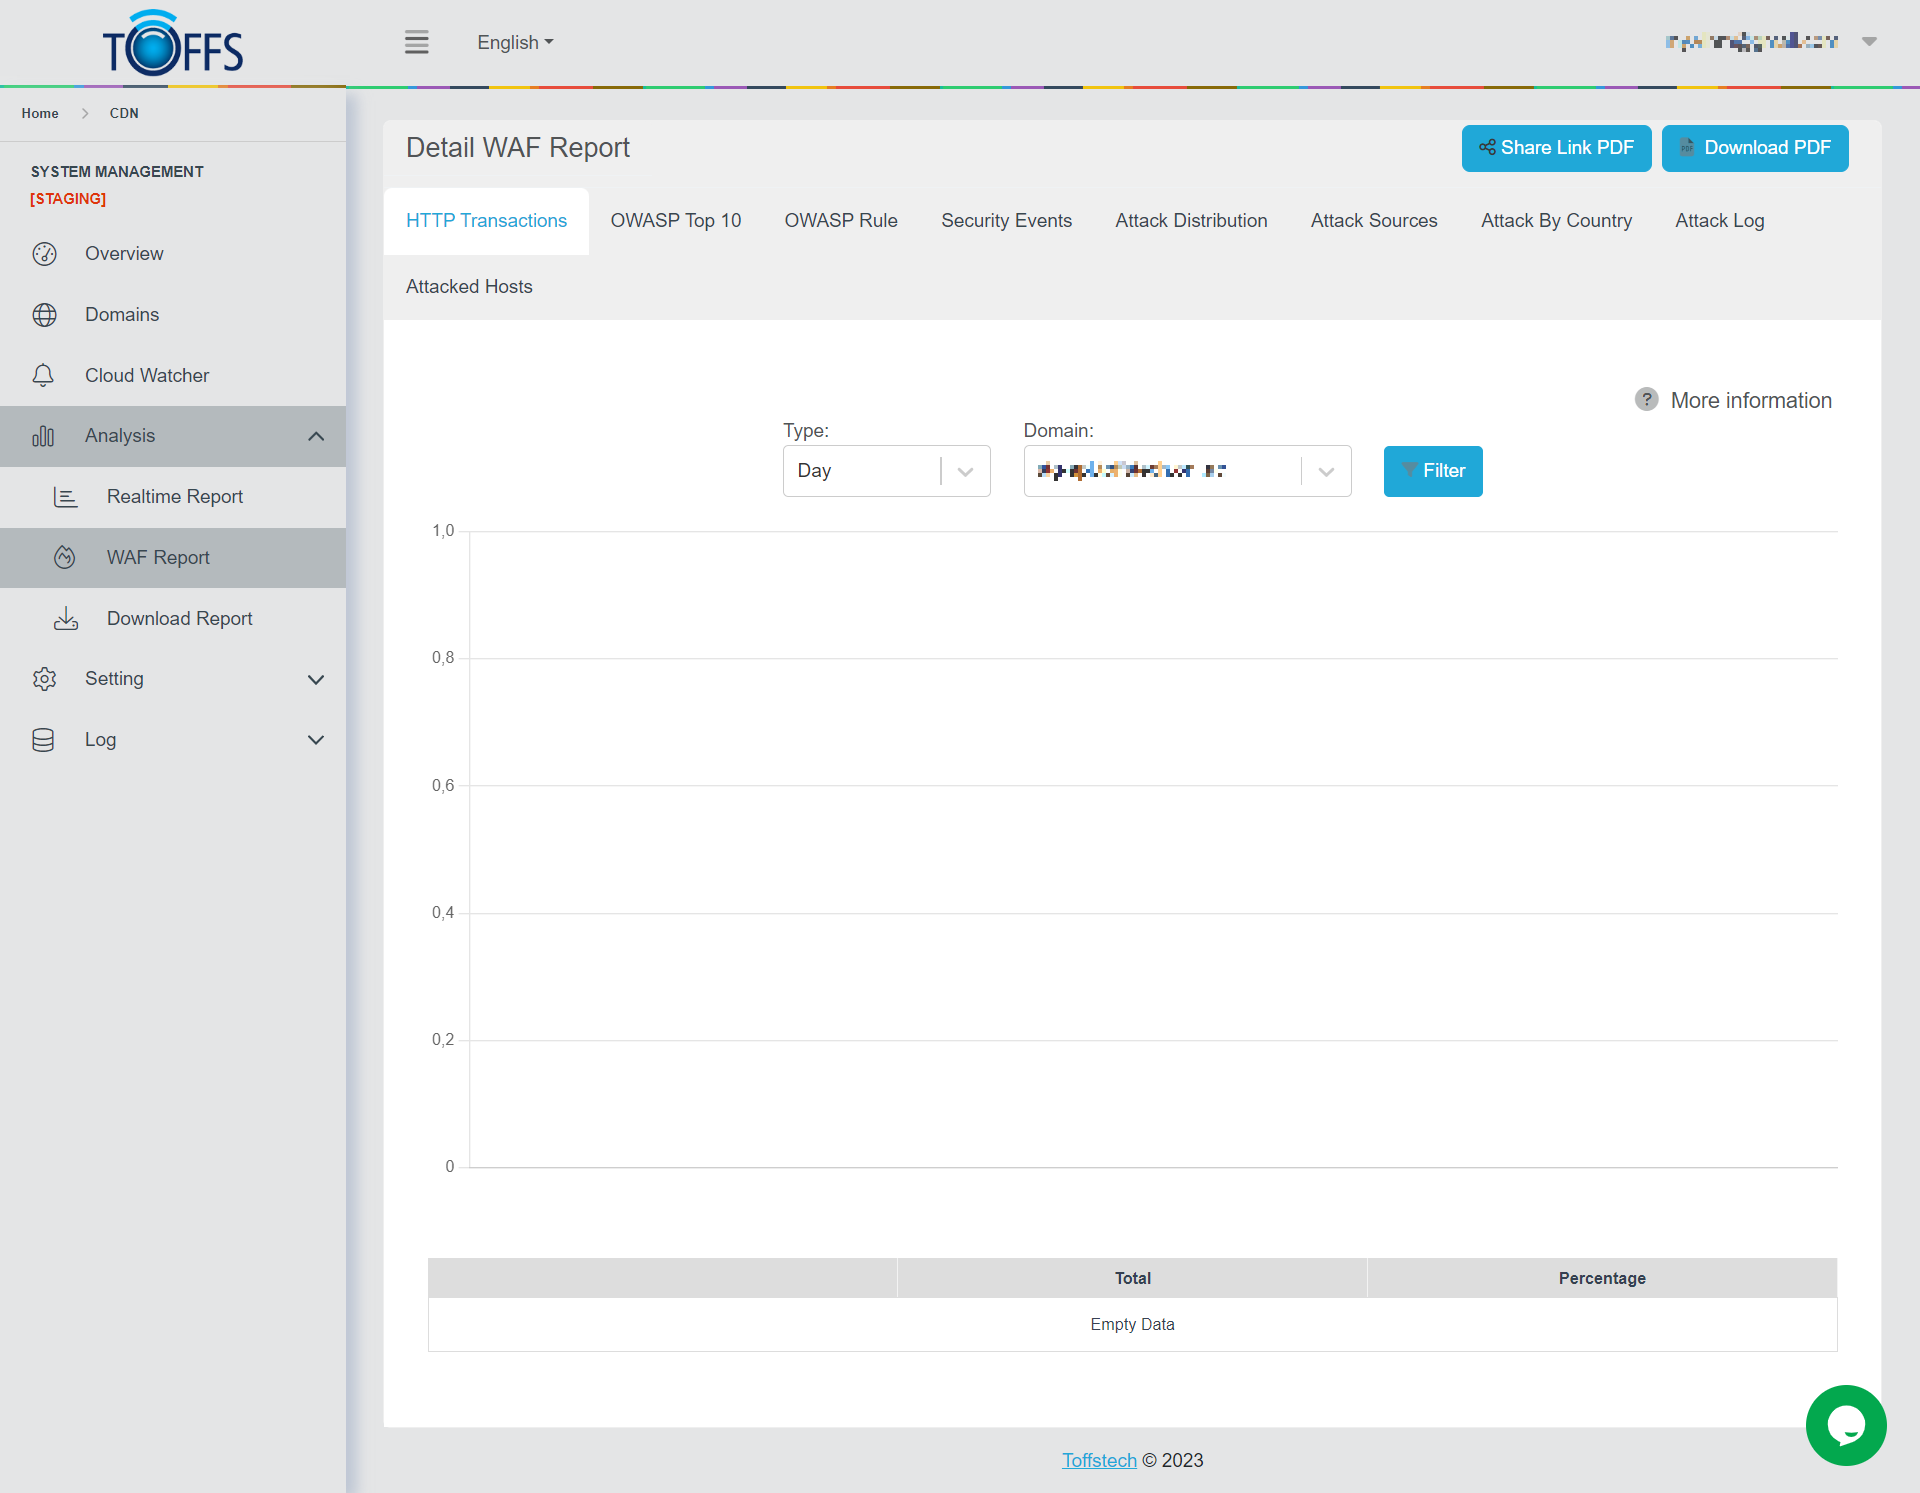
Figure 165
To download or share the Realtime report, complete the following steps:
Step 1: Select the Time from the Type drop-down menu.
Step 2: Select the Domain from the Domain drop-down menu.
Step 3a: Click the Download button.
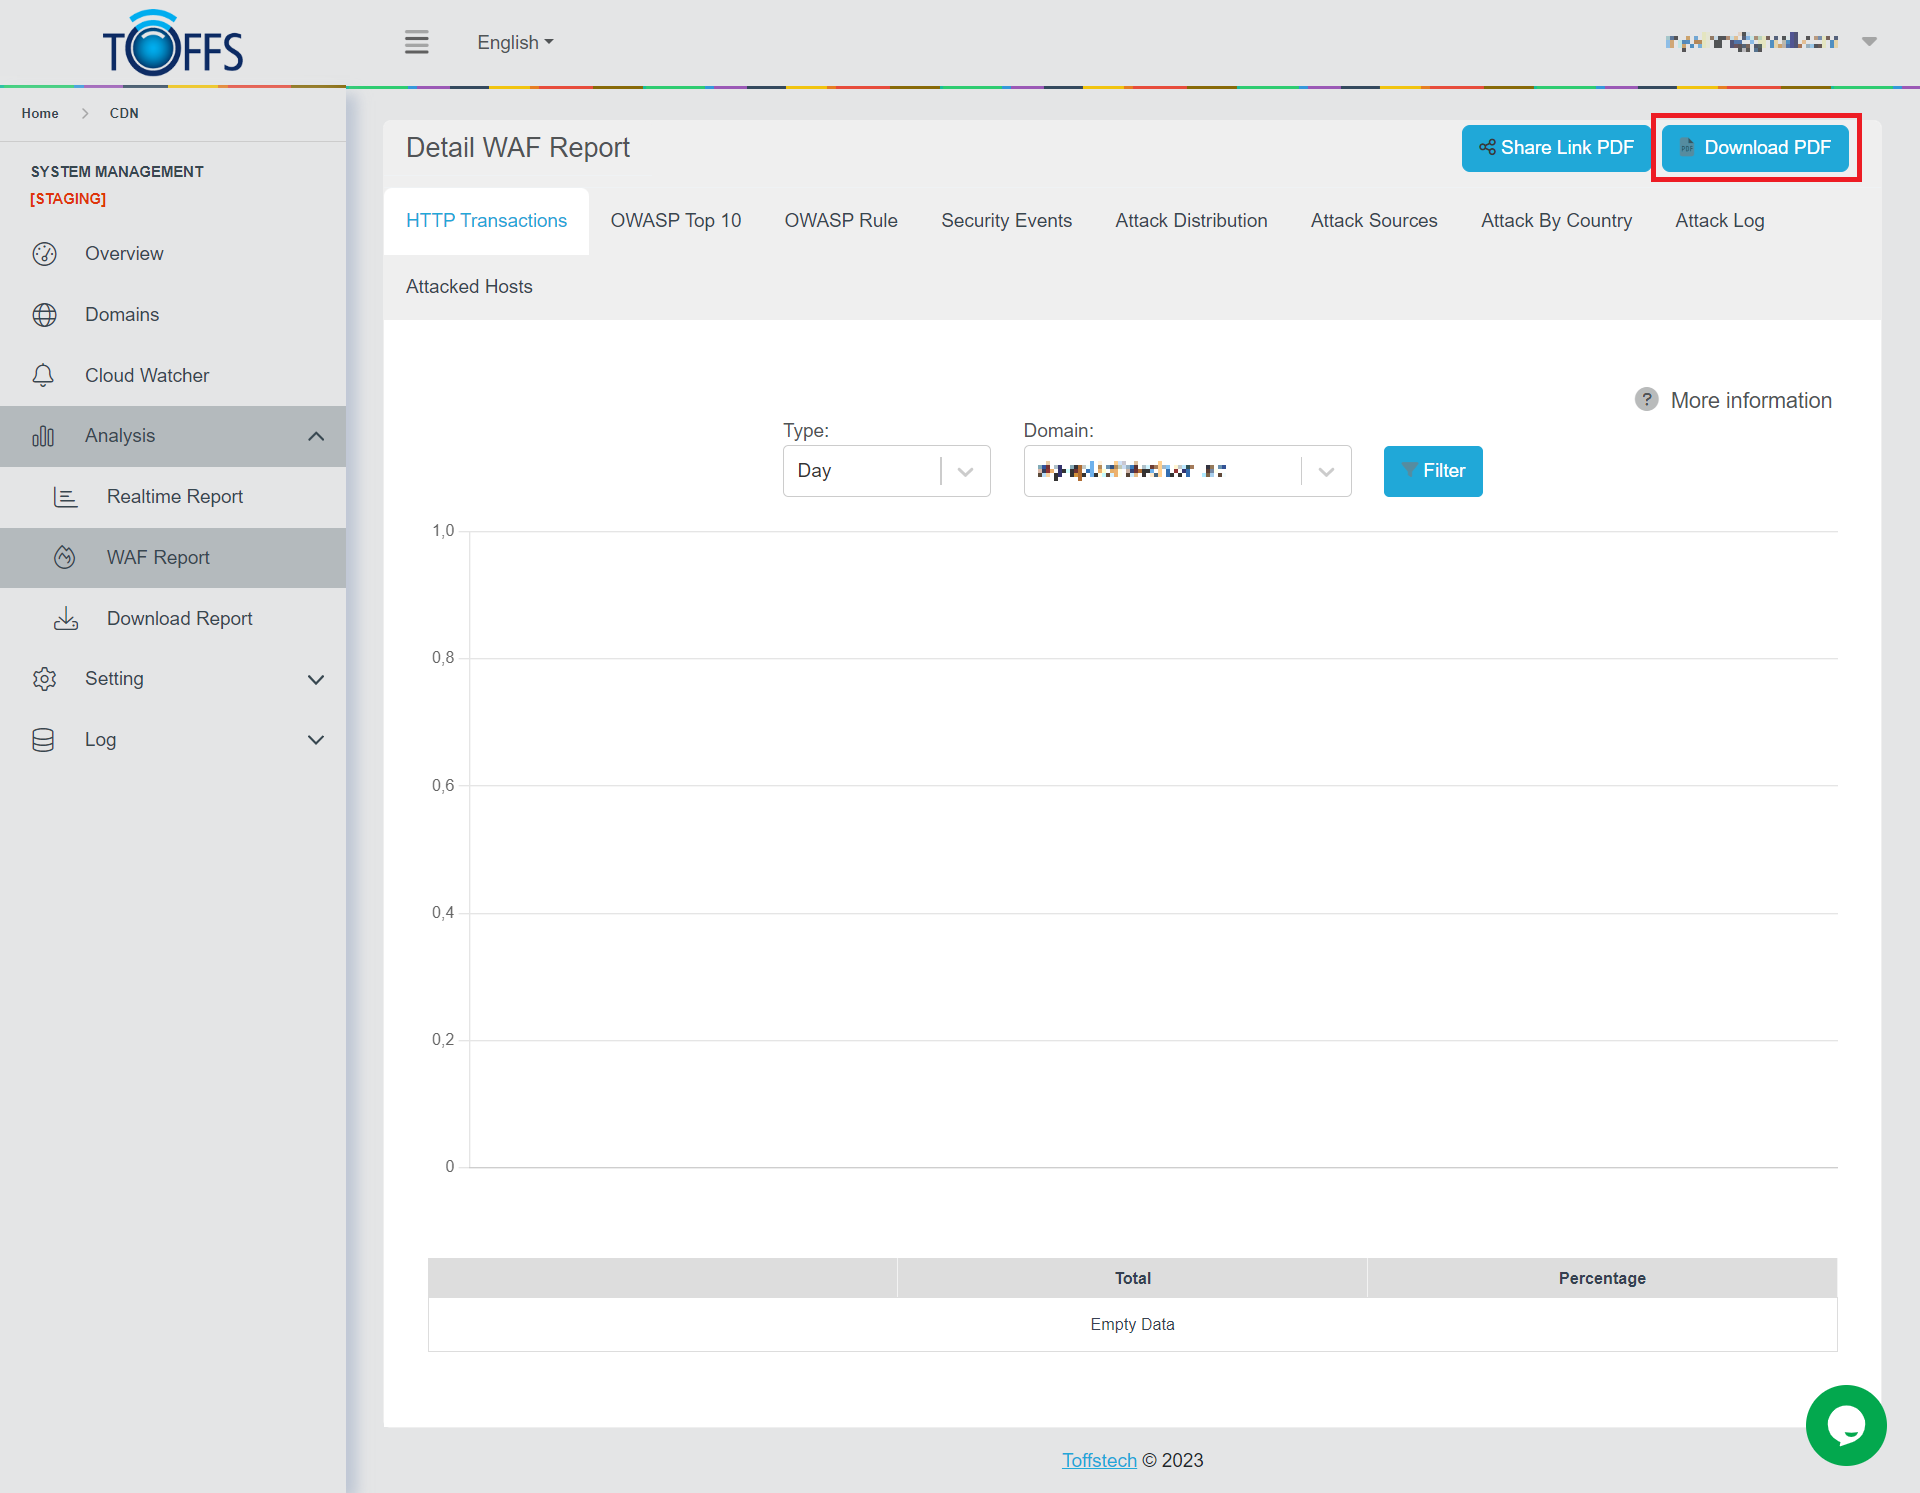
Figure 166
Step 3b: To share the report, click the Share Link PDF button.
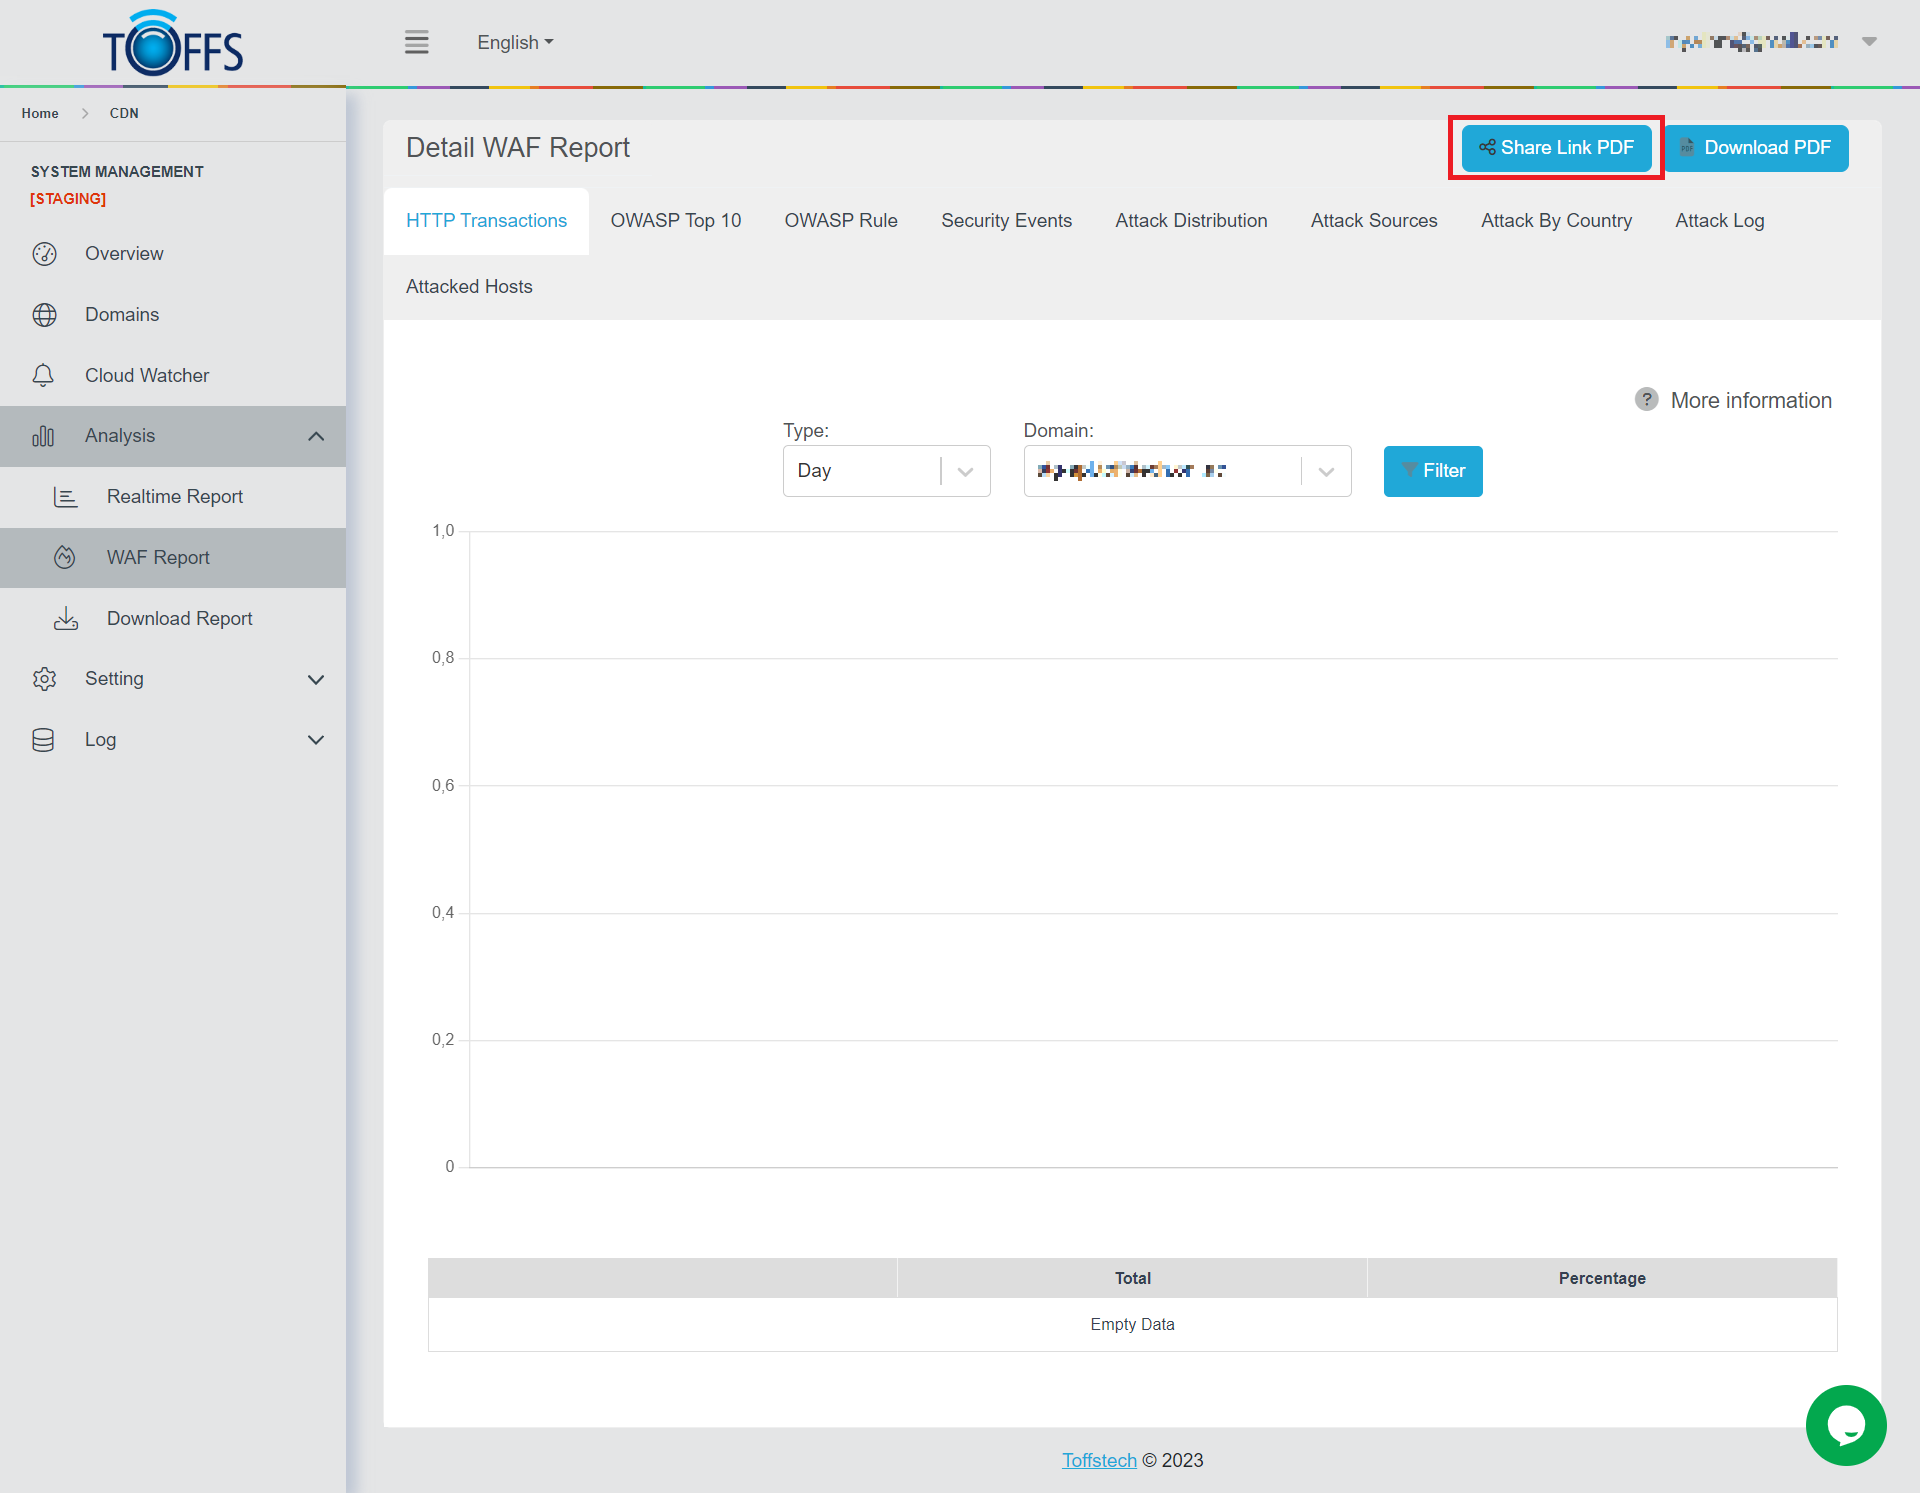
Figure 167
Click Copy symbol button to get the report public sharing link. This URL is only valid for 7 days.
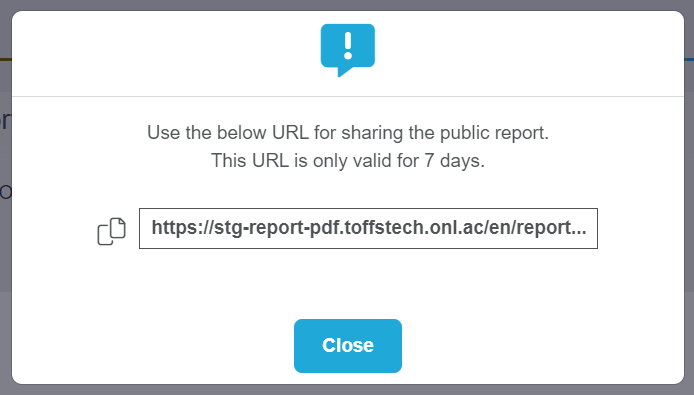
Figure 168
In the share link, you may also click the “Download PDF” button. The system will automatically download the PDF file.

Figure 169
Download Report
Access Log
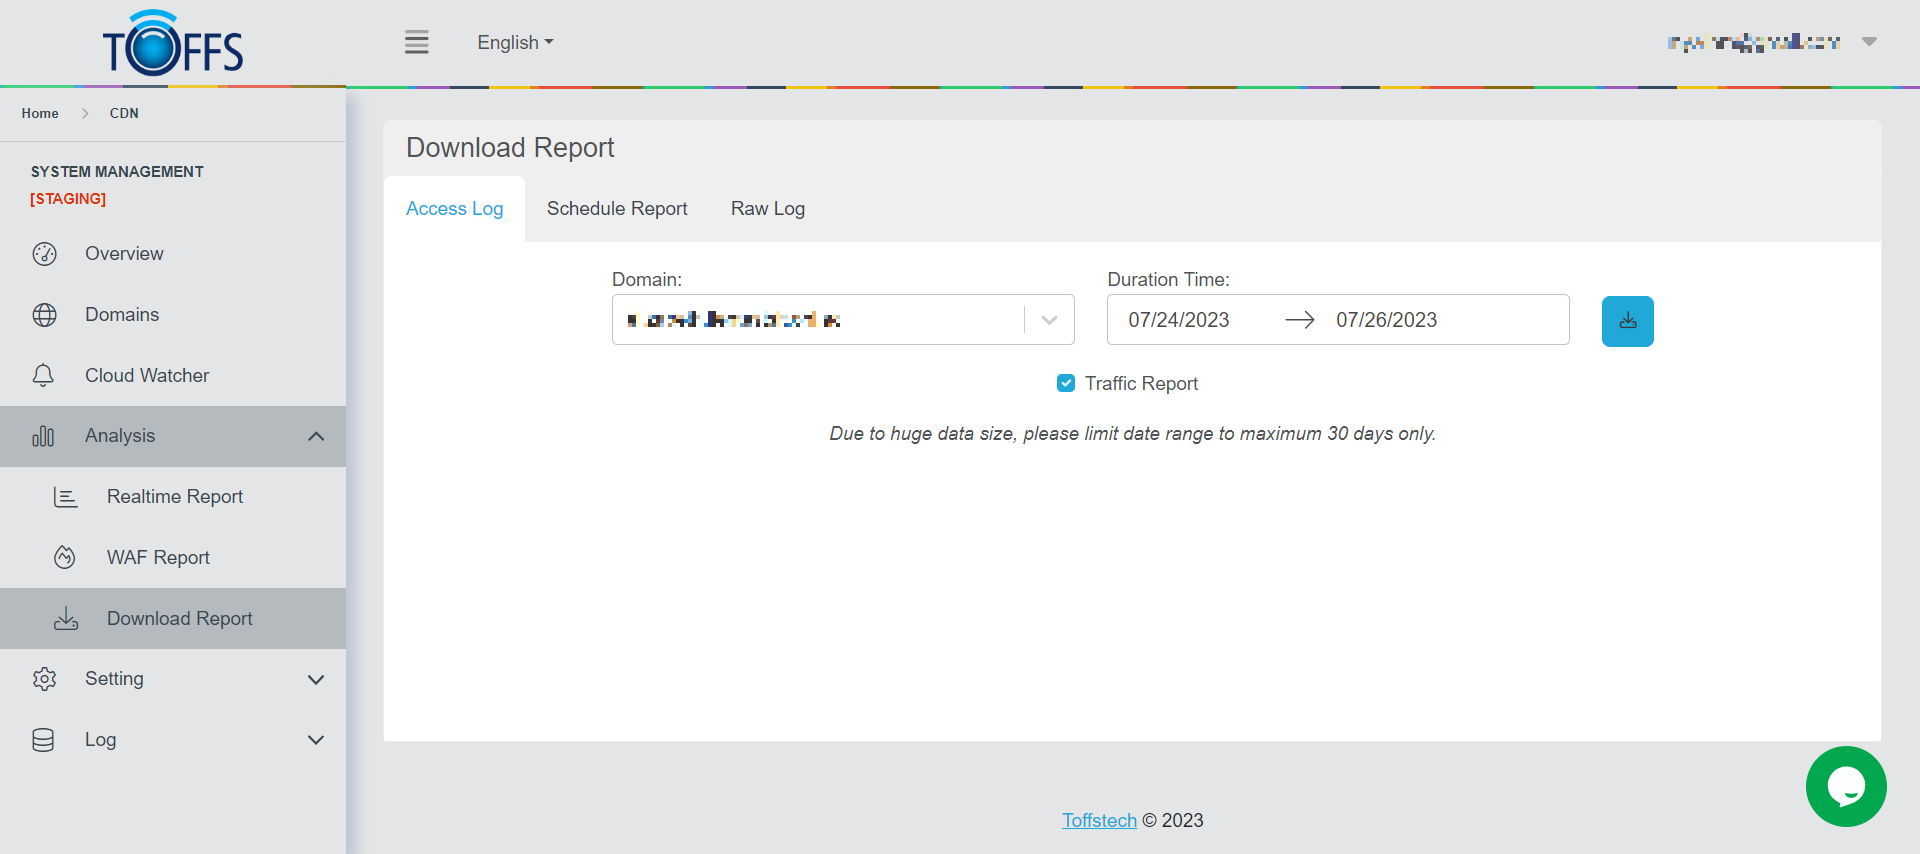
Figure 170
This is the “Access Log” page under the “Download Report” page.
This page allows the user to view and download previous records of traffic and WAF reports on specific dates and timings by keying in the desired date and time to be reviewed.
- Select the Domain that you wish to view.
- Select the Date and Period of Time of which you want to view the information from.
- Choose either “Traffic Report”, “WAF Report” or both to be able to view the information.
- A “Download” button will appear depending on the duration requested and the respective size of the file will determine the extraction time.
To download the Access Log report, complete the following steps:
Step 1: Select Domain in the domain drop-down menu
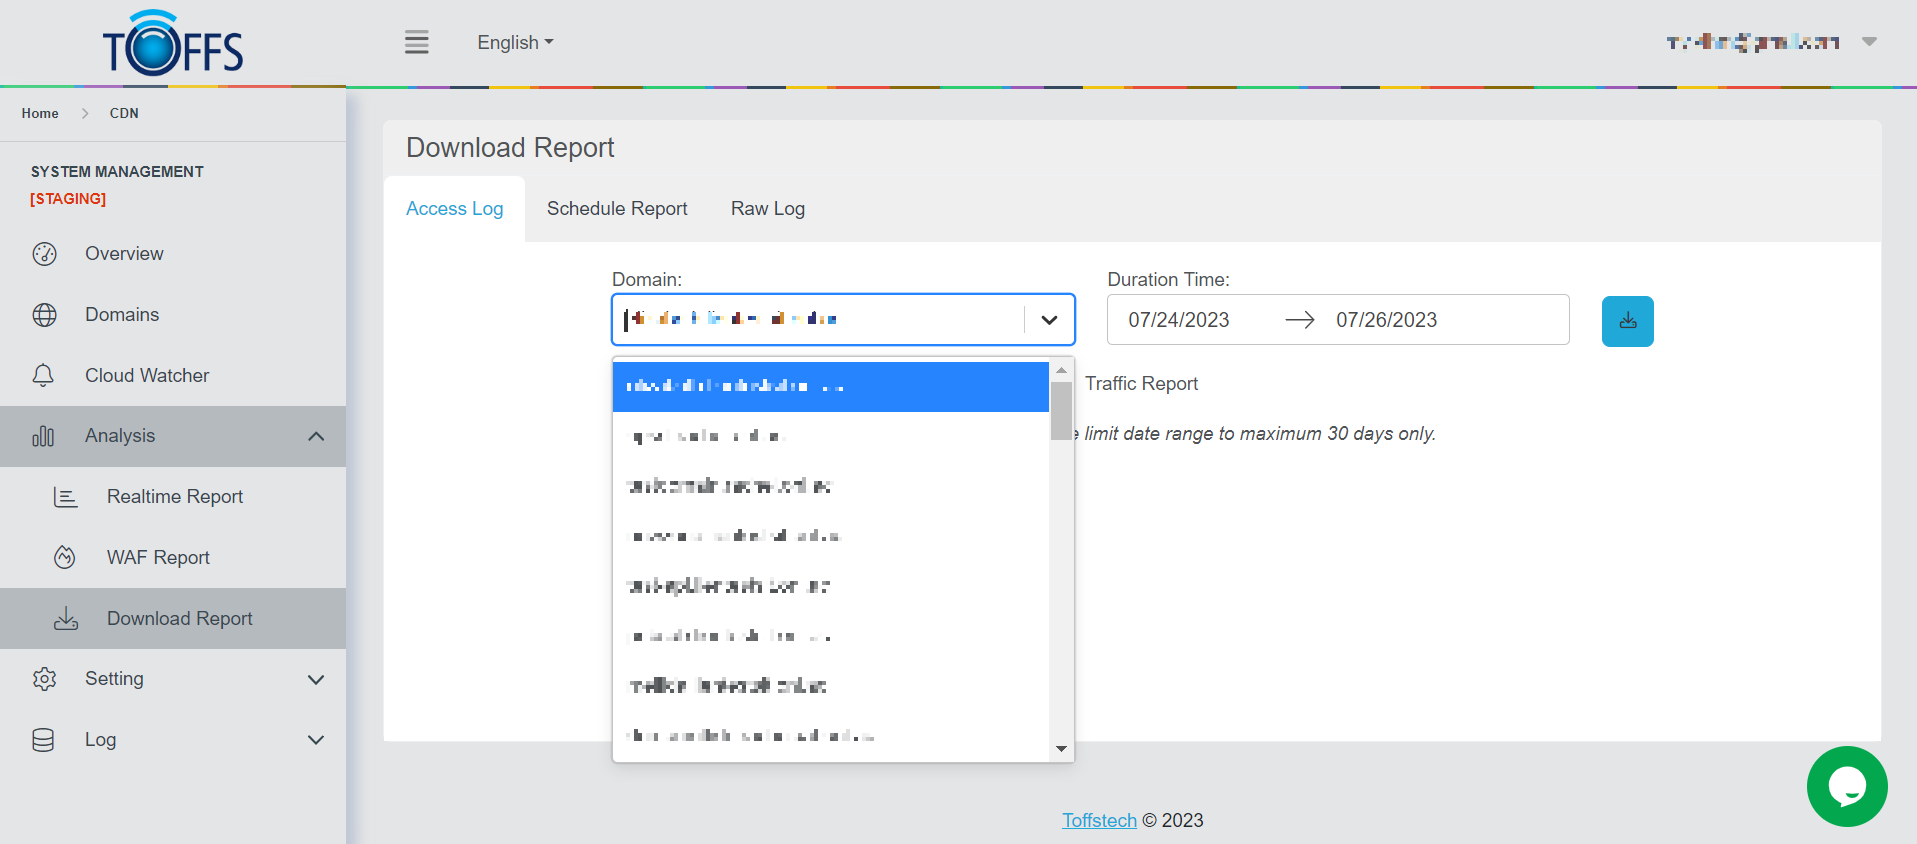
Figure 171
Step 2: Select Time
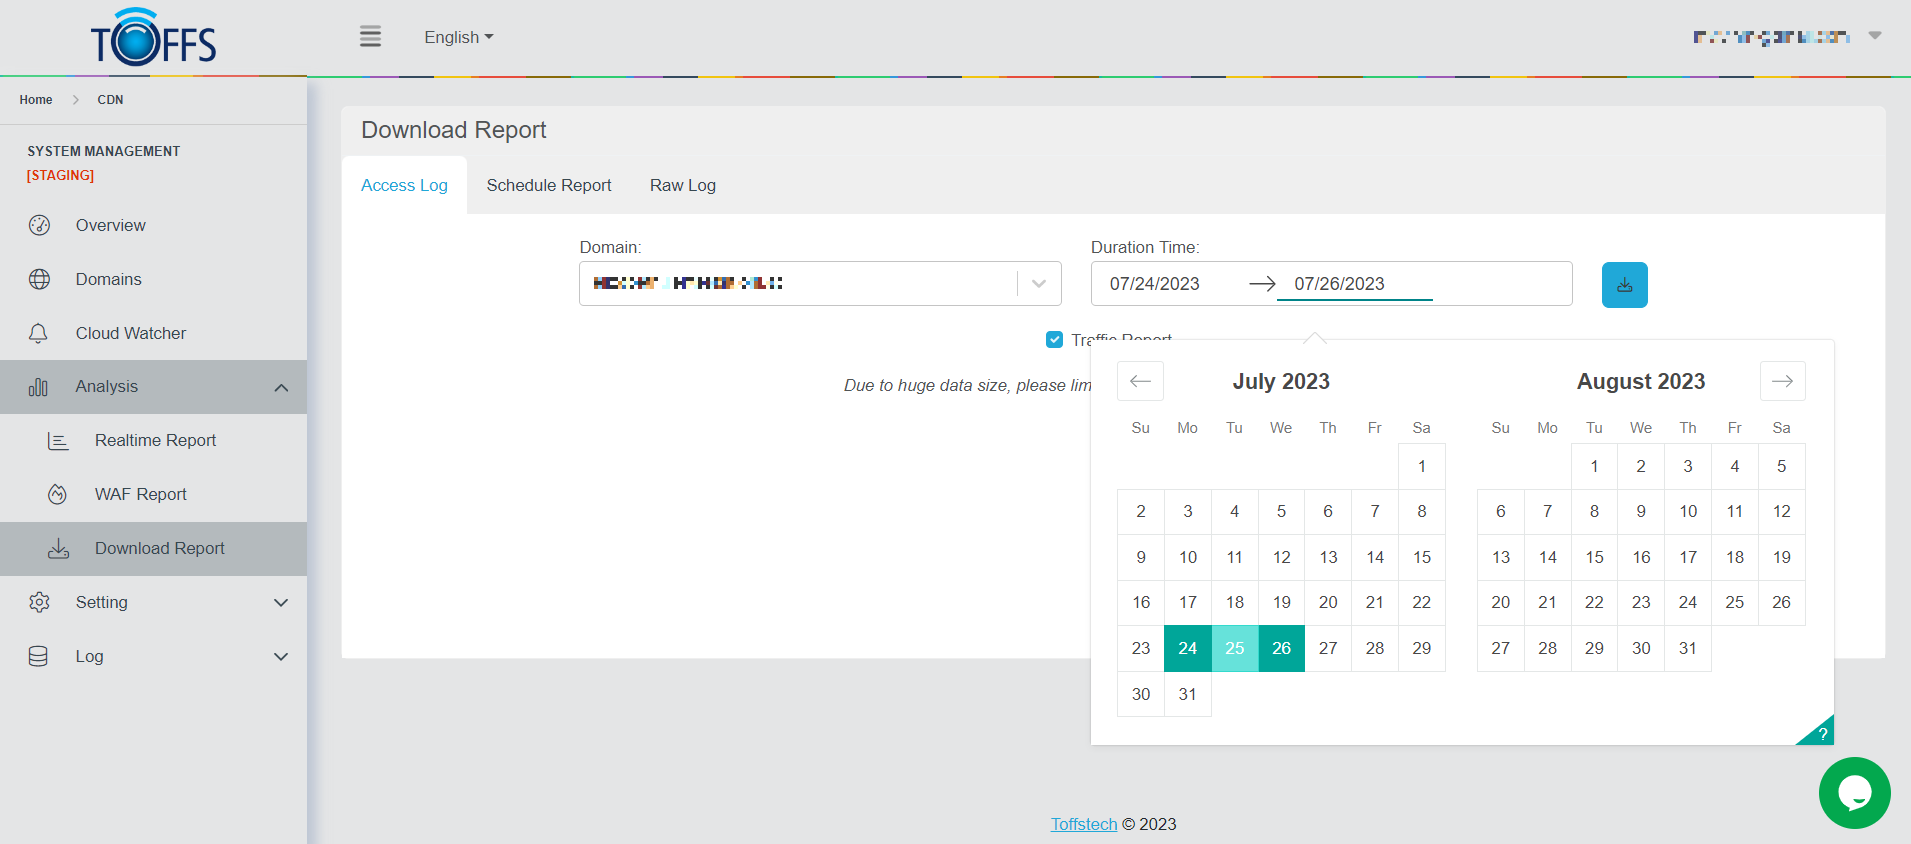
Figure 172
Step 3: Stick Traffic Report
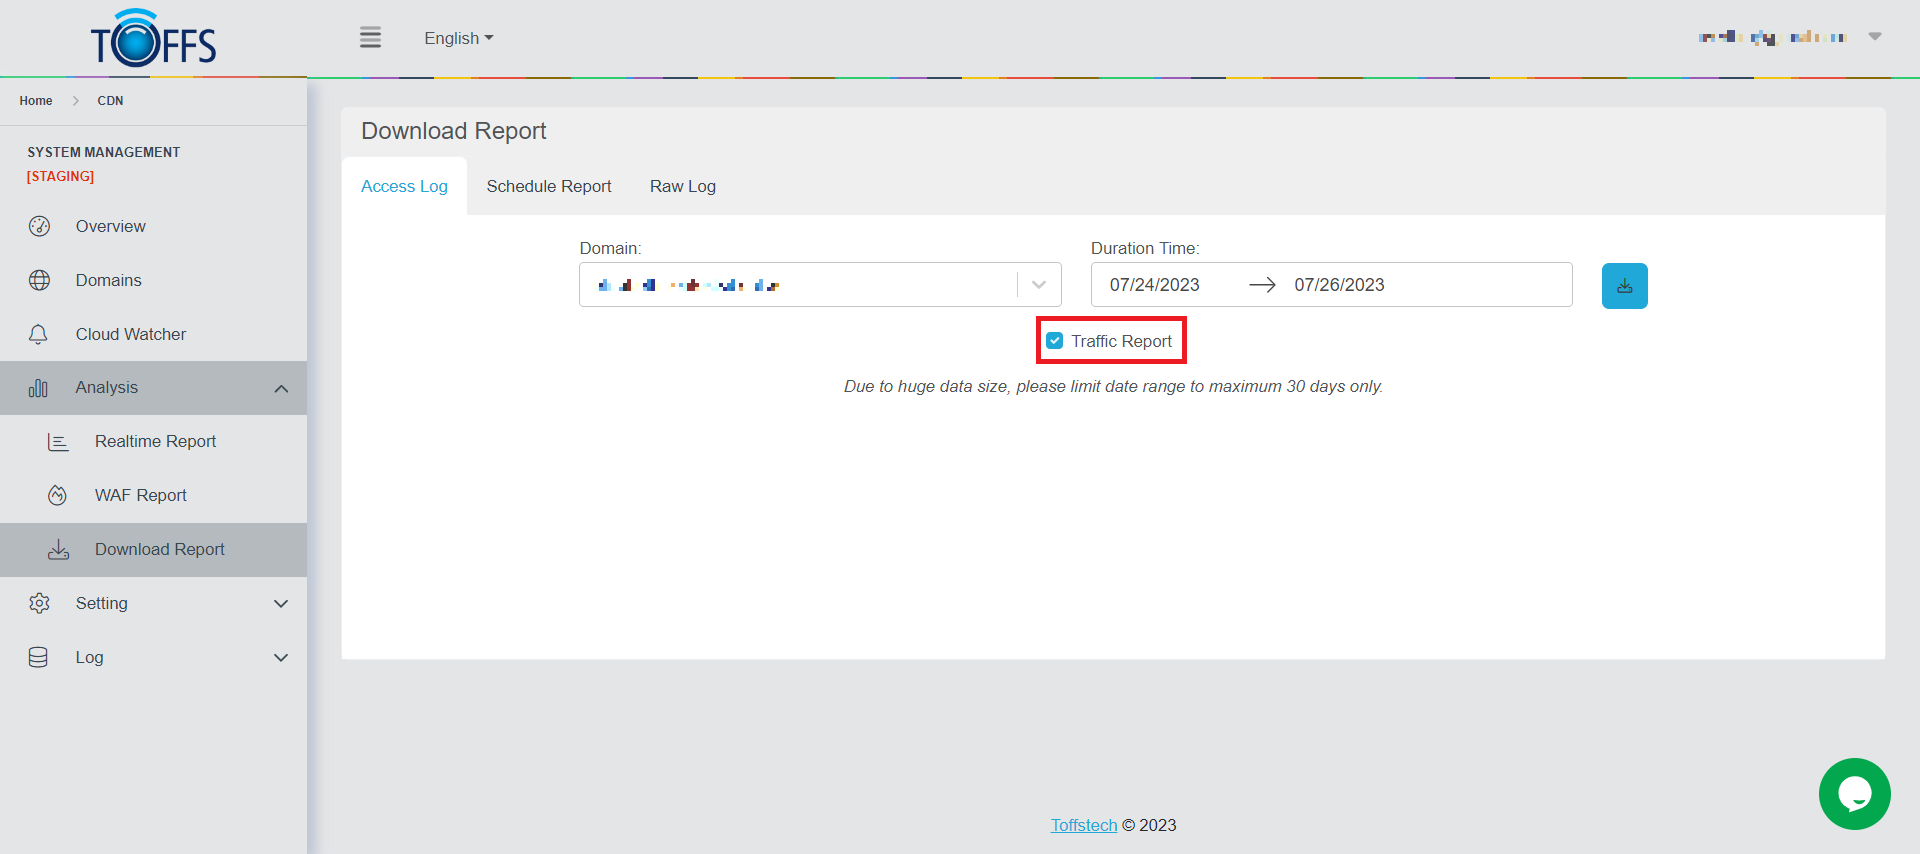
Figure 173
Step 4: Click the “Download” symbol button
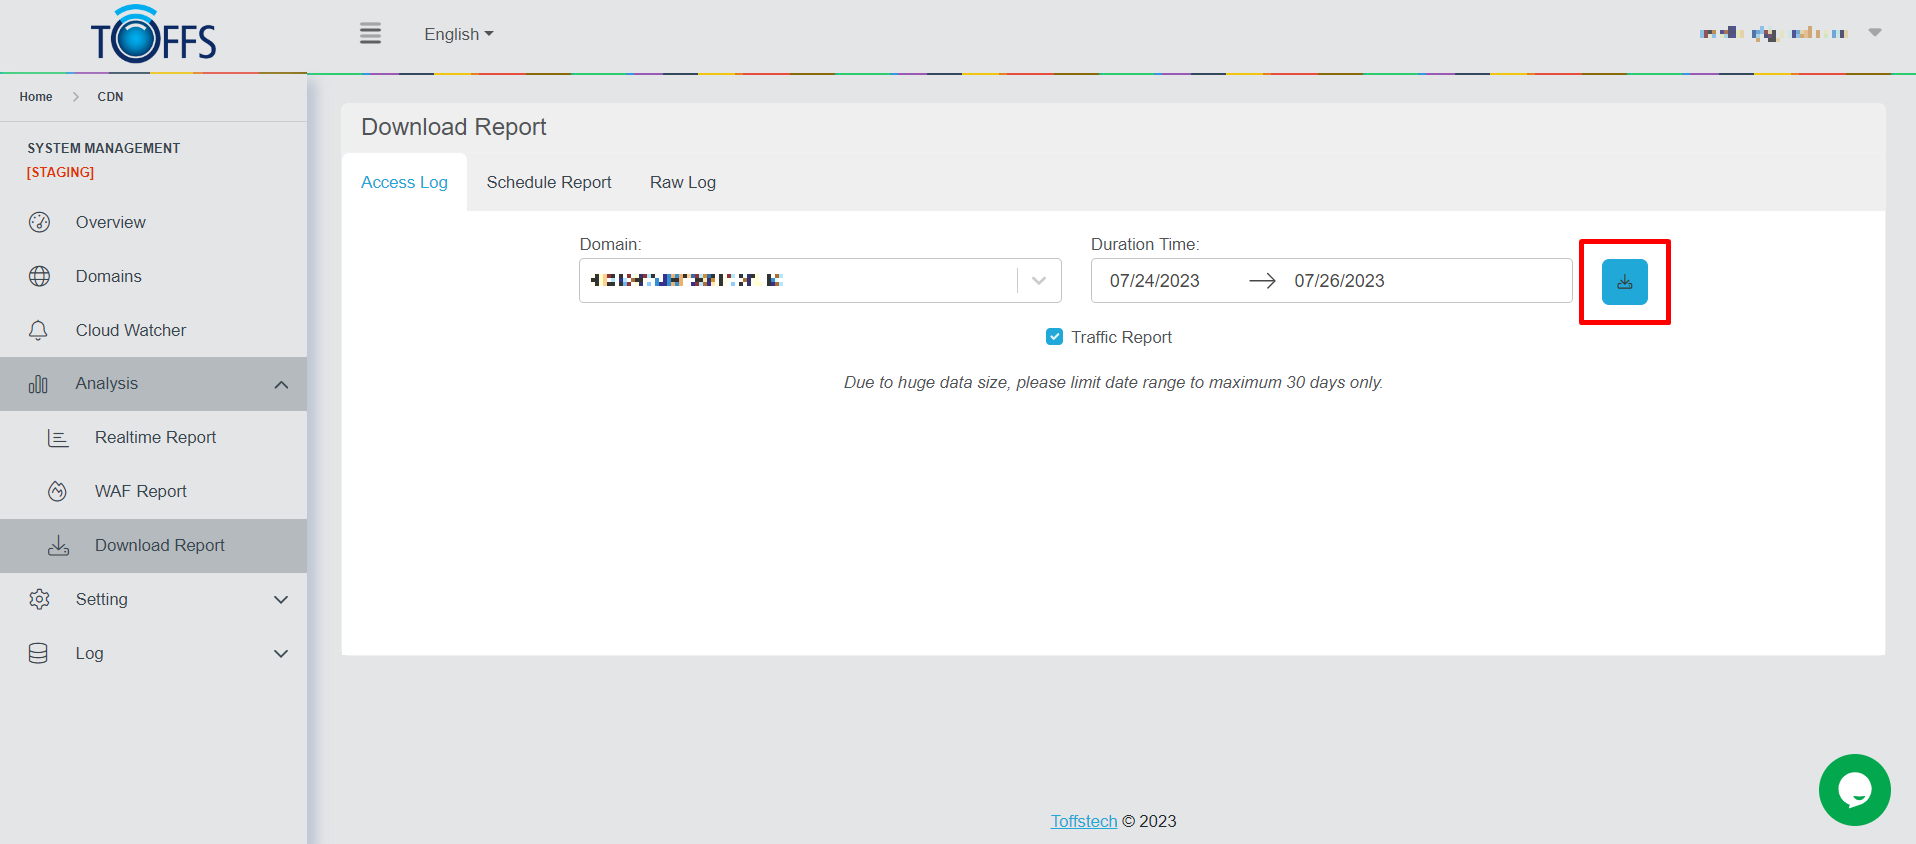
Figure 174
Step 5: Click the “Download” button
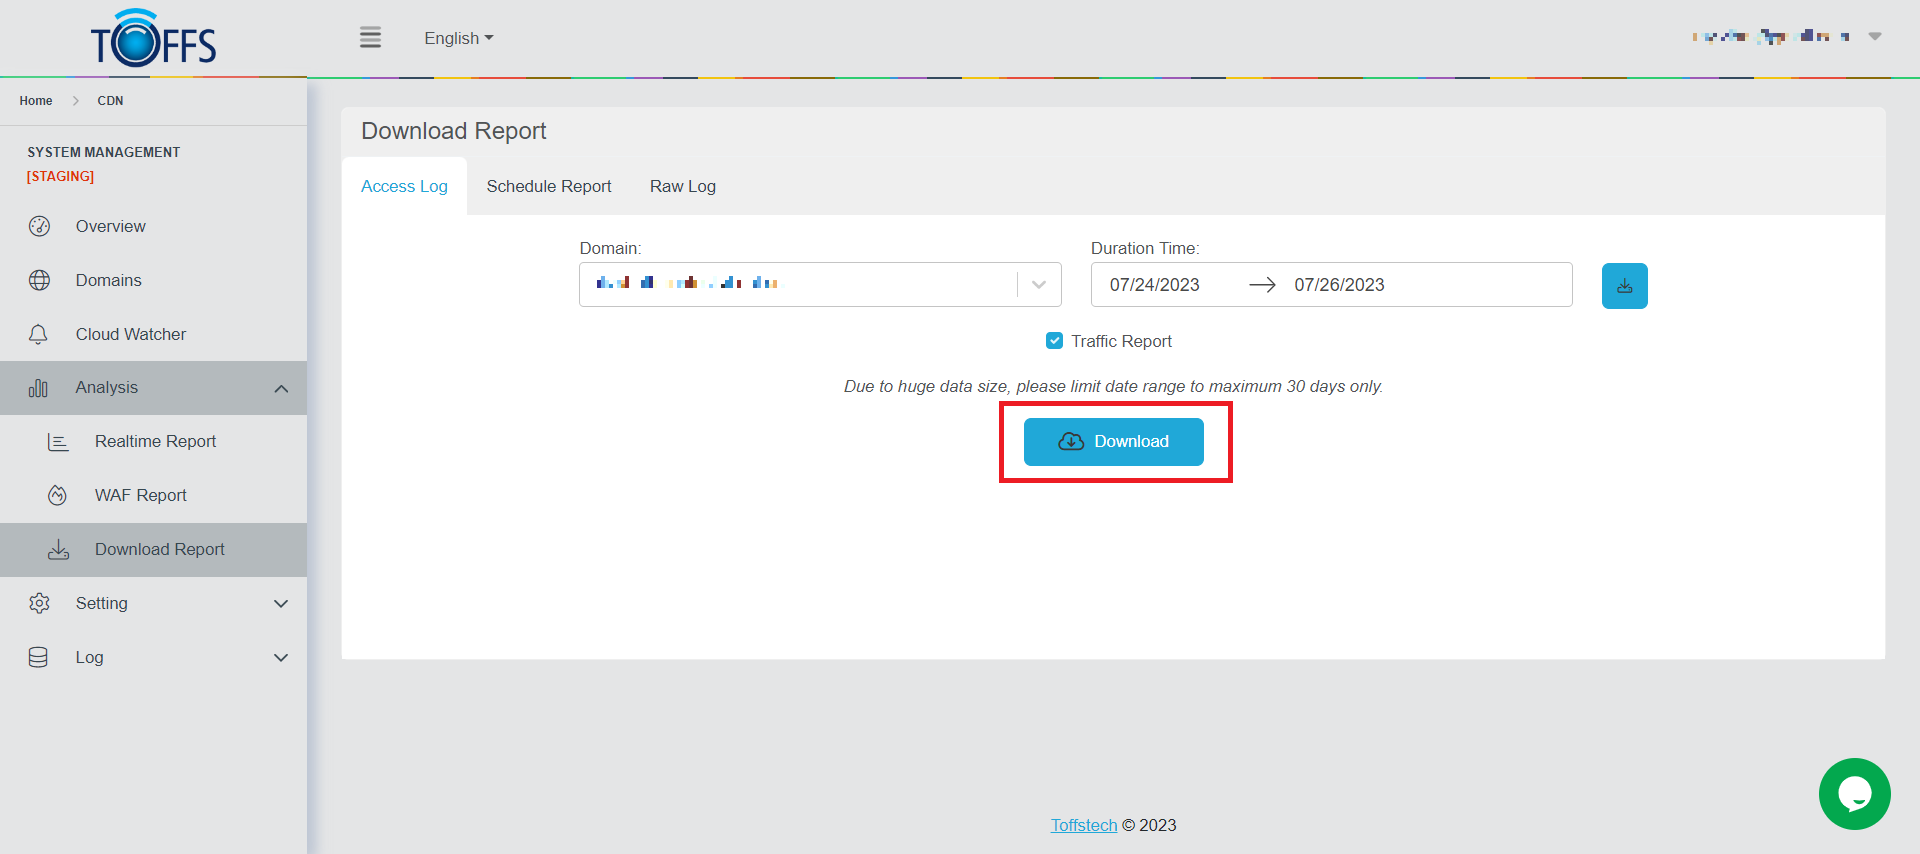
Figure 175
The system will automatically download the Access Log Report into the computer.
Schedule Report
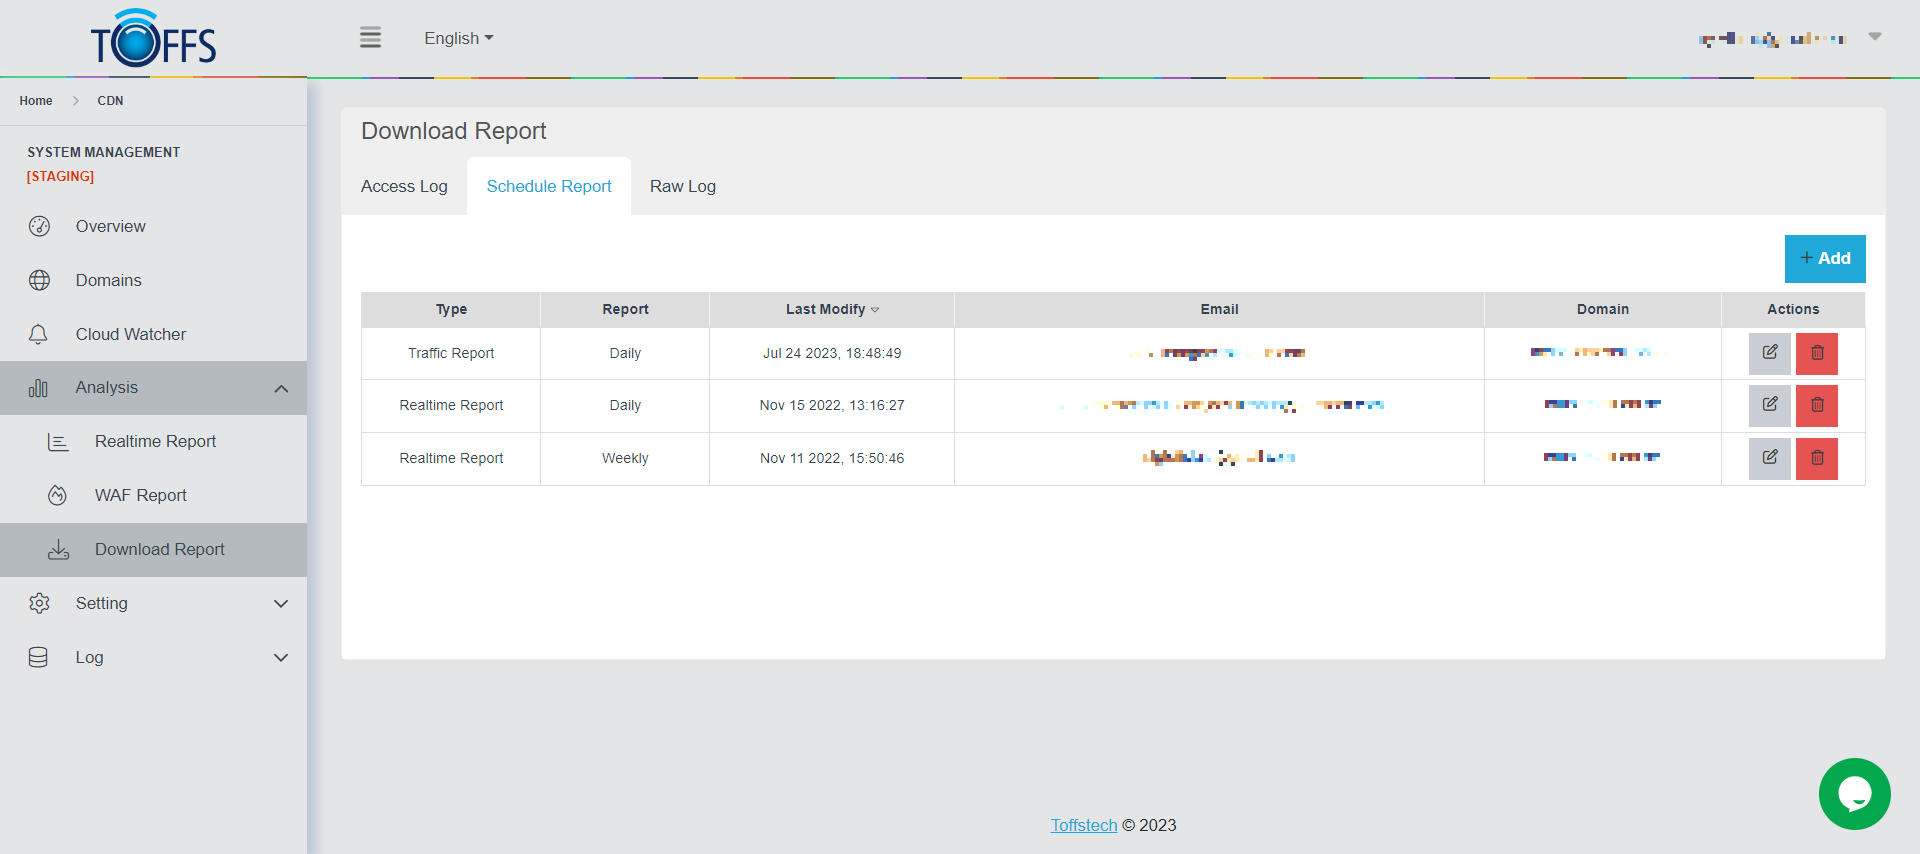
Figure 176
This is the “Schedule Report” under the “Download Report” page.
With this feature, you can effortlessly schedule reports to be generated daily, weekly, or monthly, and conveniently access them in a table for easy viewing. Additionally, you have the option to set up automatic email delivery of these reports to your preferred email address.
To get started, simply click the “+Add” button, which allows you to configure your desired report schedule. You can choose the frequency at which the report will be generated and sent to your email address. The available options include hourly, daily, weekly, and monthly intervals.
Here are the specific settings for each type of report schedule:
**Daily Report: **
- Sending Time: 0h UTC (Coordinated Universal Time)
**Weekly Report: **
- Sending Day: Monday
- Sending Time: 0h UTC (Coordinated Universal Time)
**Monthly Report: **
- Sending Day: First day of the month
- Sending Time: 0h UTC (Coordinated Universal Time)
By following these simple steps, you can conveniently automate your report generation and delivery process, saving you time and effort. Start using the “Schedule Report” feature today to streamline your workflow and stay up-to-date with the latest data insights.
Add Schedule Report
To schedule the report, complete the following steps:
Step 1: In Schedule Report, click “+Add” button
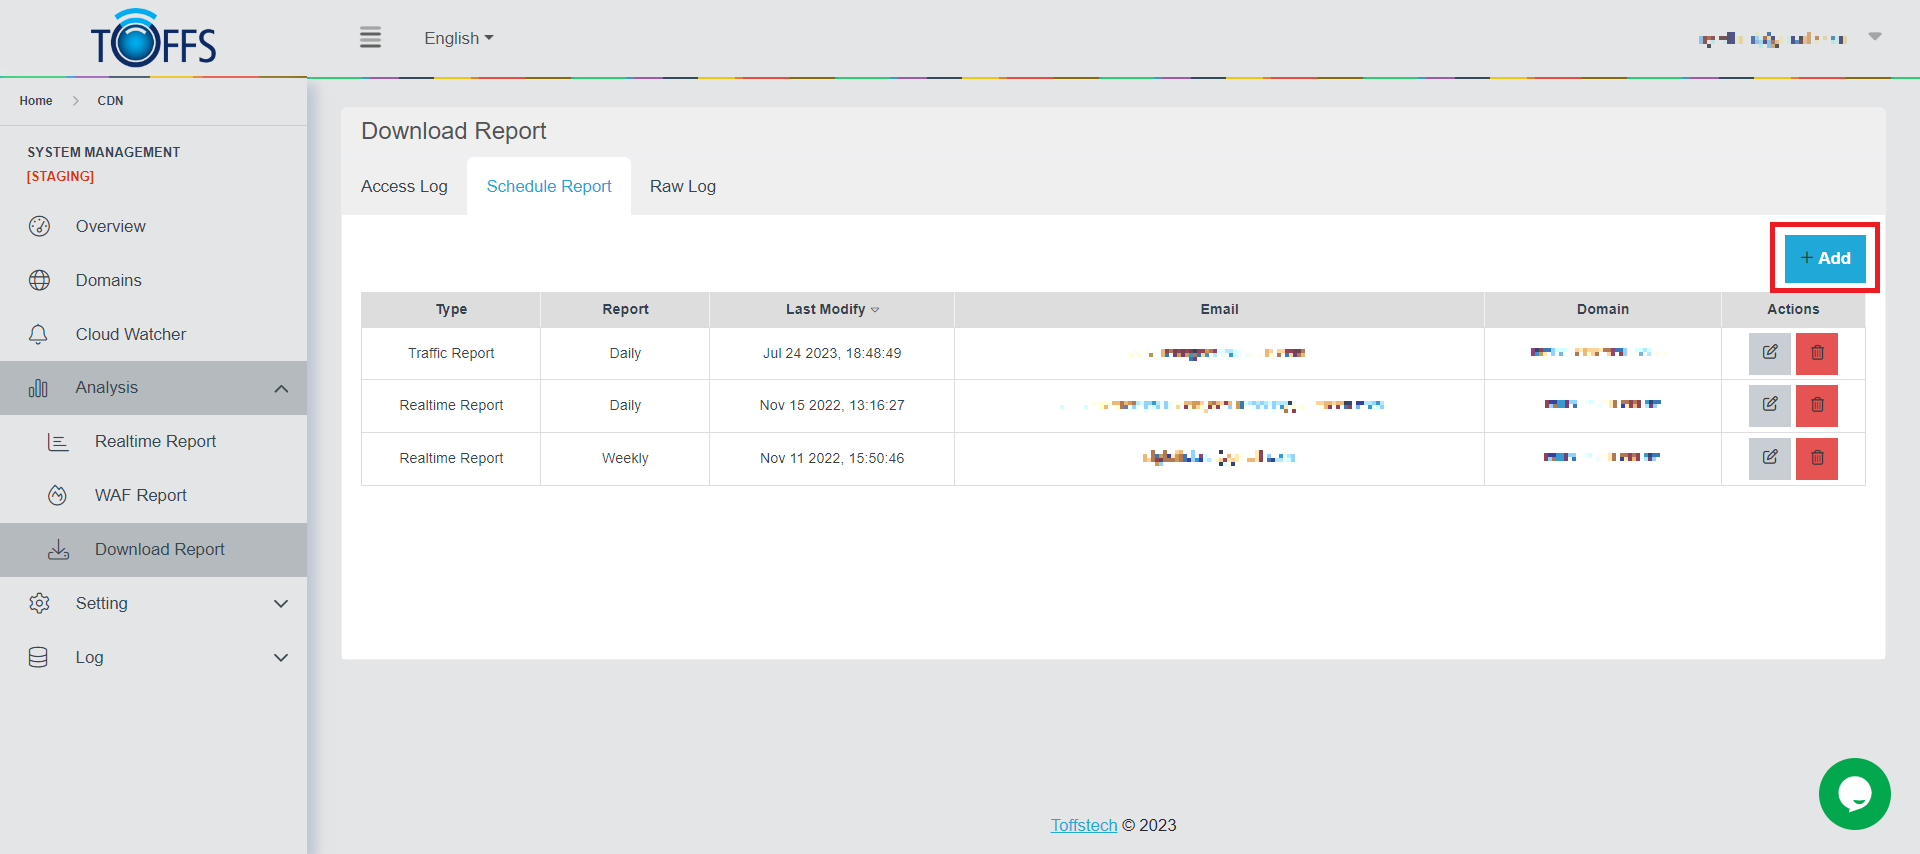
Figure 177
Step 2: Select the Domain
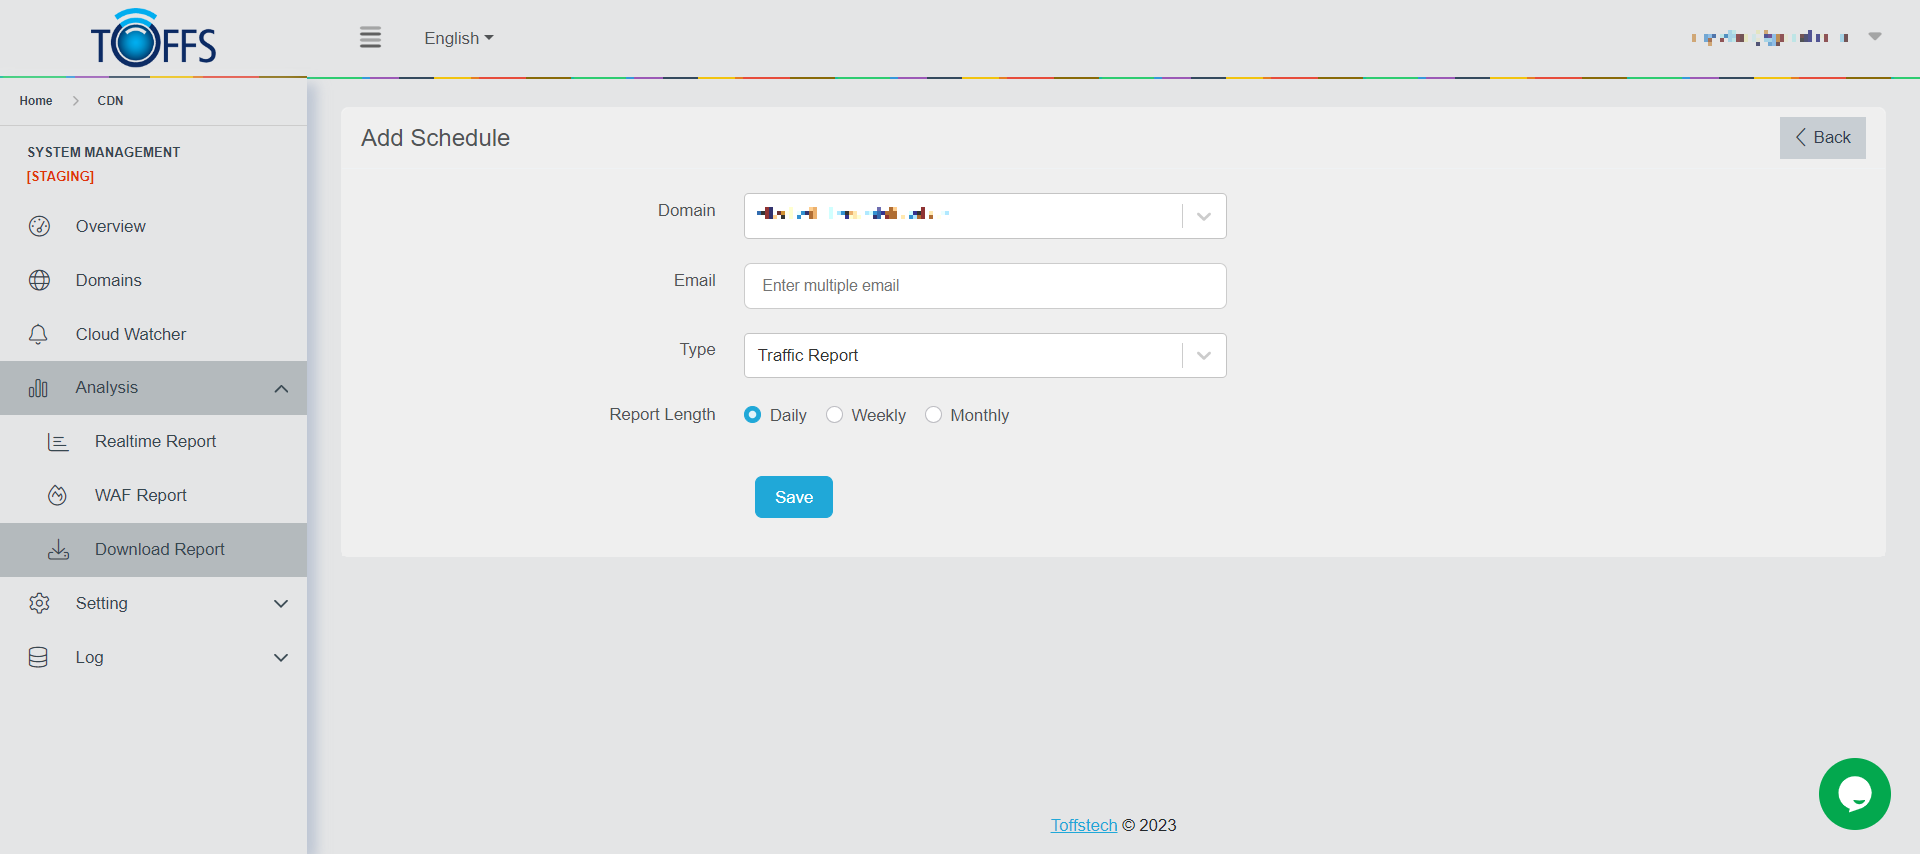
Figure 178
Step 3: Enter Email (can enter multiple emails to receive the reports)
Step 4: Select Report Length: Daily, Weekly or Monthly
Step 5: Select Type report to receive
Step 6: Click “Save” to finish
Edit Schedule Report
To edit the schedule, complete the following steps:
Step 1: In Schedule Report, click the “Edit” symbol button next to each Schedule Report line that needs to be edited.

Figure 179
The system will redirect to the Edit Schedule page to edit or update the details.
Step 2: Click “Save” to finish.
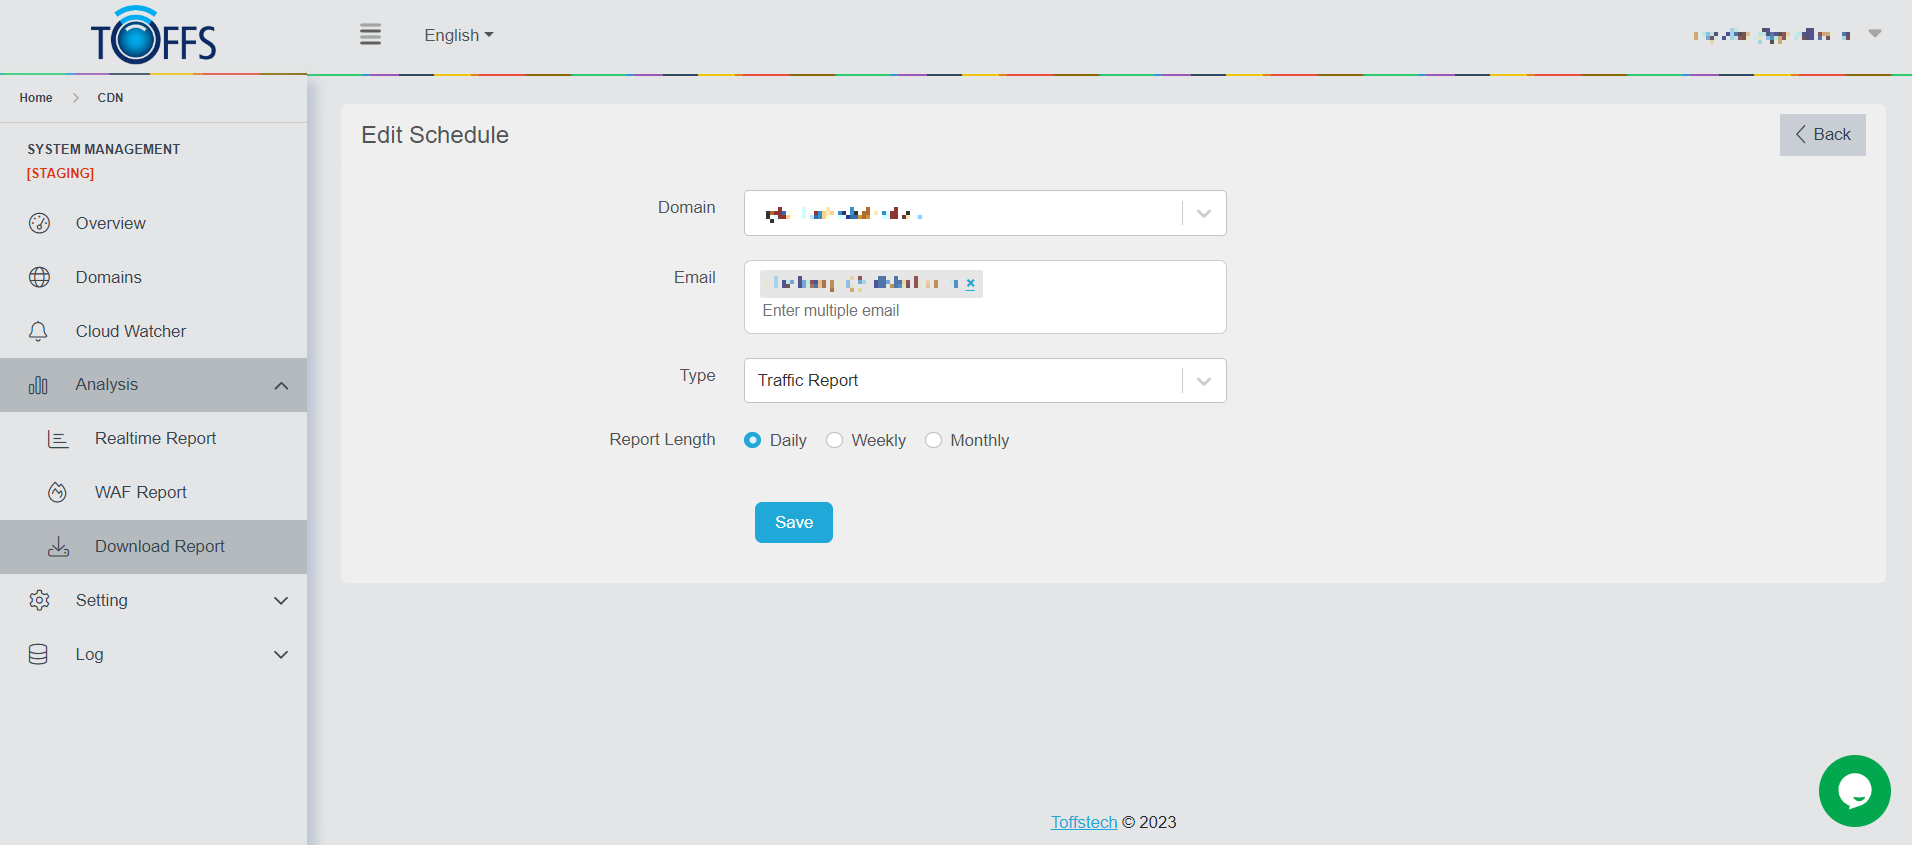
Figure 180
One adding new Schedule Report successfully, the system will redirect back to the Schedule Report page and show data as added.
Delete Schedule Report
To delete a Schedule Report, complete the following steps:
Step 1: In the Schedule Report page, click the “Delete” symbol button.
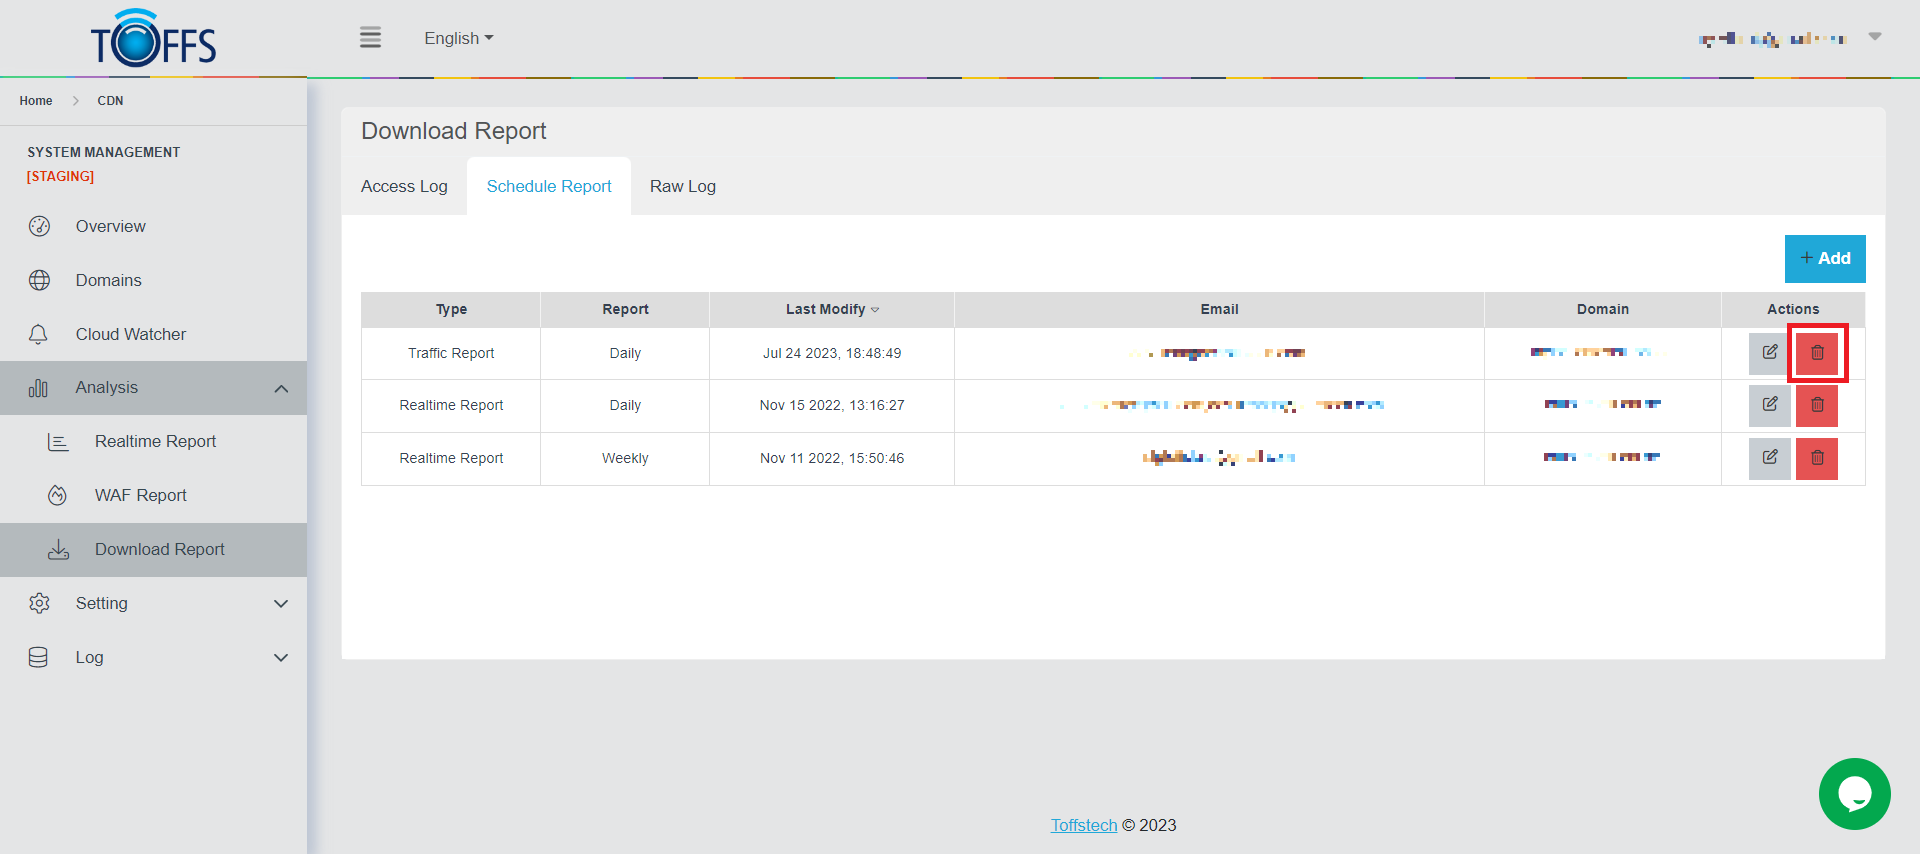
Figure 181
Step 2: The system will display a dialogue box to confirm before deleting. Click “Yes” if you continue to want to delete.
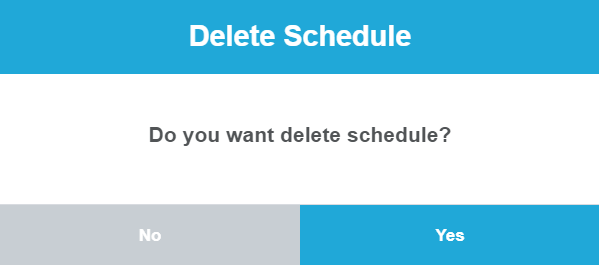
Figure 182
The Schedule Report will be deleted from the system
Raw Log
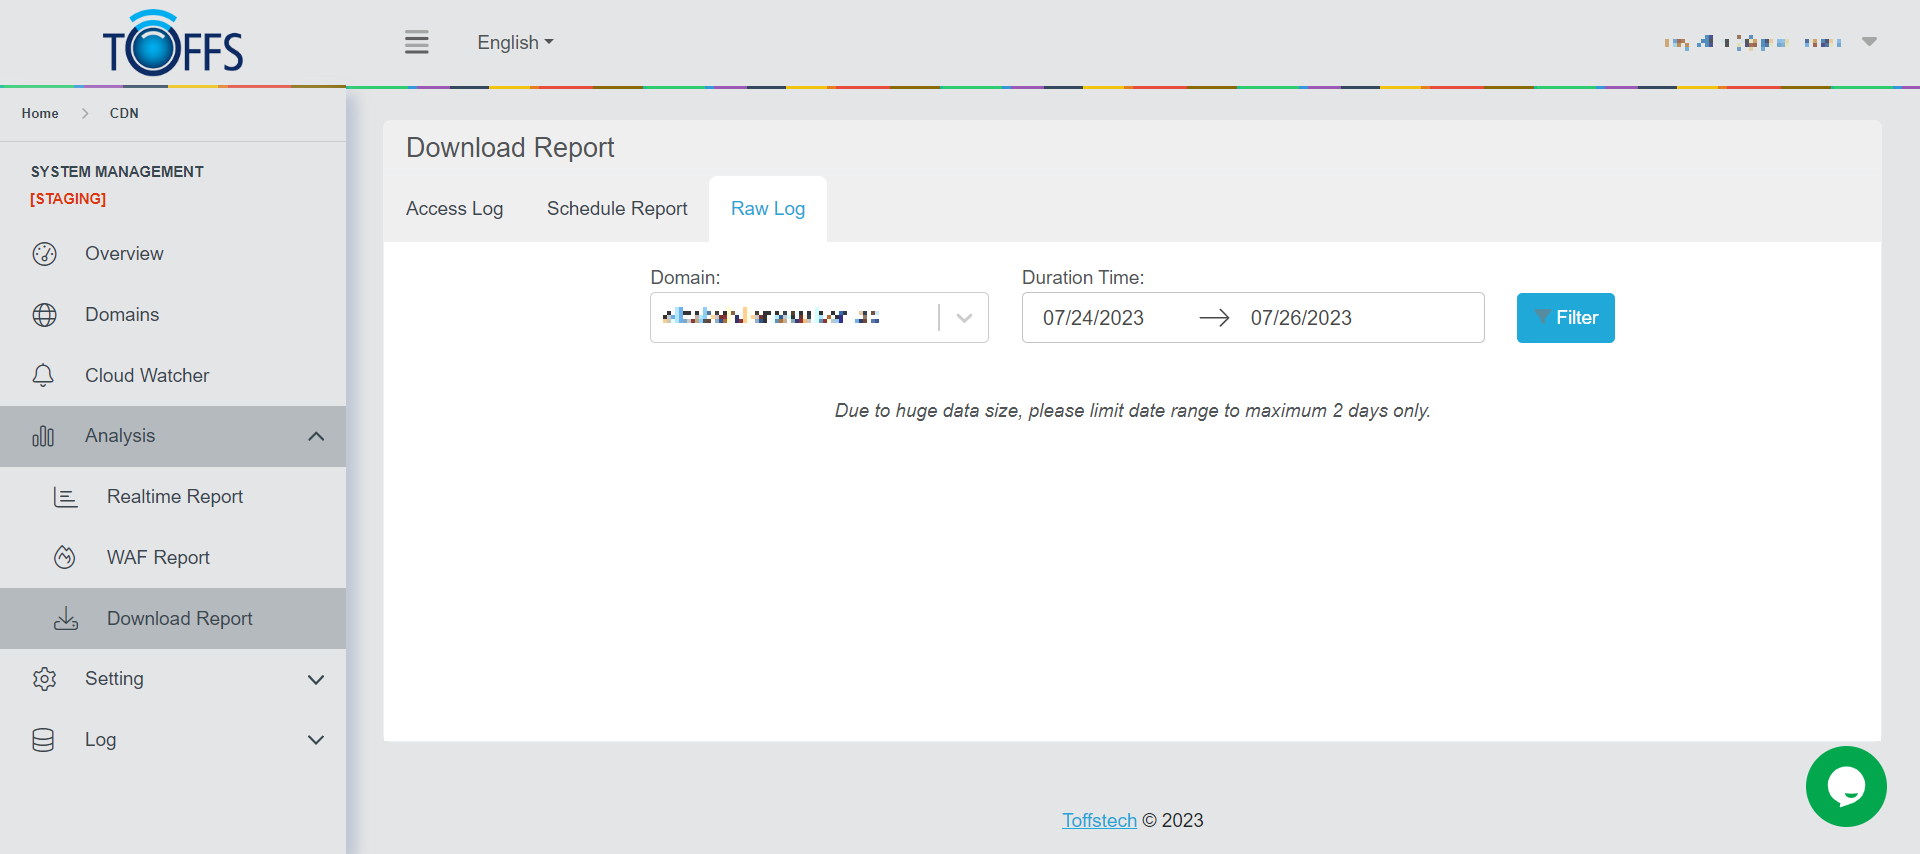
Figure 183
This the “Raw Log” under the “Download Report” page.
This page allows the user to view and download previous records of traffic and WAF reports on specific dates and timings by just keying in the date and time that you wish to look at and the graph will appear. This is a more specific version of the “Access Log” which shows you much more pinpoint.
To download the Access Log report, complete the following steps:
Step 1: Select** Domain** in the domain drop-down menu
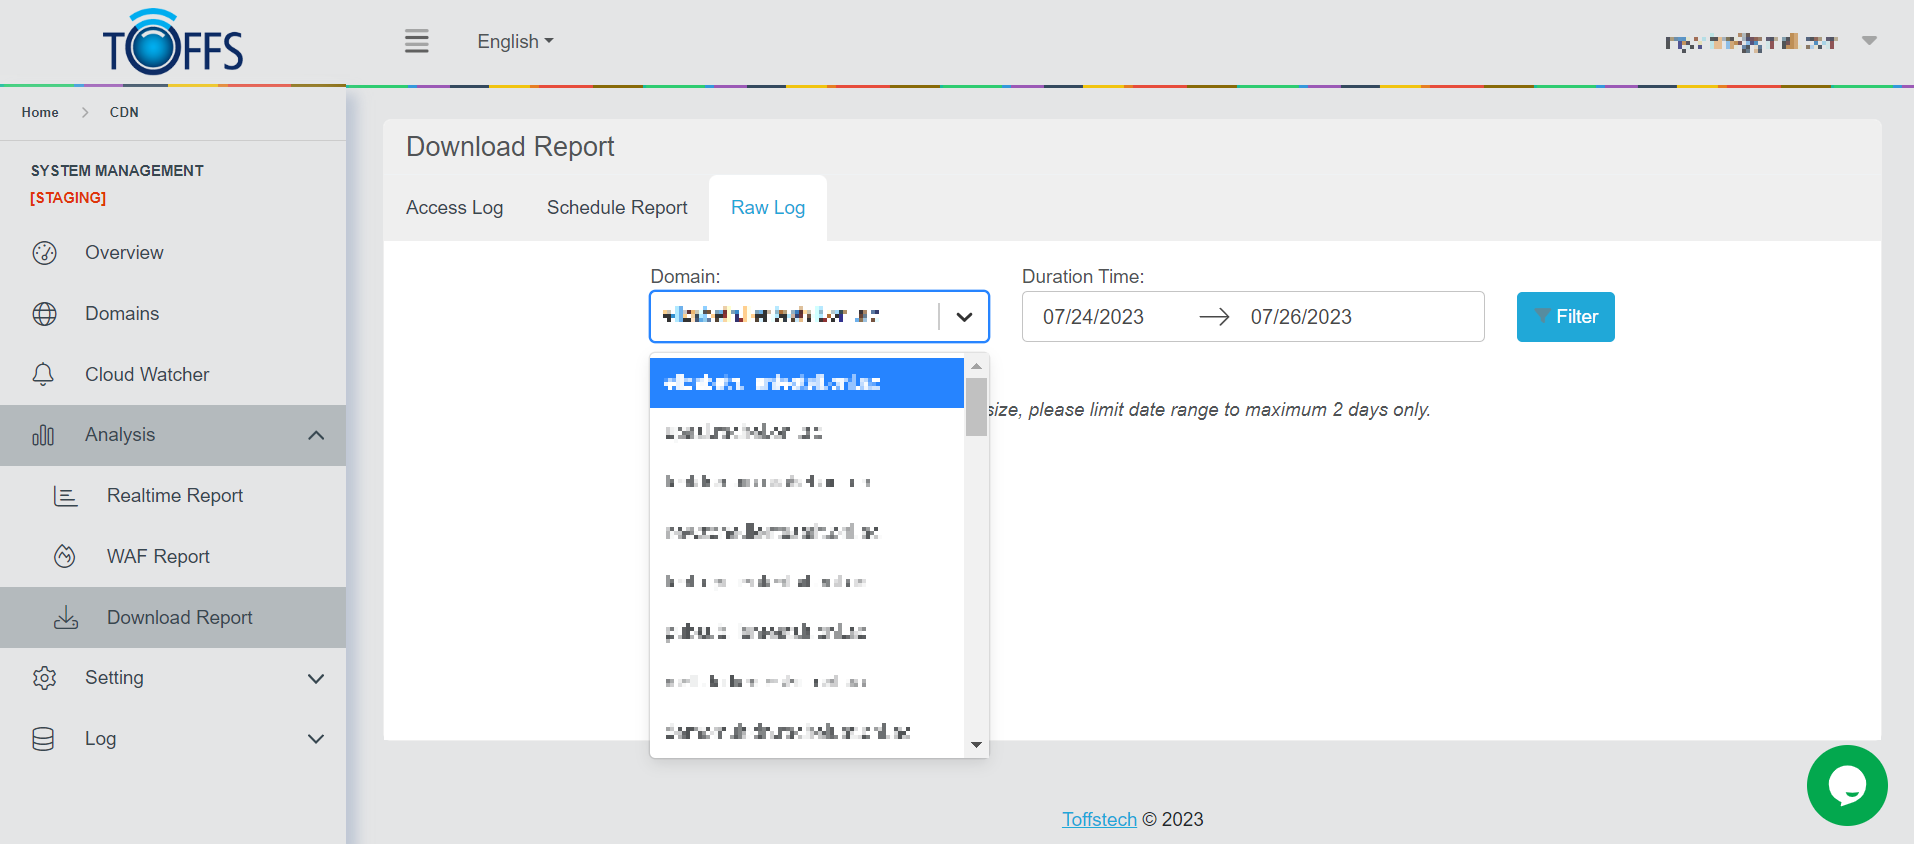
Figure 184
Step 2: Select Time
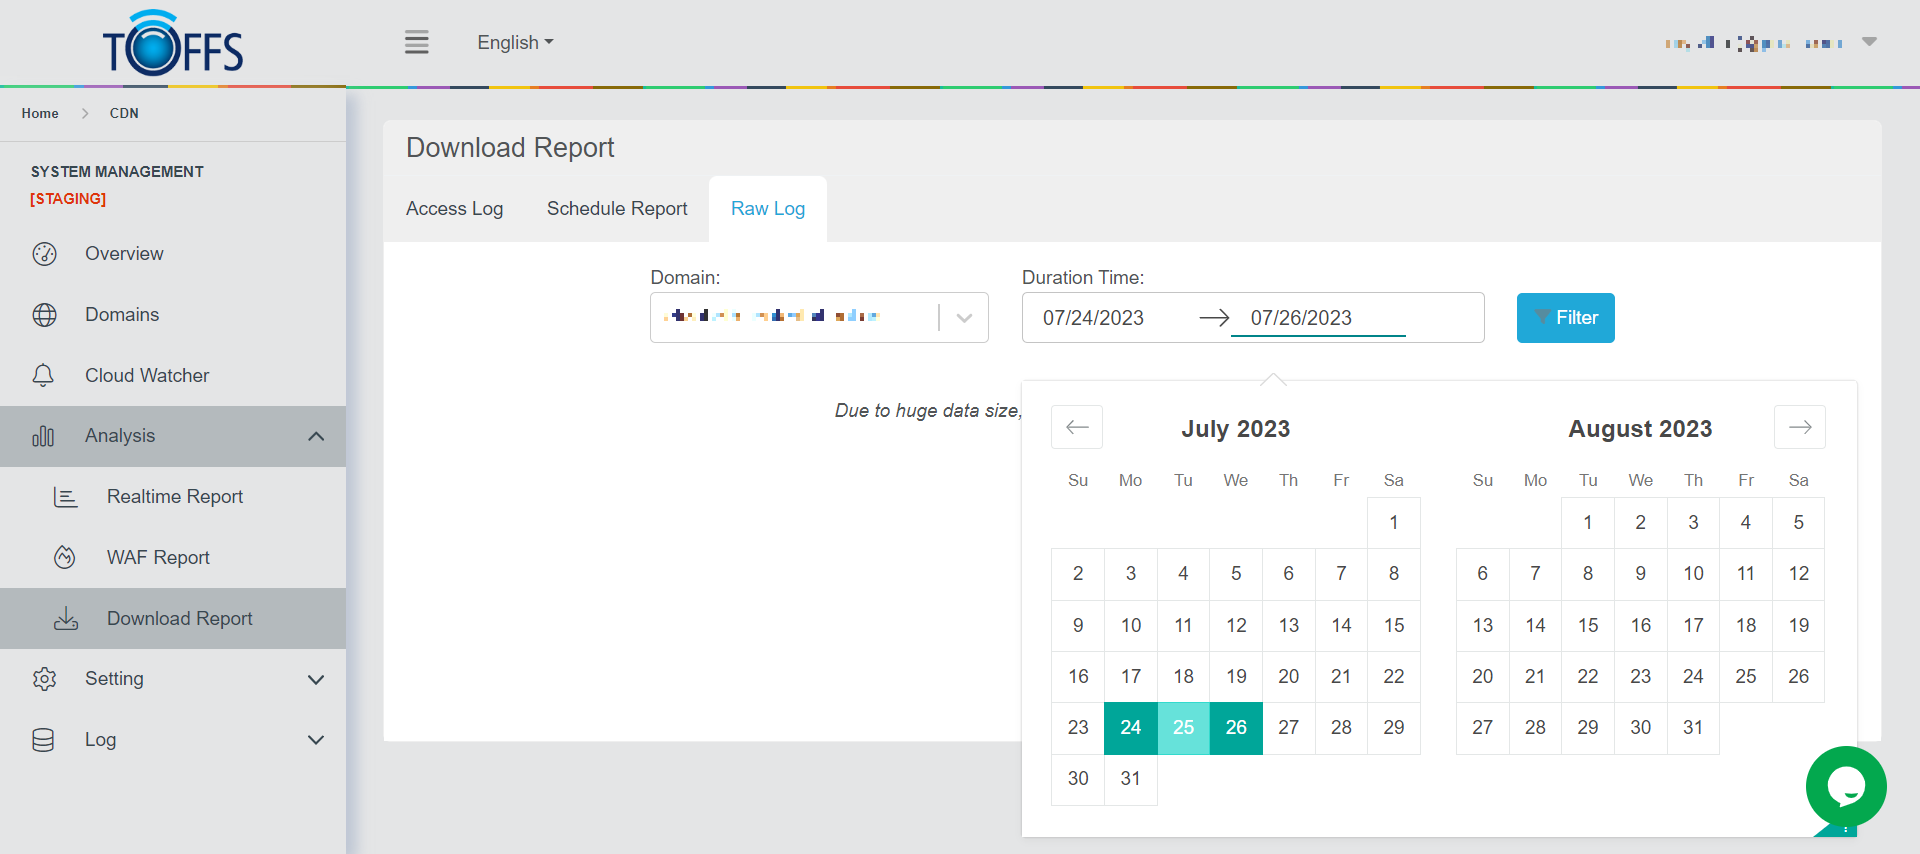
Figure 185
Step 3: Upon clicking the “Filter” button, a loading bar will appear with the following text “Please wait for the filter data log”.
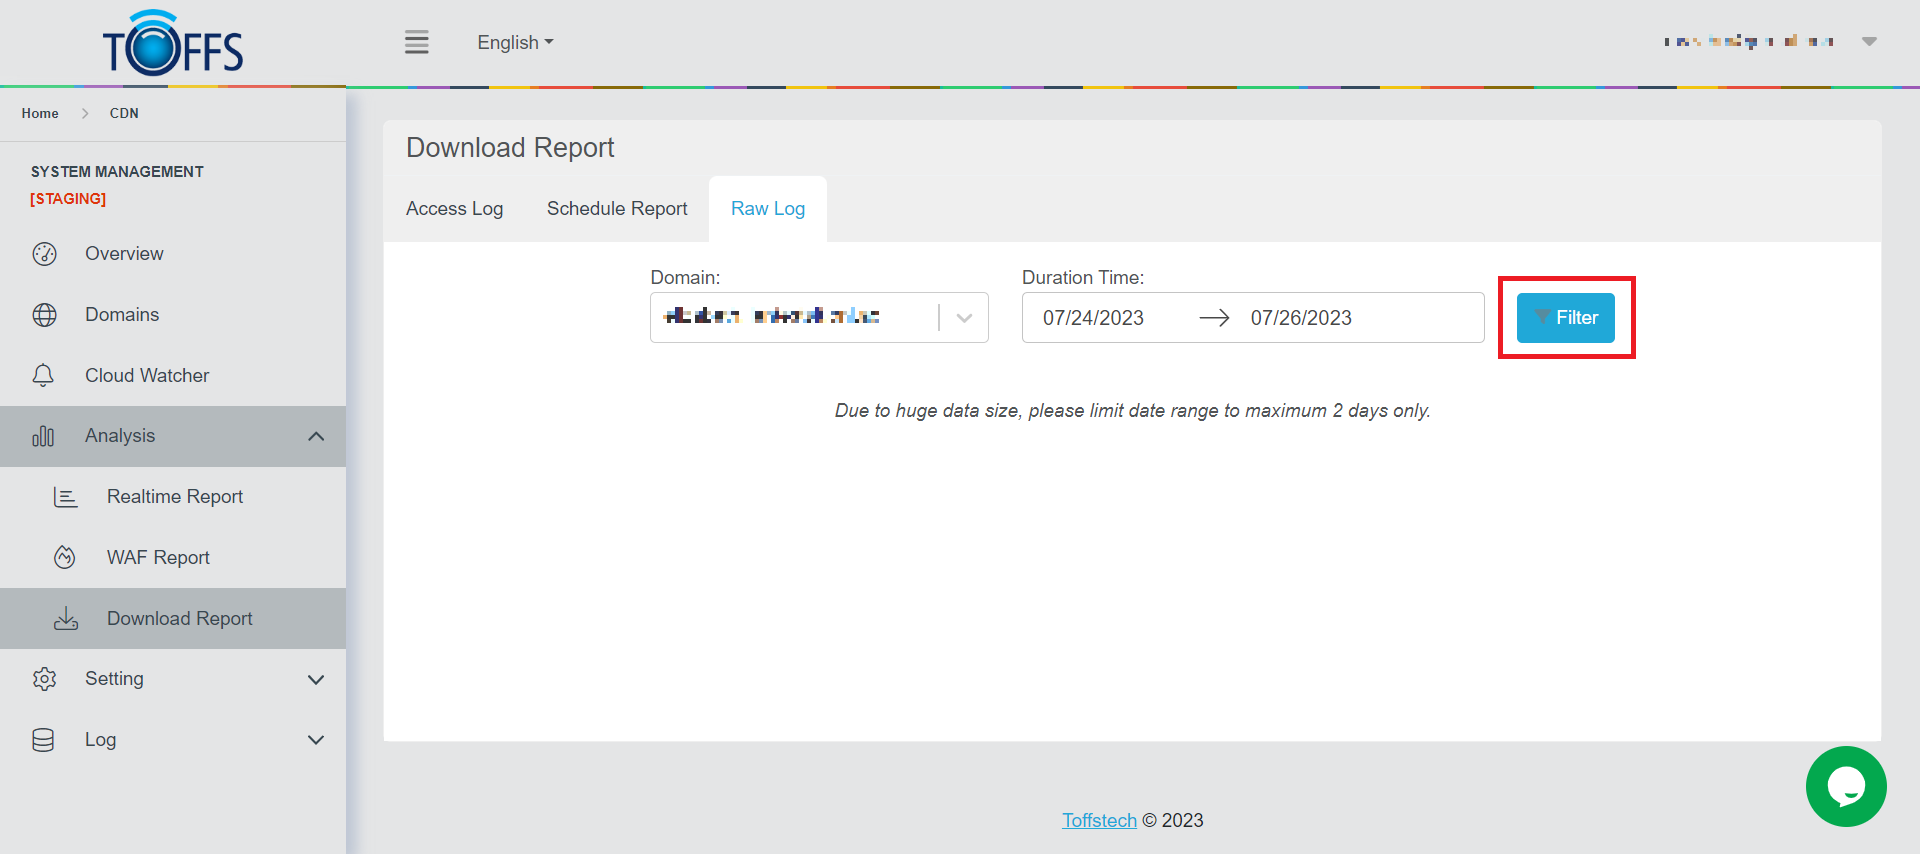
Figure 186
Step 4: A “Download” button will appear depending on the duration requested and the respective size of the file will determine the extraction time. Click the “Download” button
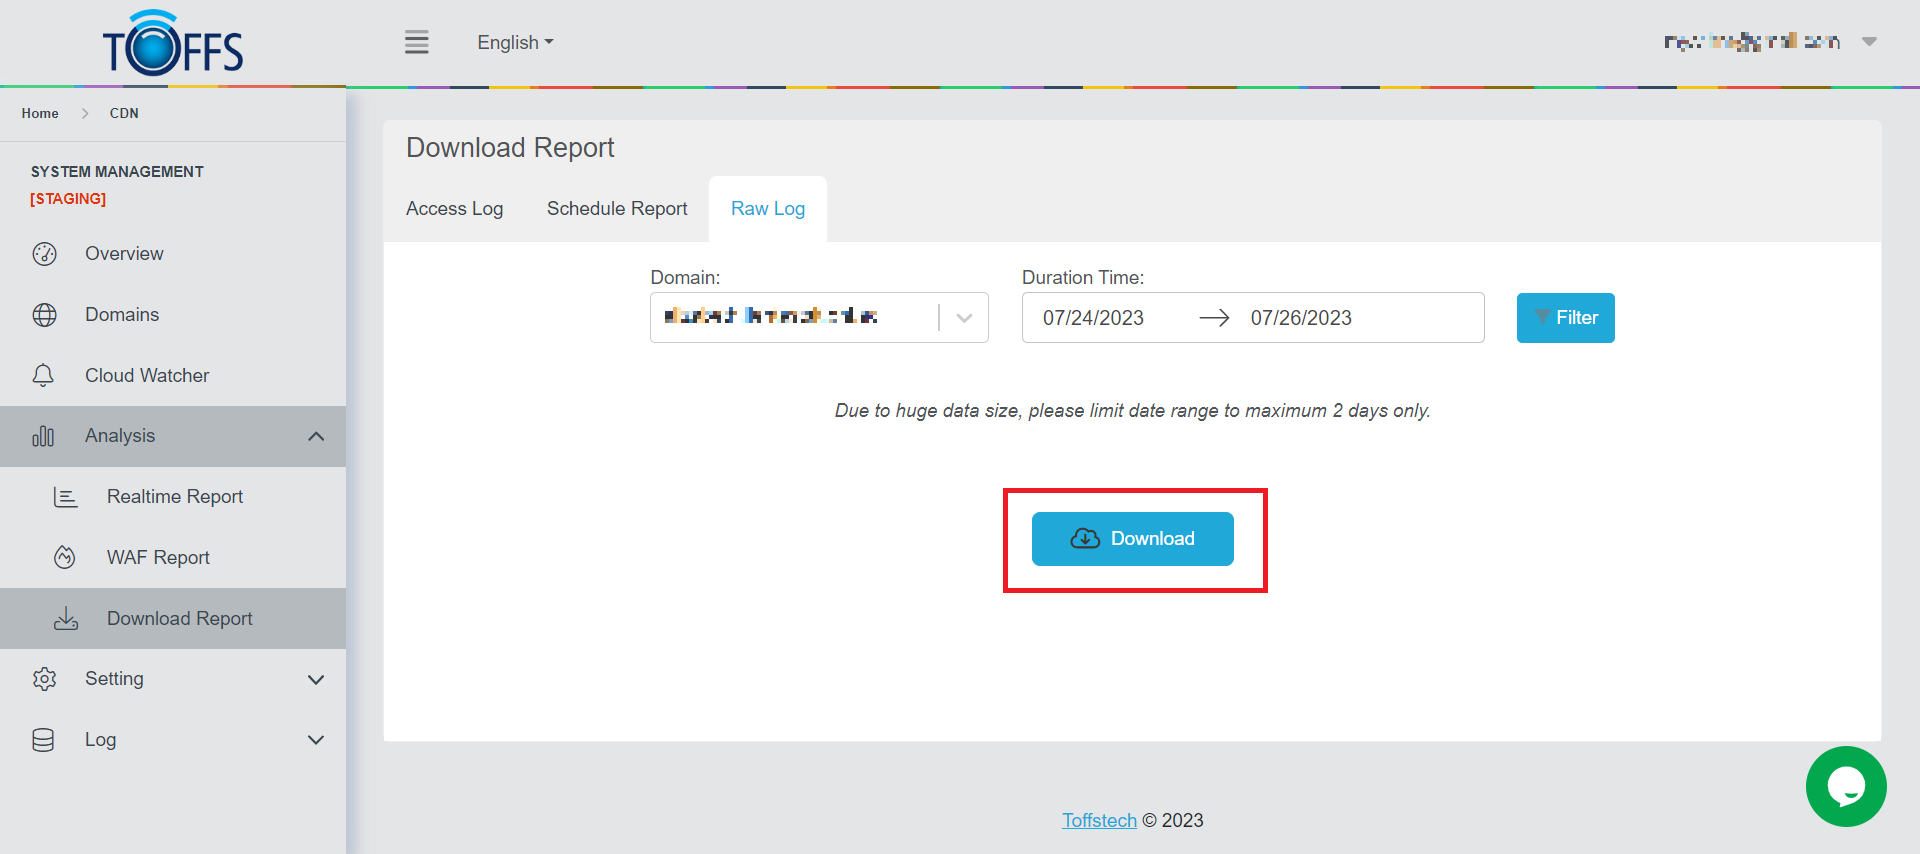
Figure 187
Upon clicking the “Download” button, an automated action to download the file - file type CSV will proceed.
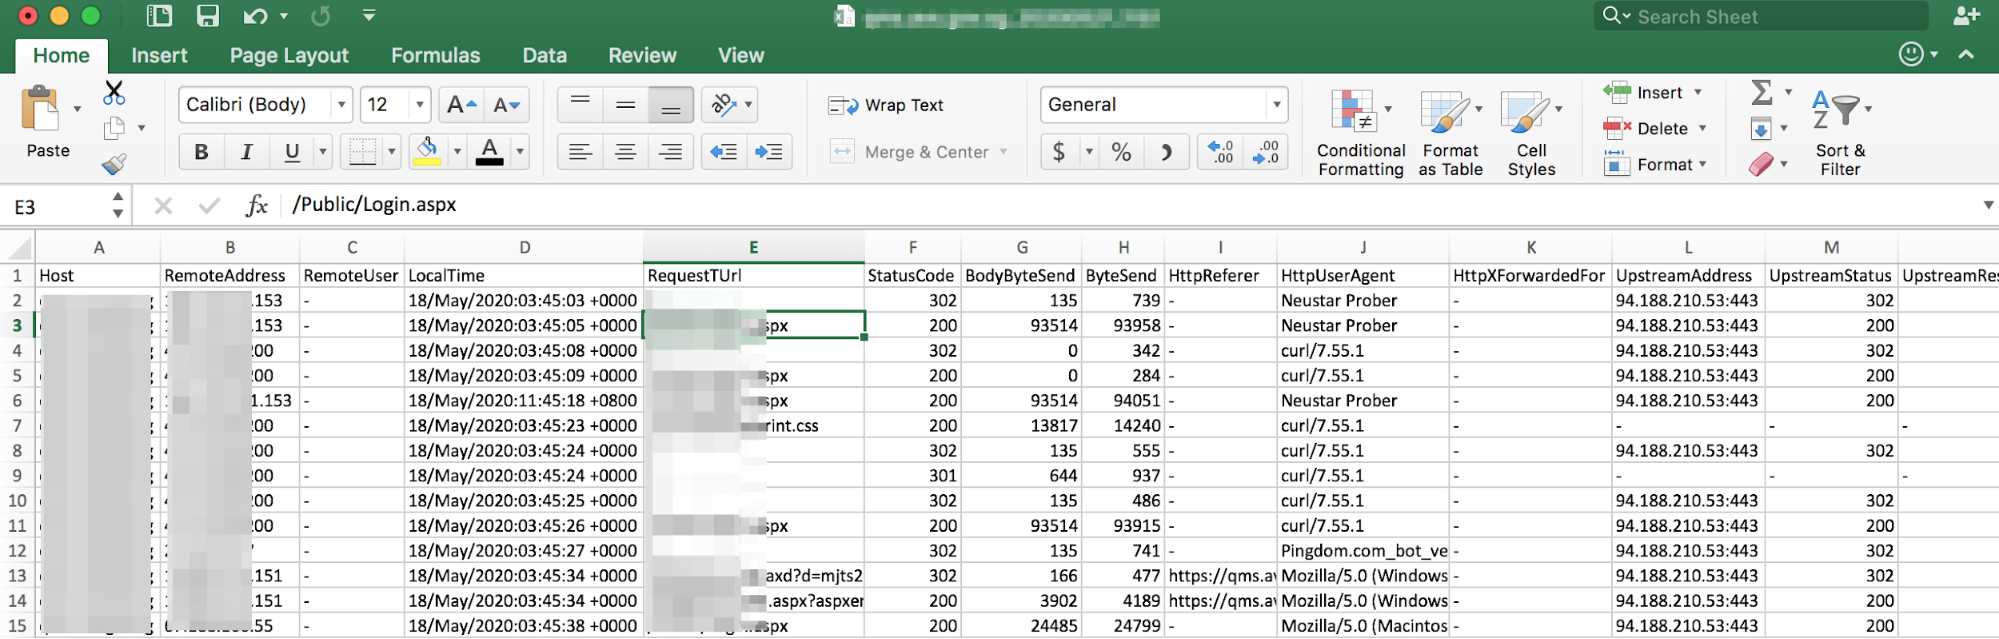
Figure 188
A sample downloaded “Raw Log” file will look like this
Please contact Toffs Security Operation Center for assistance if you encounter any issues.