Setting
Setting
The Setting function is an essential part of the CDN (Content Delivery Network) modules used by the TOFFS Technologies Support Team. This function provides configuration options for managing the Global WAF (Web Application Firewall) Rule, Binding IP, Server, and Zone settings. By properly utilizing the Setting function, the support team can enhance the performance, security, and efficiency of the CDN services offered to clients.
Global WAF Rules are a critical part of web security. They protect your web applications from various threats, such as SQL injection, cross-site scripting (XSS), and other common attack vectors. Within the “Setting” function, you can define and manage Global WAF Rules to customize security policies for your CDN-enabled websites.
Binding IP is a crucial aspect of CDN management, especially when you want to restrict access to your CDN services from specific IP addresses or IP ranges. The “Setting” function allows you to configure IP binding to enhance security and control access to your content.
The “Setting” function also provides options to manage Server within the CDN infrastructure. Here, you can add or remove servers (Master or Slave), modify server settings, and ensure that your CDN is optimally utilizing server resources for content delivery.
Zone define the geographical regions where your CDN delivers content. Properly configuring zones ensures that your content is cached closer to end-users, reducing latency and enhancing website performance.
Global WAF Rule
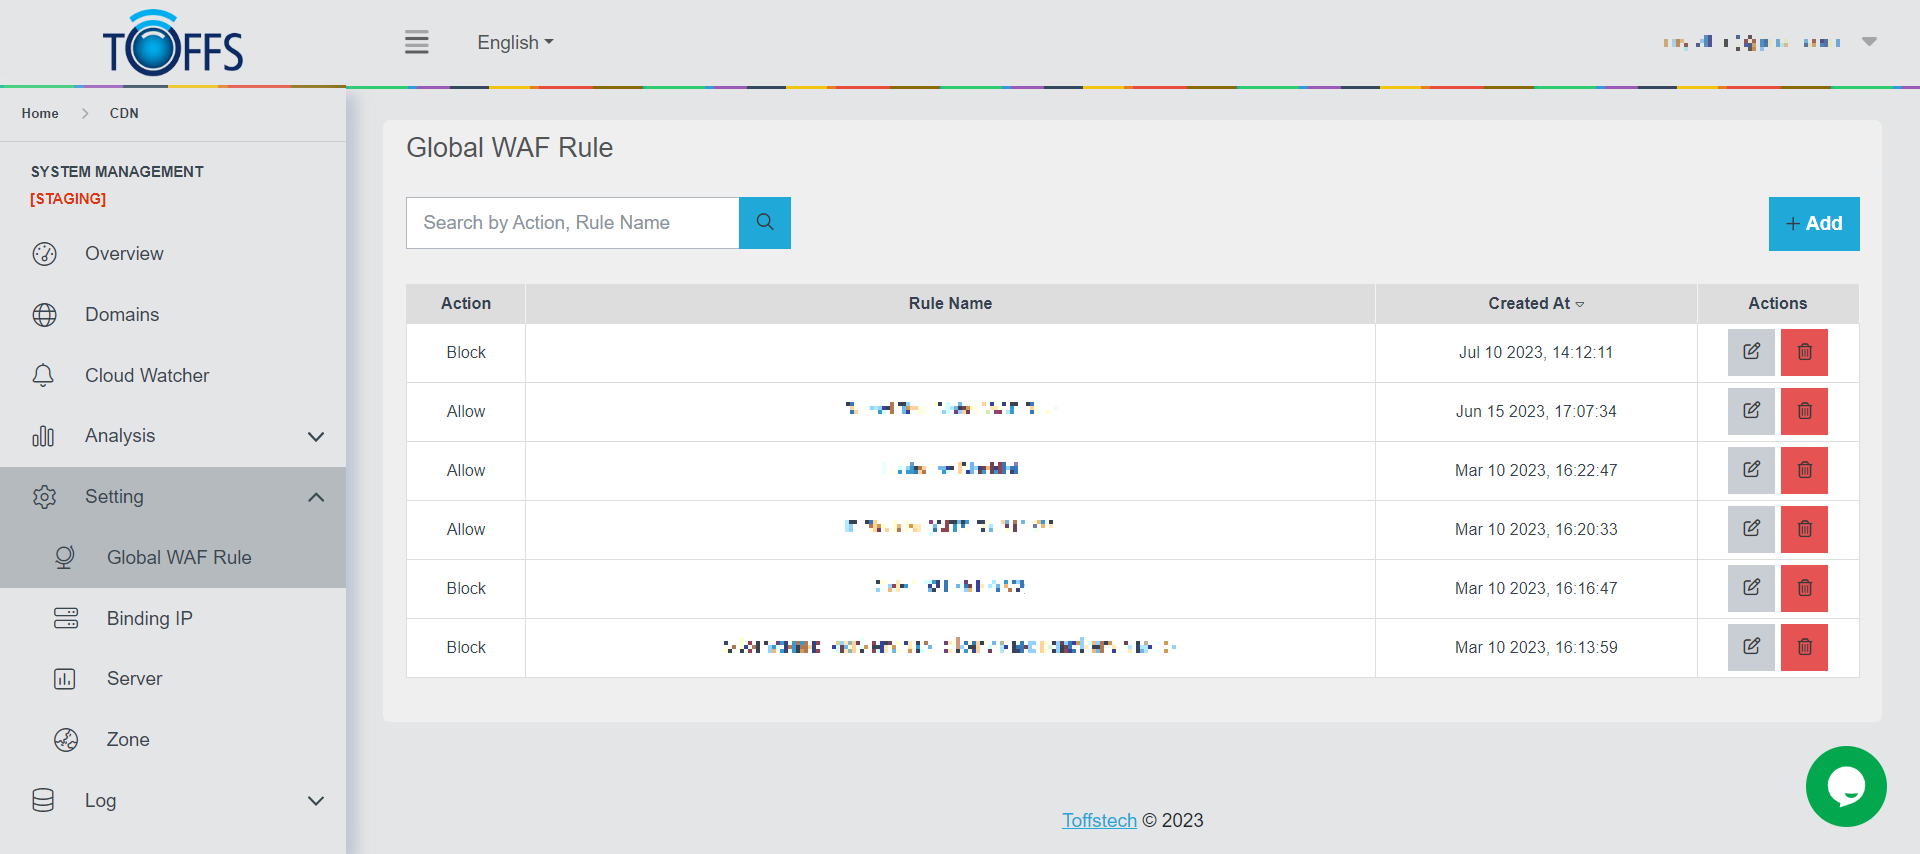
Figure 189
This is the “Global WAF Rule” page used for Toffs Technologies Support Team.
This page serves as a platform for the Toffs Technologies Support Team to create Global rules that are evaluated for every request passing through the WAF. These rules hold a higher priority compared to the rest of the rules present in the managed rule sets. Each Global WAF Rule consists of a rule name, rule priority, and an array of matching conditions.
The “Search” function facilitates the supporter in locating the implemented Global WAF rules more efficiently.
Furthermore, the “+Add” function empowers the supporter to include Global WAF rules to safeguard the domains of all customers.
Here’s how the Global WAF Rule flow works:
Adding a new rule:
- In the Global section, the rule will be added to the Global WAF Rule page, with its default status set to OFF.
- In the Local section, the same rule will also be added to the Custom WAF Rules page, with its default status set to OFF and Global Type.
Removing an existing rule:
- In the Global section, the rule will be removed from the Global WAF Rule page.
- In the Local section, the rule will also be removed from the Custom WAF Rules page.
To utilize the Global WAF Rule effectively:
-
The supporter can enable or disable this rule on both the Global WAF Rule page and the Custom WAF Rules page for each customer’s domain.
-
On the other hand, customers can only enable or disable this rule on their respective Custom WAF Rules page for their domains.
It is essential to note that the system enforces WAF rules based on priority levels: Global WAF Rule takes precedence over Custom WAF Rule, which in turn takes precedence over Basic WAF Rule. This hierarchy ensures effective rule management and security for the Toffs Technologies Support Team and their customers.
Binding IP
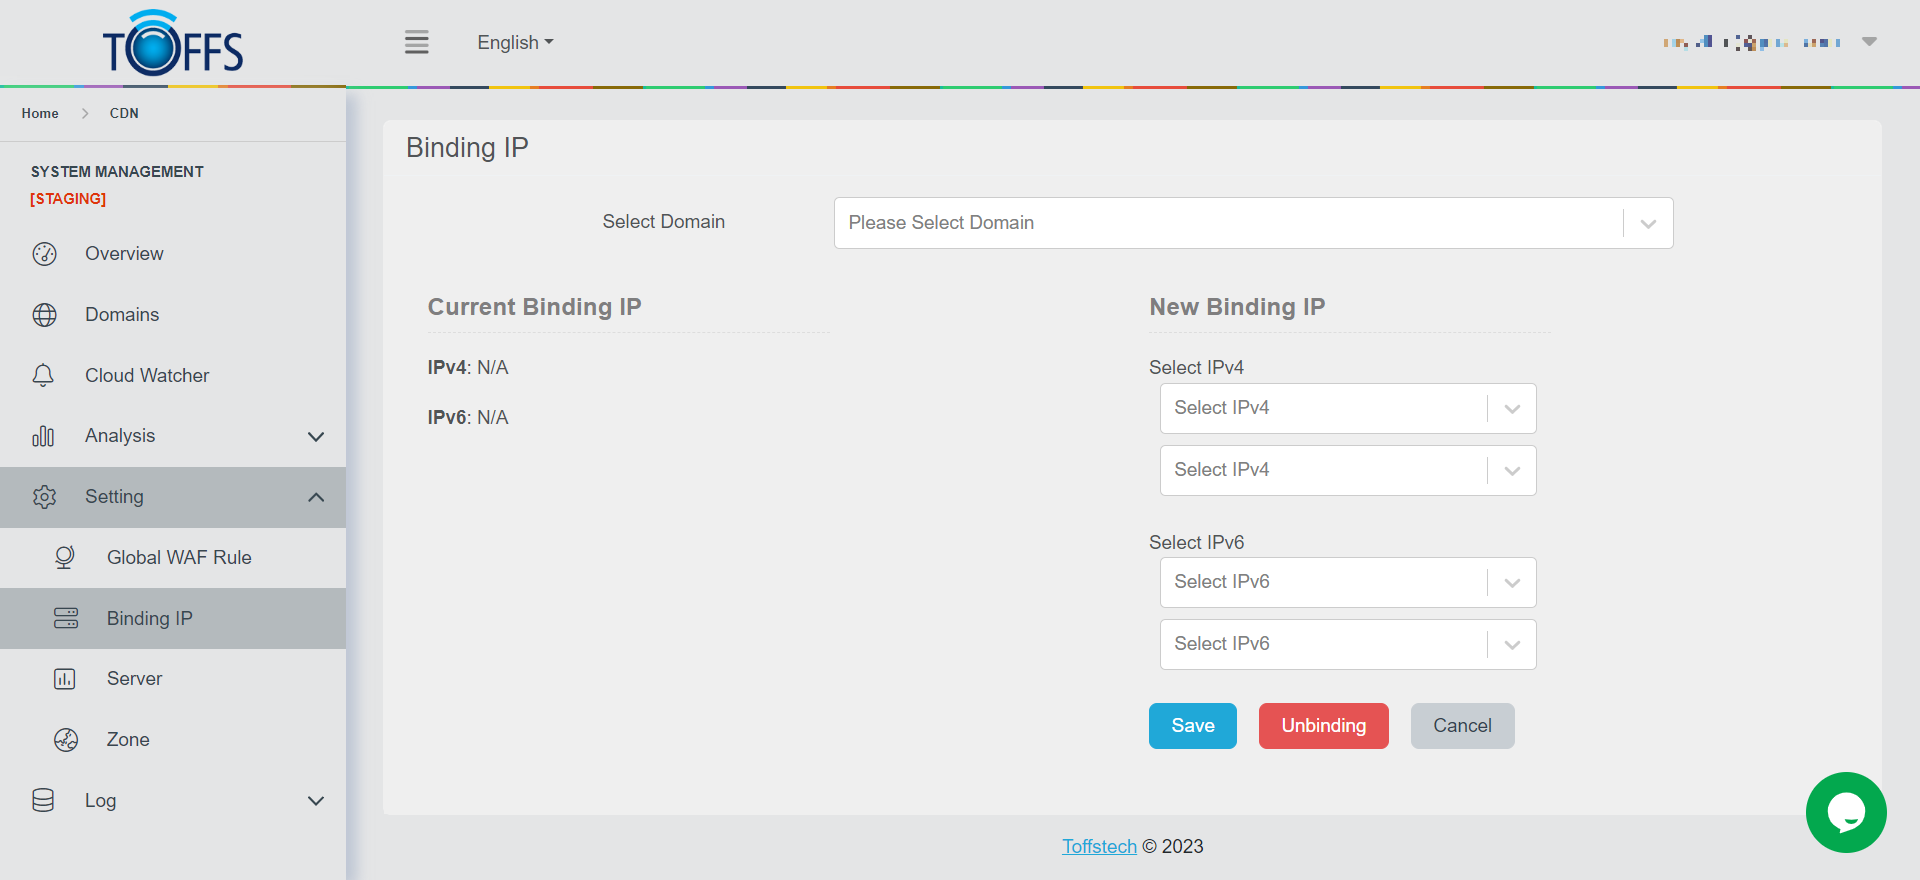
Figure 190
This page is mainly used for Toffs Technologies Support Team. This page serves as a dedicated platform for our support team to efficiently manage and update customers’ websites’ IP addresses. Here, you’ll find all the necessary tools and features to enable seamless editing and changing of IP addresses for our valued clients’ websites.
Server
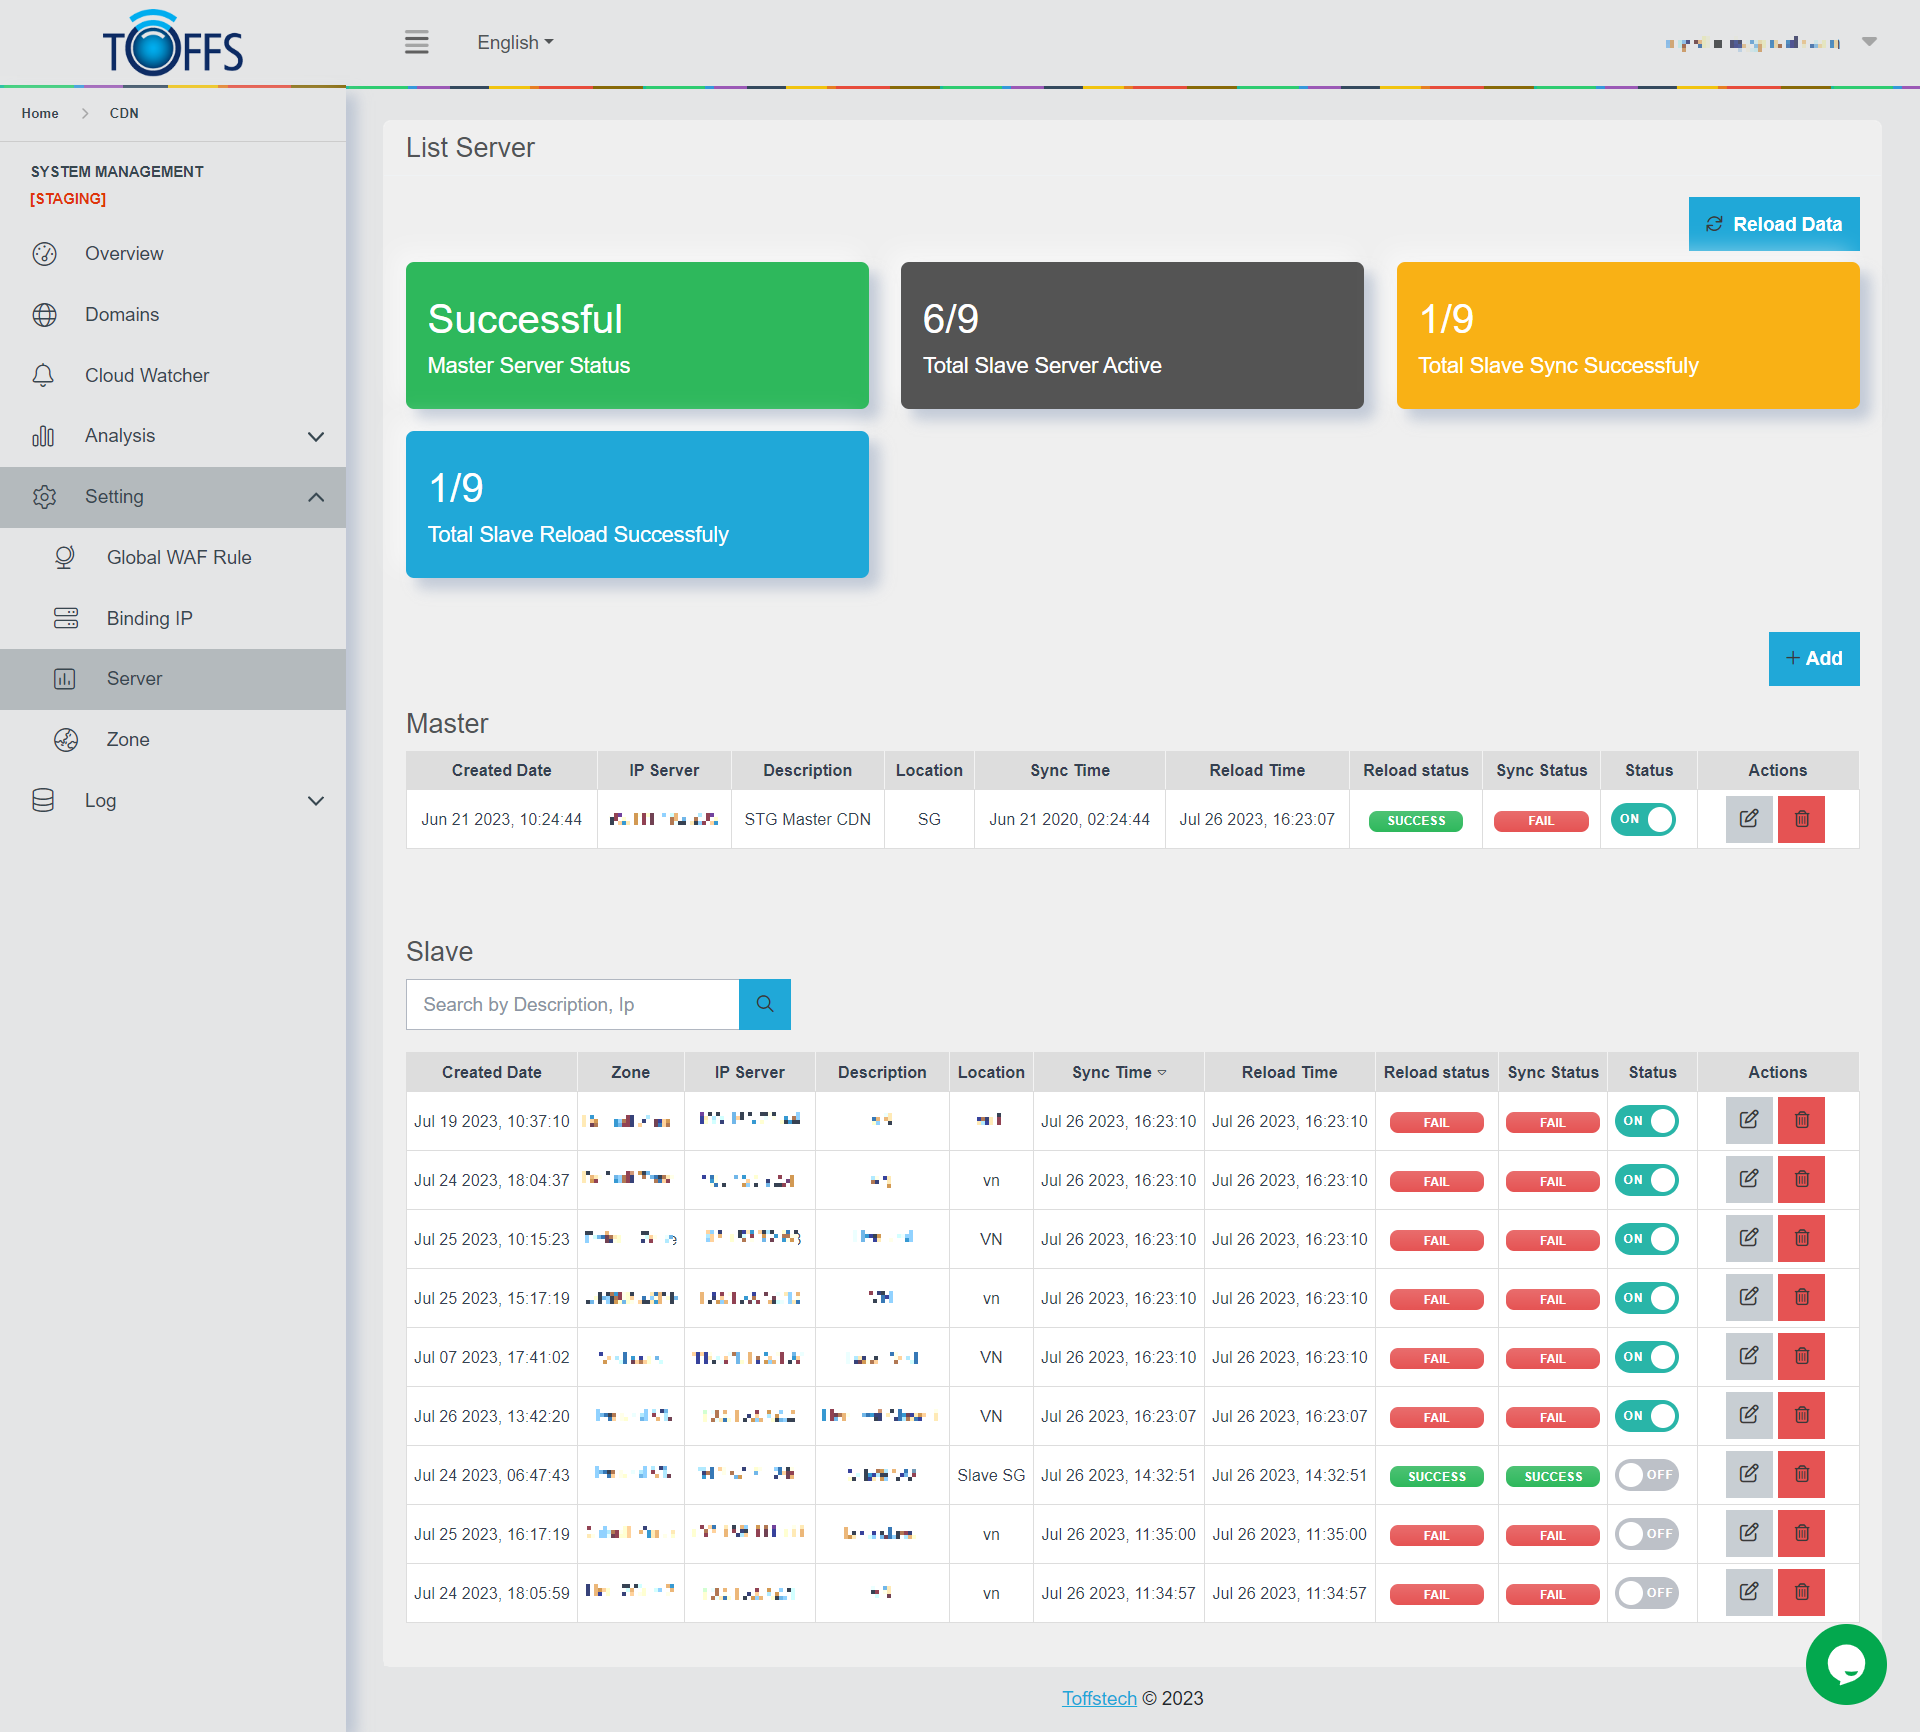
Figure 191
This is “Server” page used for Toffs Technologies Support Team. This platform serves as a comprehensive tool to efficiently manage our servers and monitor the status of Nginx across our infrastructure. With this page, we can effortlessly oversee the critical aspects of our servers and ensure smooth operations for our valued clients.
Zone
The Zone feature within TOFFS Technologies’ CDN Service provides the capability to move domain configurations from the Default-Zone to specific Sub-Zones. The Default-Zone acts as a central repository for configurations, while Sub-Zones store configurations for selected domains. This hierarchical organization enables more granular control over configuration management and improved performance.
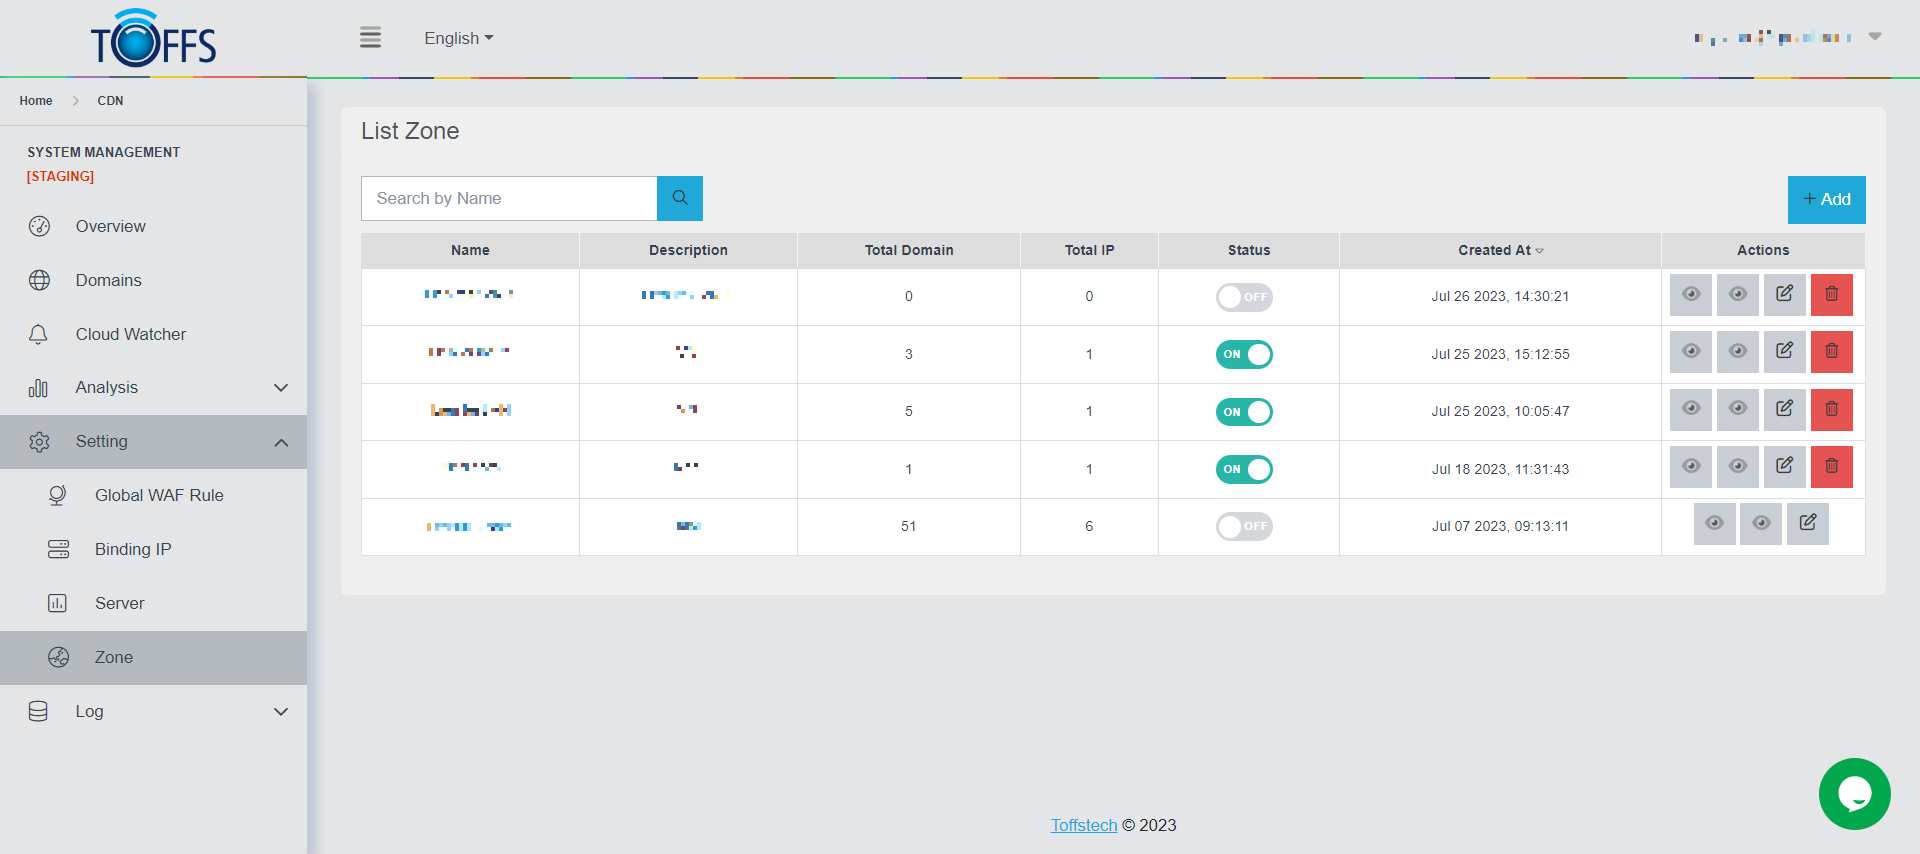
Understanding Zones
In the context of TOFFS Technologies’ CDN Service, a zone refers to a designated area where configurations for domains are stored. The Default-Zone contains configurations for all domains, while Sub-Zones store configurations for specific domains. This separation allows for optimized resource allocation and faster loading times.
Relationship with the Server Feature
The Zone feature is closely related to the Server feature, which includes essential information about server setup. This information includes:
-
Master Server’s IP: The primary server responsible for managing the configuration and content delivery.
-
Slave Servers’ IP: Secondary servers that assist in content delivery, along with their reload time and reload status.
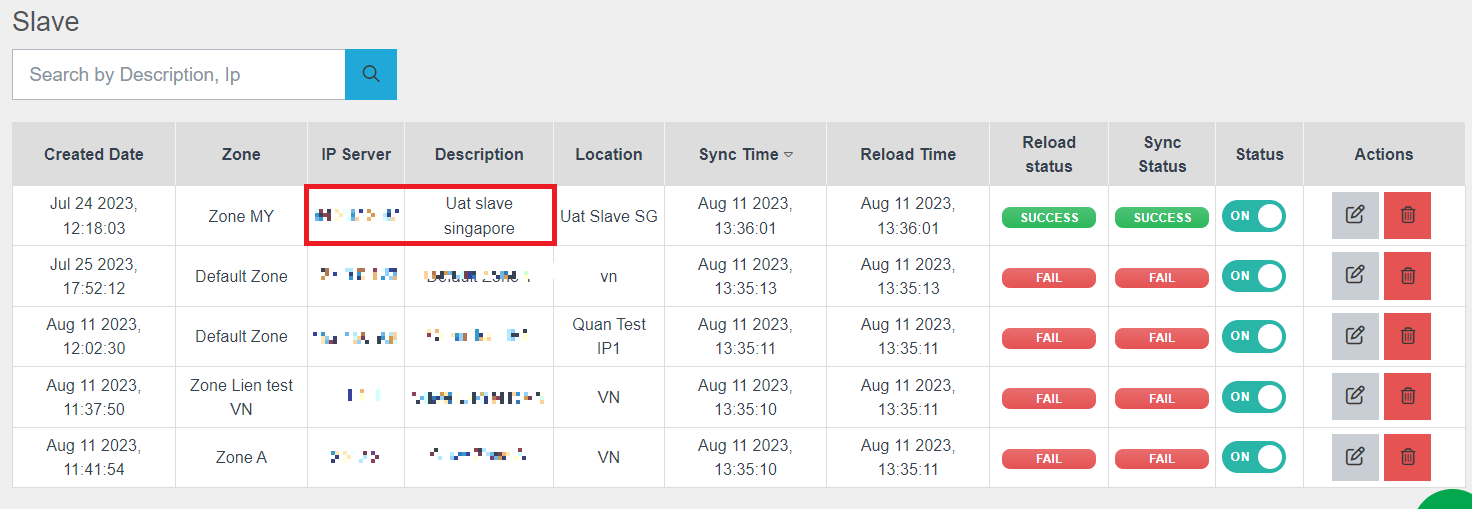
Adding Zones and Slave Server IPs
When adding a new Zone, the Slave Servers’ IPs associated with the respective Sub-Zone will also be displayed. This integration streamlines the process of configuring zones and related server IPs, ensuring efficient content delivery and resource allocation.
Benefits of Using the Zone Feature
-
Enhanced Performance: By distributing configurations across different zones, content delivery can be optimized, resulting in faster loading times for end-users.
-
Efficient Resource Allocation: Configuration management becomes more efficient, allowing resources to be allocated appropriately based on specific domains’ requirements.
-
Seamless Maintenance: Naming Slave Server IPs to match Sub-Zone names simplifies maintenance and management tasks, improving overall system manageability.
Important Considerations
-
IP Assignment: Each Default-Zone and Sub-Zone is assigned to a specific IP address. Care must be taken when moving IPs between zones and assigning IPs to new zones.
-
Avoid Duplicate IPs: It is crucial not to assign an IP that is already being used within the Default-Zone to a new Sub-Zone to prevent conflicts and configuration issues.
To add a new Zone
Step 1: Click on the ”+ Add” button. This will open the Zone creation interface.
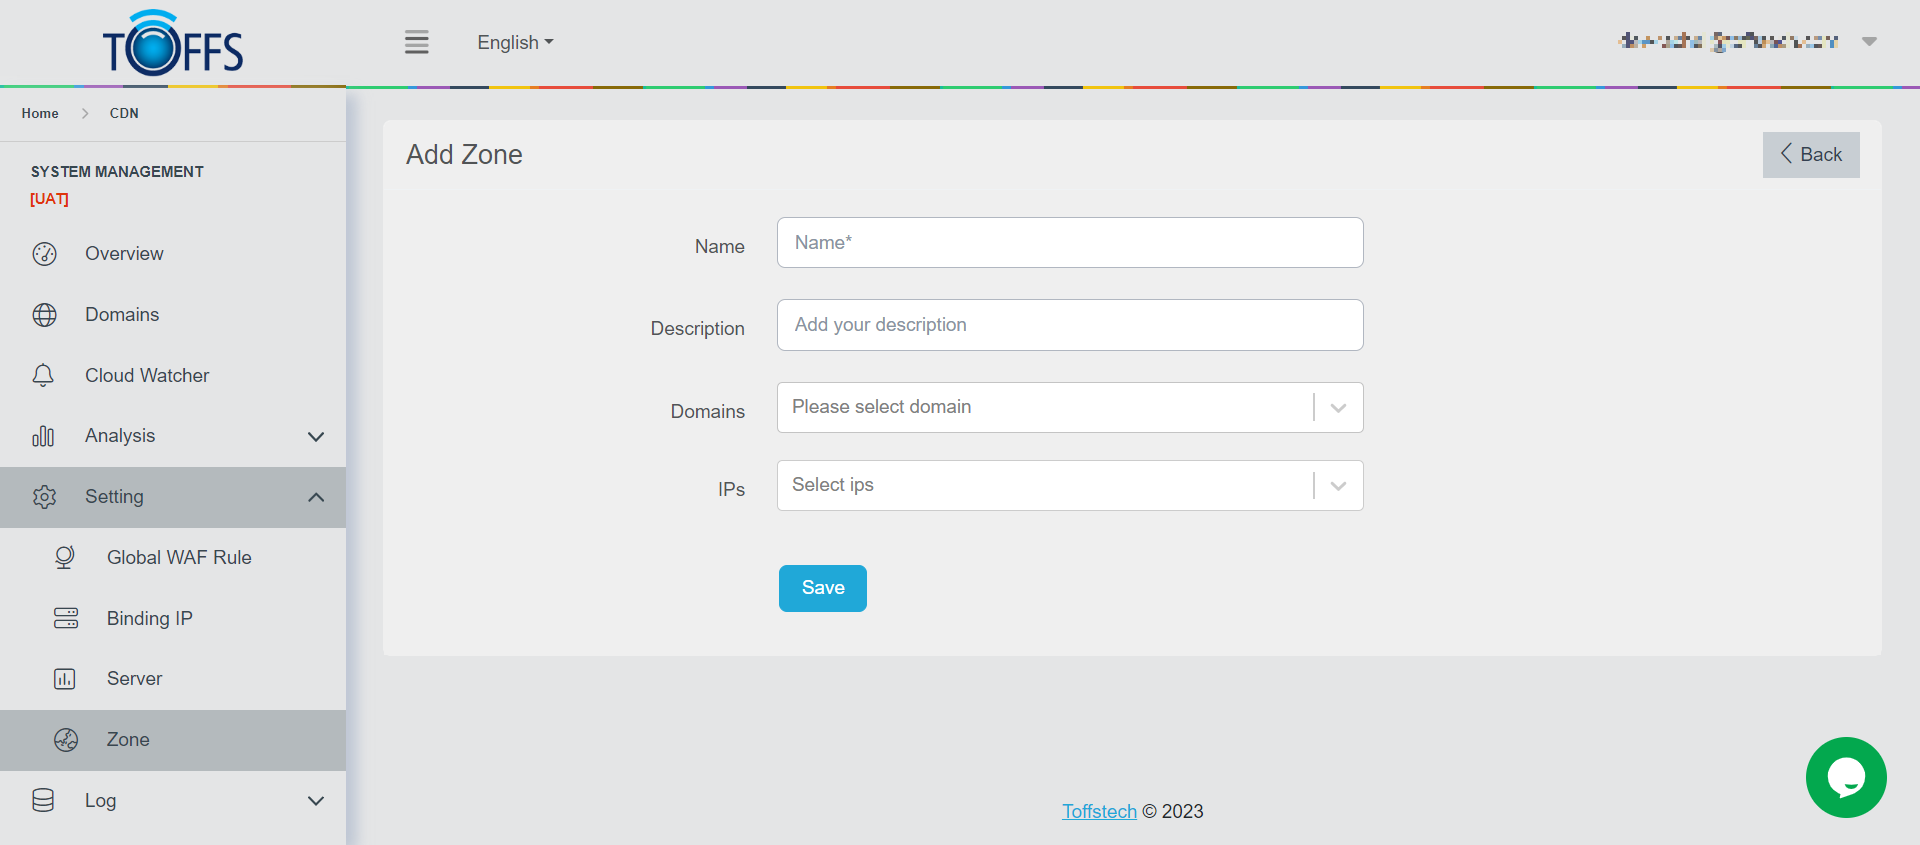
Step 2: Fill in Zone Details
In this section, you will provide essential information about the zone you want to create.
-
Name: Enter a unique and descriptive name for the zone. This could be something like “HQ Zone,” “Branch Office A,” or any name that helps you identify the zone easily.
-
Description: Provide a brief description of the zone’s purpose, location, or any other relevant information. This will help team members understand the zone’s context.
-
Domains: Enter the domains associated with this zone. Domains could be your network domains, subdomains, or any relevant DNS information.
-
IP: Select a Slave’s IP.
Step 3: Review and Save
-
Double-check all the information you’ve entered in the fields to ensure accuracy.
-
If everything looks correct, locate and click the “Save” button to save the zone. This action will add the new zone to your network’s configuration.
Editing an Existing Zone
If you need to make changes to an existing zone:
Step 1: Navigate to the list of zones or the specific zone you want to edit.
Step 2: Locate the “Edit” icon option associated with the zone and click on it.
Step 3: Update the necessary fields (Name, Description, Domains, IP) with the new information.
Step 4: Once again, review the changes and click the “Save” button to apply the edits.
Deleting a Zone
Step 1: In the list of zones, find the zone you want to delete.
Step 2: Look for a “Delete” icon option associated with the zone and click on it.
Step 3: Confirm your decision when prompted. Please be cautious as this action cannot be undone.
You’ve successfully learned how to use the Zone feature as a member of the TOFFS Tech Support Team. This feature allows you to efficiently manage and organize critical information related to various zones within your network infrastructure. Remember to use this feature responsibly and only with the appropriate permissions.
Please contact Toffs Security Operation Center for assistance if you encounter any issues.