List Records
List Records
In this section, we’ll be exploring the functionality of the “List Records” page, which displays the subdomains of a domain and their respective modes. Let’s dive in!
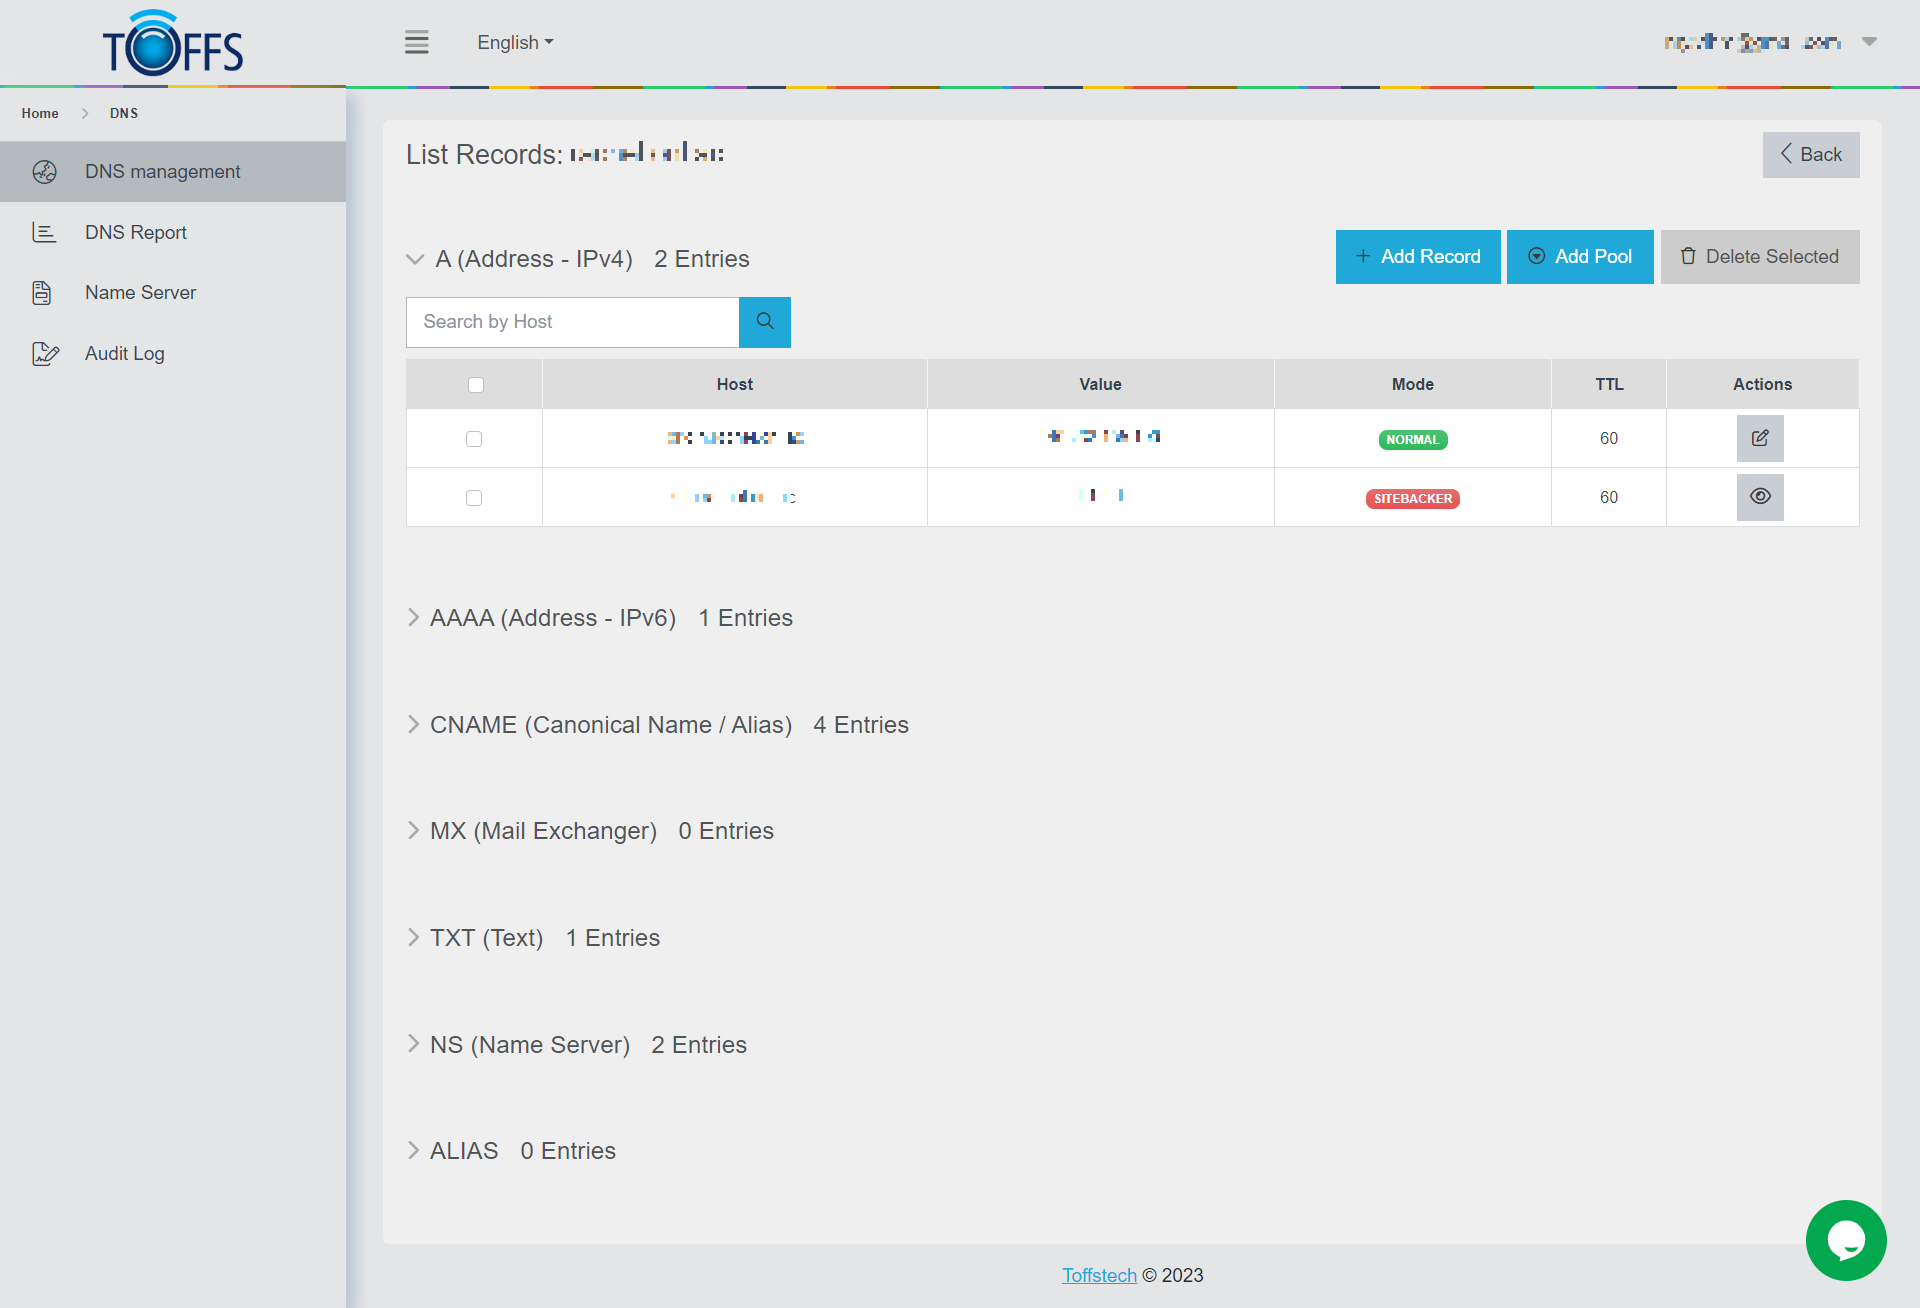
Figure 219
Displaying Subdomains and Modes: On the “List Records” page, you can view the subdomains of a domain along with their associated modes. This provides a comprehensive overview of the records related to the domain.
Adding New Records: To add a new record, you can simply use the ”+ Add Record” function. Clicking on this function will open a form where you can input the necessary details for the new record. Once you’ve filled out the required information, you can save the record, and it will be added to the list.
Editing Existing Records: If you need to modify the value of an existing record, you can easily do so using the “Edit” button. Locate the record you want to update, click on the “Edit” button, and a dialog or form will appear, allowing you to make the necessary changes. Remember to save your modifications once you’re done.
Removing Records: In case you no longer need a specific record, the “Delete Record” button comes to your rescue. Simply select the record you wish to remove and click on the “Delete Record” button. A confirmation prompt may appear, ensuring you want to proceed with the deletion. Once confirmed, the record will be permanently removed from the list.
With these simple functions, you can efficiently manage the records on the “List Records” page, making it easier to organize and update the subdomains and their respective modes within the domain. Happy record managing!
Normal
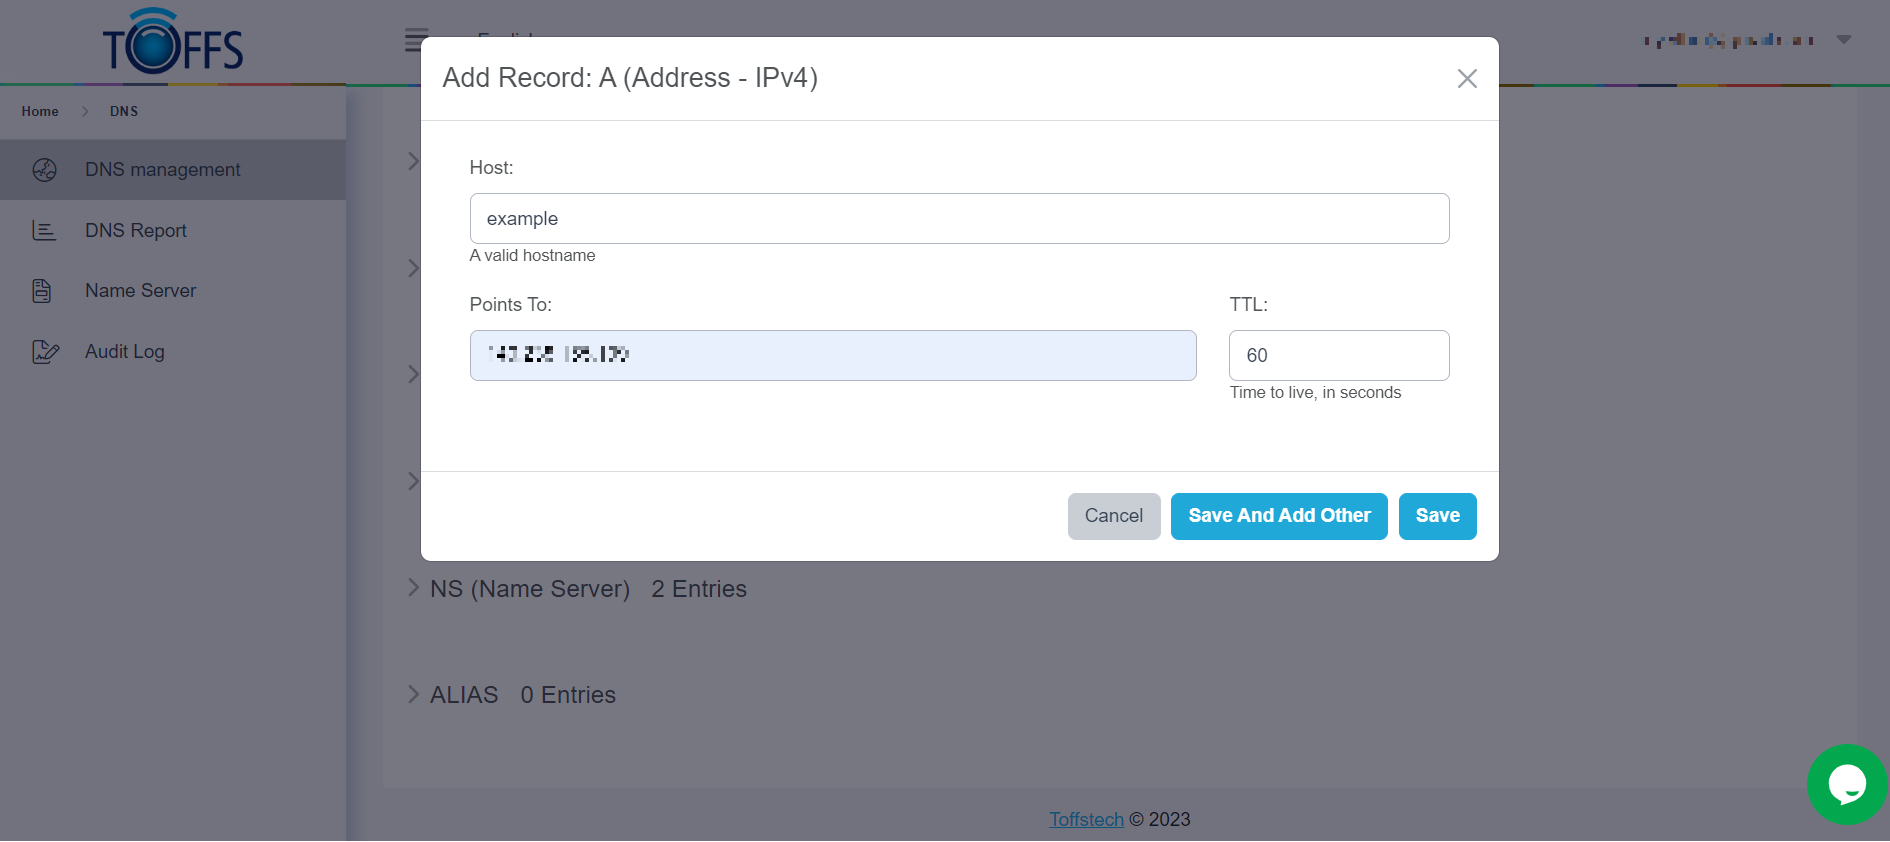
Figure 221
- A Records: A records (Address records) are fundamental DNS records that map a domain name to an IPv4 address. They are used to point your domain to a specific server or hosting provider’s IP address. A single domain can have multiple A records, pointing to different IP addresses for load balancing or redundancy.
Example A Record: example.com IN A 192.168.1.100
- AAAA Records: Similar to A records, AAAA records (IPv6 Address records) map a domain name to an IPv6 address. These records are used to support IPv6 connections, which are becoming increasingly important as IPv4 addresses become scarce.
Example AAAA Record: example.com IN AAAA 2001:0db8:85a3:0000:0000:8a2e:0370:7334
- CNAME Records: CNAME records (Canonical Name records) are used to create an alias for a domain or subdomain. Instead of pointing directly to an IP address, a CNAME points to another domain name, which, in turn, resolves to the desired IP address. This is useful when you want multiple domain names to resolve to the same destination.
Example CNAME Record: www IN CNAME example.com
- MX Records: MX records (Mail Exchange records) specify the mail servers responsible for receiving email messages destined for a domain. When someone sends an email to your domain, the MX record directs the email to the appropriate mail server.
Example MX Record: example.com IN MX 10 mail.example.com
- TXT Records: TXT records (Text records) allow domain administrators to store arbitrary text data associated with a domain. They are commonly used for adding SPF (Sender Policy Framework) records to prevent email spoofing and for domain verification for various services like Google Workspace.
Example TXT Record (SPF): example.com IN TXT “v=spf1 mx -all”
- NS Records: NS records (Name Server records) specify the authoritative name servers for a domain. These name servers hold the DNS records for the domain and are responsible for resolving queries related to that domain.
Example NS Record: example.com IN NS ns1.example.com
- ALIAS Records: ALIAS records are a special type of DNS record used to create a DNS record at the root (apex) of a domain that acts like a CNAME record but with the benefits of an A record. ALIAS records are often used to point a domain to a third-party service provider (like a content delivery network) without sacrificing the root domain’s performance.
Example ALIAS Record: example.com IN ALIAS some-cdn-provider.com
PD Pool
PD Pool stands for Resource Distribution Pool. PD Pool is a fantastic tool used for grouping type A (IPv4 address) or type AAAA (IPv6 address) records, allowing you to control how these records respond to queries.
In essence, PD Pool empowers you to customize how your records handle incoming queries, making it an essential resource for efficient address management. So, let’s get started and explore how to leverage the power of PD Pool!
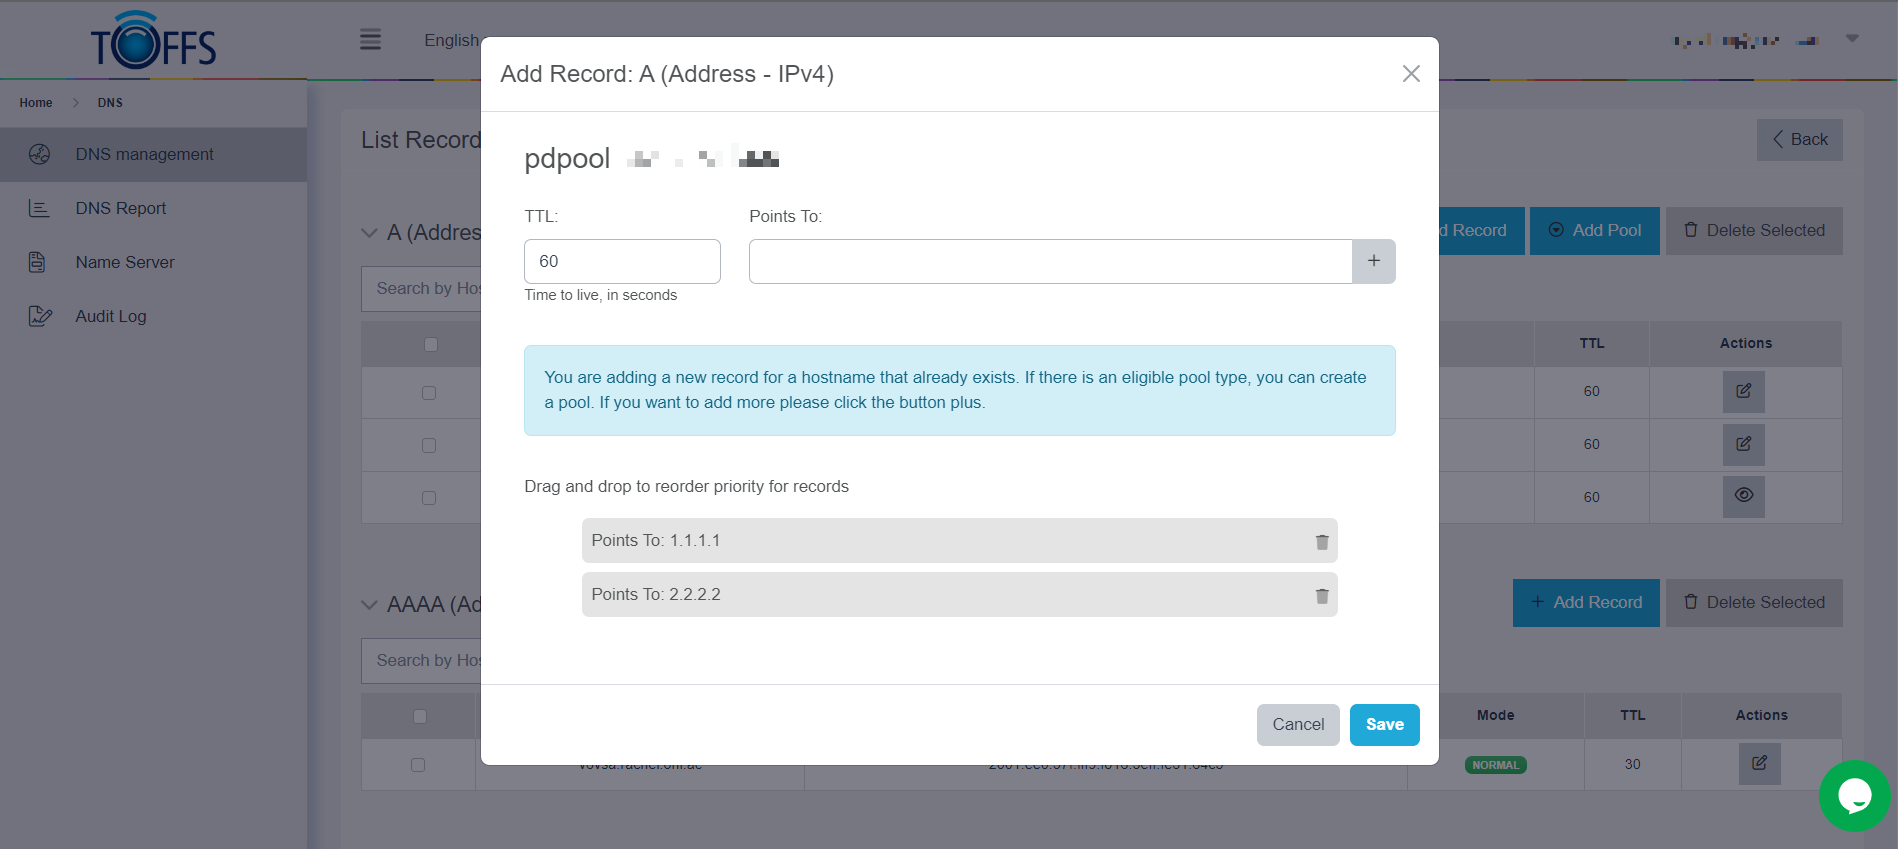
Figure 222
Directional (DIR)
What is Directional DNS?
Directional DNS provides origin-based routing, allowing you to optimize the flow of various DNS requests based on the location or source IP address of the site visitor. By employing Directional DNS, you can direct traffic to different servers, data centers, or content and service providers. This not only speeds up responses but also optimizes resource utilization and enables the delivery of custom content.
How does Directional DNS work?
Directional DNS identifies the geographical location of a site visitor or the origin of their IP address, or both, and allows you to provide a specific route to a particular resource. To illustrate, suppose you have a website with data centers in New York and Amsterdam. With Directional DNS, a website visitor from New York with a specified IP address will be directed to the New York data center, rather than the one located in Amsterdam. This optimization facilitates regional routing, enables the provision of region-specific applications or content, and grants control over access to local service providers.
Understanding the Configuration Rules:
- Directional DNS allows you to select either A types or CNAME types within the same pool.
- With A type, the pointed value must be an IP address.
- With CNAME, the pointed value must be a domain.
- The order of response to IP or Geo Country depends on Priority, allowing for prioritization of specific rules over others.
Directional Pool Record Types:
There are three types of records within a Directional pool:
- IP: Responses are based on a user’s IP address.
- Geo Country: Responses are based on a user’s country location.
- All Non Configure: Responses are based on a user’s IP address and country location that do not belong to the IPs and Geo Countries configured in the pool.
By leveraging Directional DNS, you can significantly enhance the performance and efficiency of your DNS routing, ensuring an optimal user experience tailored to specific regions and users. Now that you understand the basics of Directional DNS and its configuration, you can start optimizing your DNS infrastructure for better traffic management and content delivery.
Create a Directional Pool
In this section, we will guide you through the process of creating a directional pool for your domain. A directional pool allows you to point users from different locations or with specific IP addresses to different destinations.
Step 1: Access List Records Page Go to the List Records page on your domain management platform.
Step 2: Add a Directional Pool Select the “Add Pool” option.
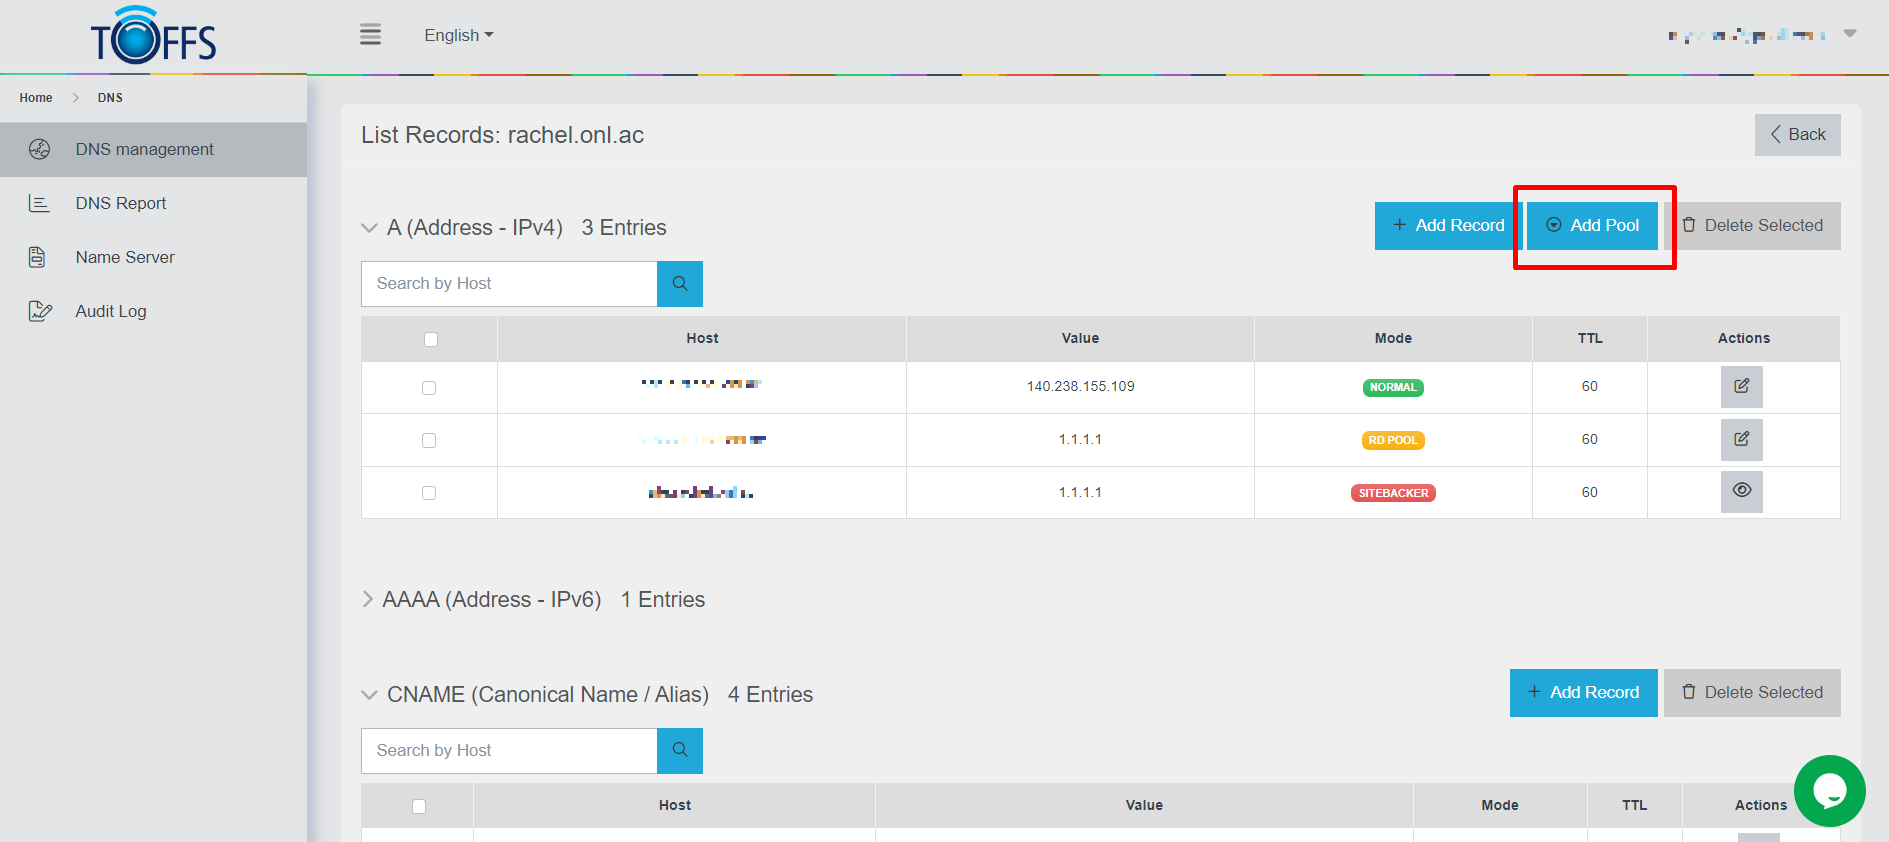
Figure 223
Step 3: Choose Directional (DIR) Type From the available pool types, choose “Directional (DIR)”.
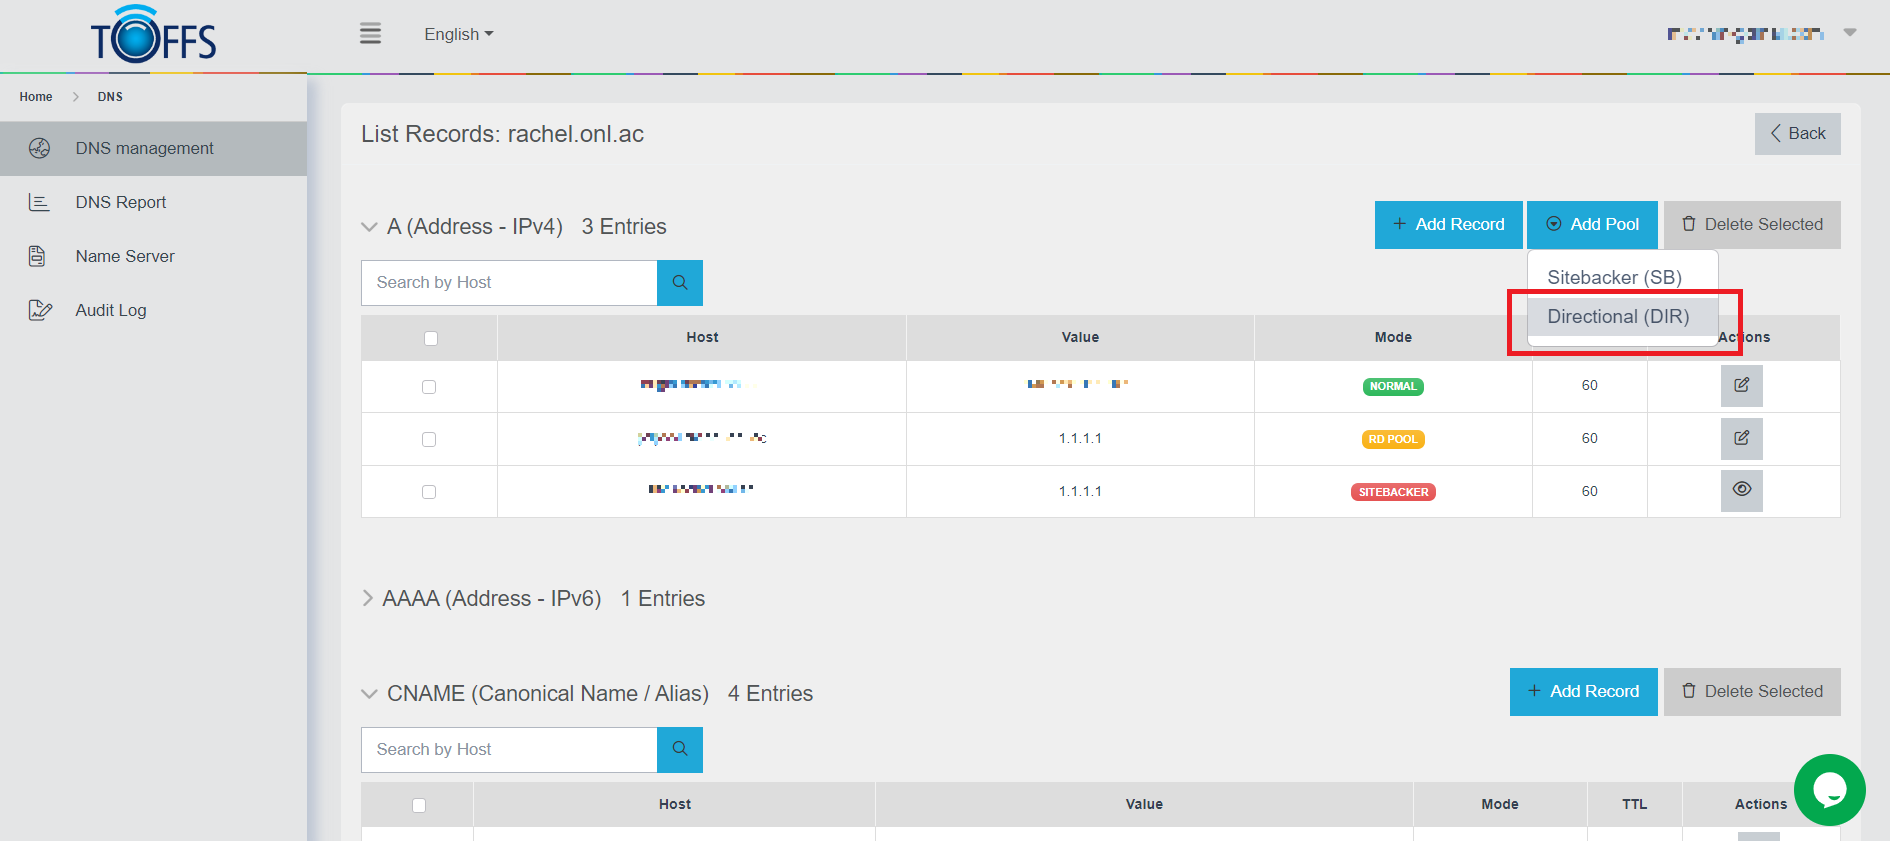
Figure 224
Step 4: Provide Host Enter the host for which you want to create the directional pool.
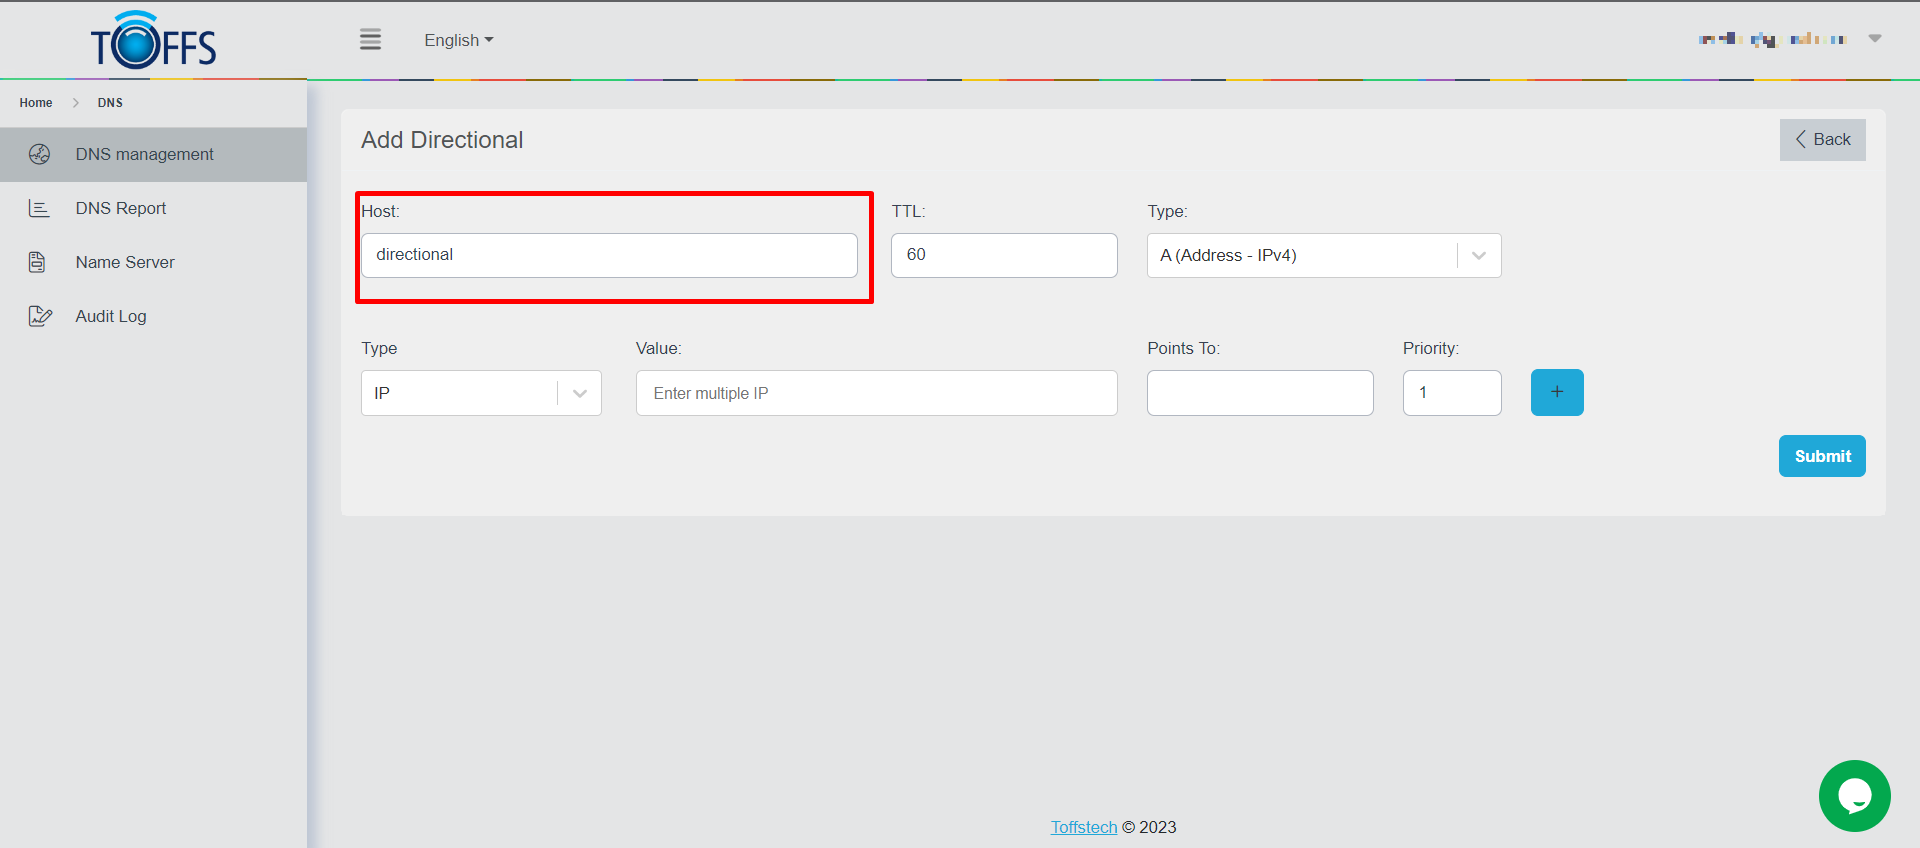
Figure 225
Step 5: Optionally Set TTL Value You can optionally set the Time To Live (TTL) value for the pool.
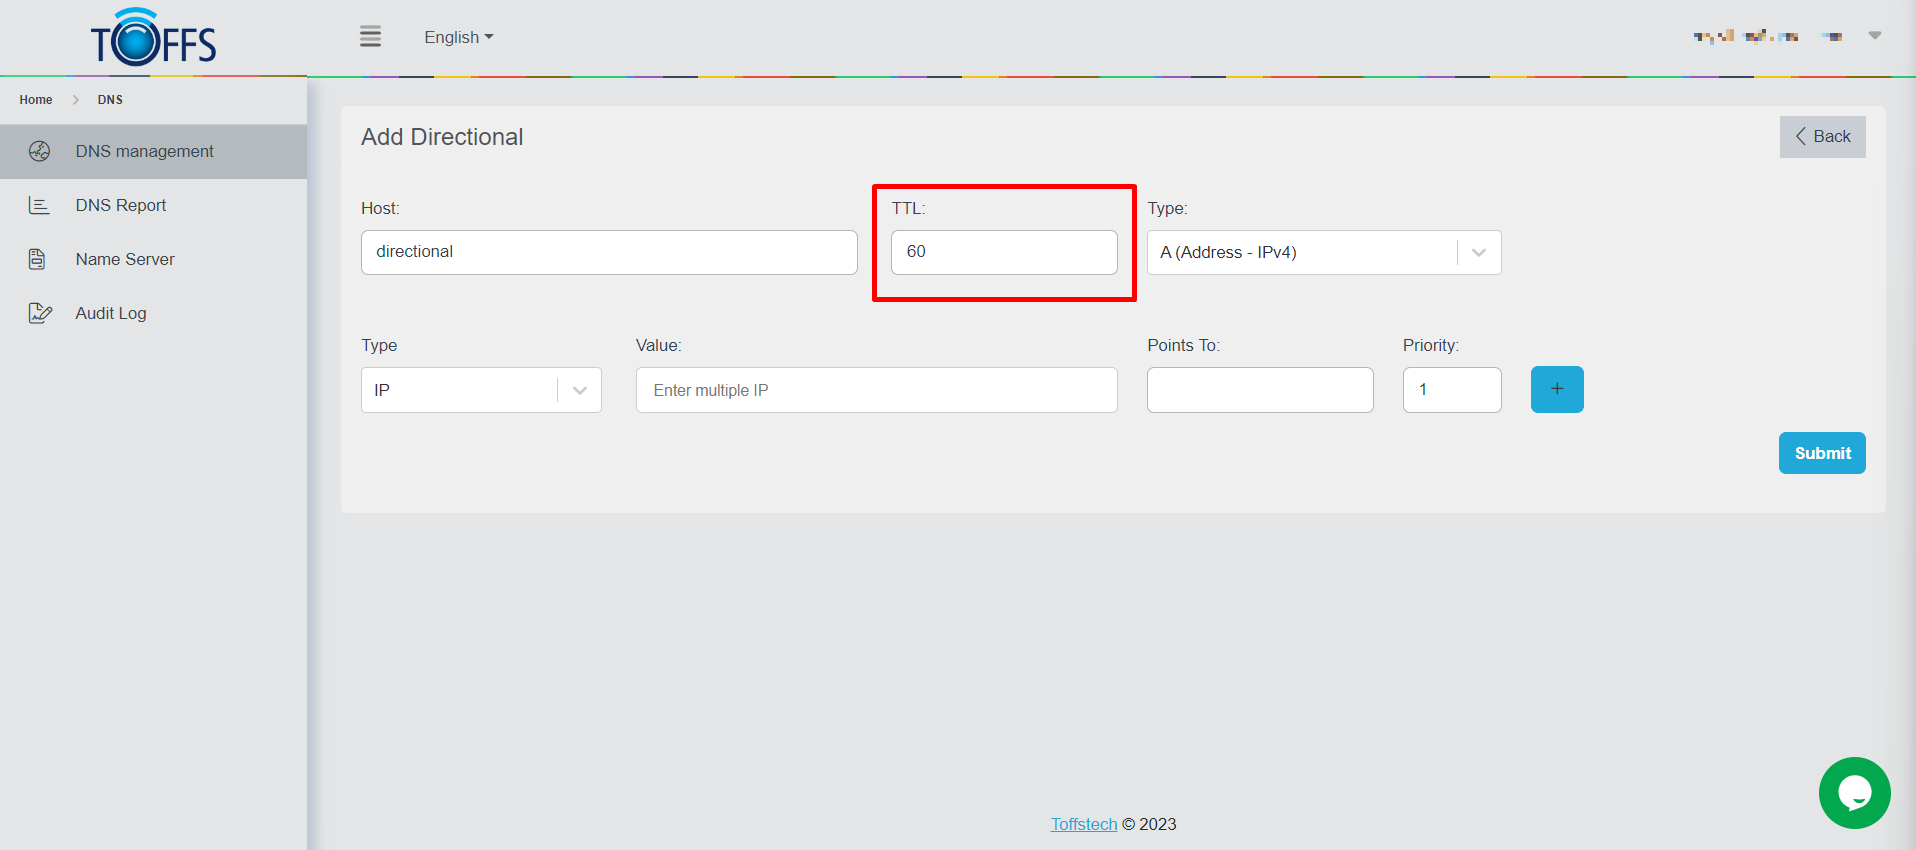
Figure 226
Step 6: Select A or CNAME Type Choose between A, AAAA or CNAME type based on your requirements.
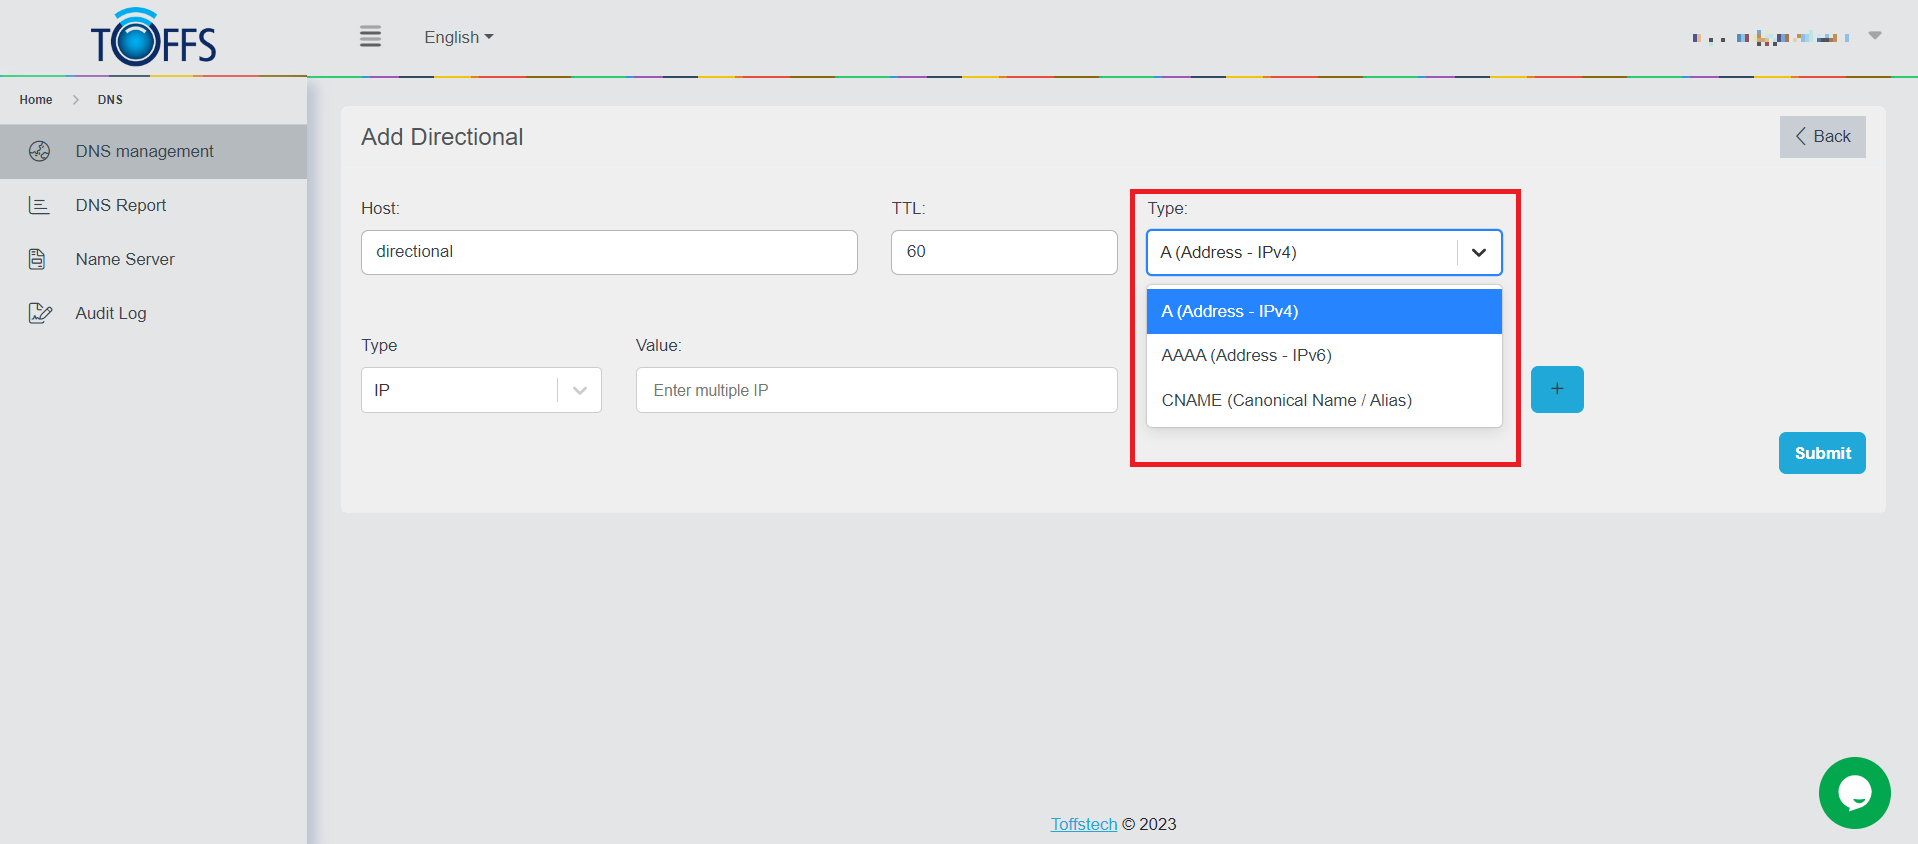
Figure 227
Step 7: Configure IP/Geo Country/All Non-Configured Type For A Type: To point users from specific IP addresses, provide one or multiple IP addresses in the Value field, and the corresponding IP or domain in the Point To field.
For Geo Country Type: To point users from specific countries, select one or multiple countries in the Value field, and provide the corresponding IP or domain in the Point To field.
For All Non-Configured Type: To point all other users who don’t match the above configurations, provide the IP or domain in the Point To field.
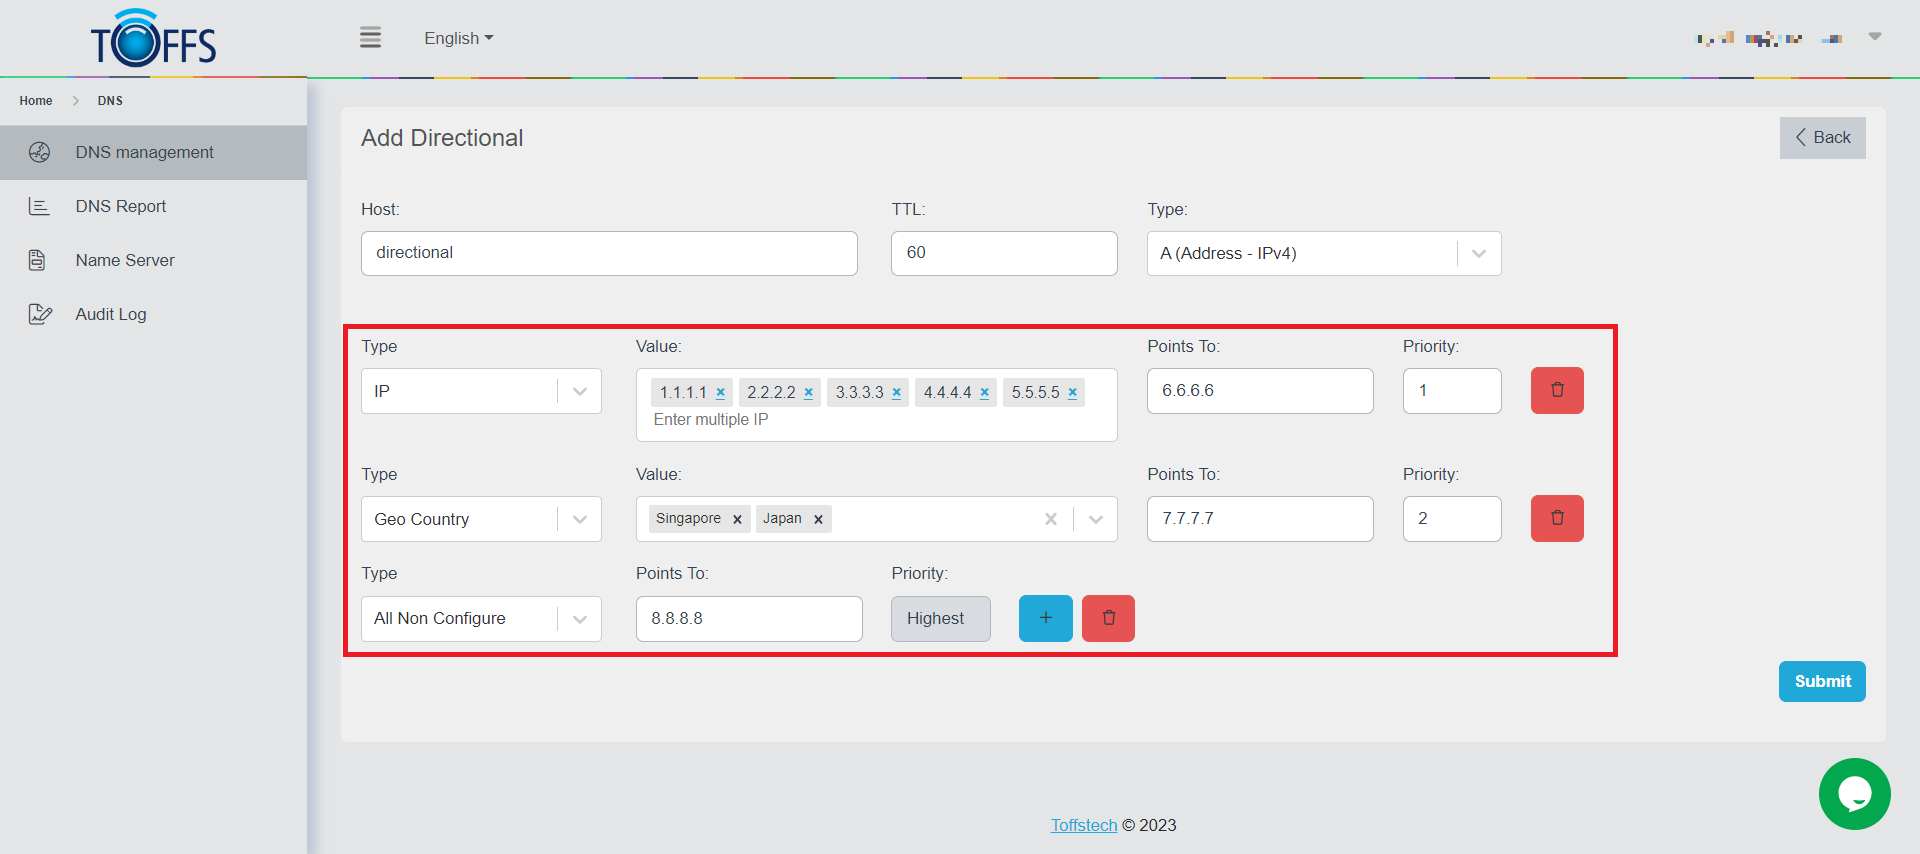
Figure 228
Step 8: Add Additional Records (Optional) If you want to add more directional records, click the ”+” button and repeat Step 7 for each additional record.
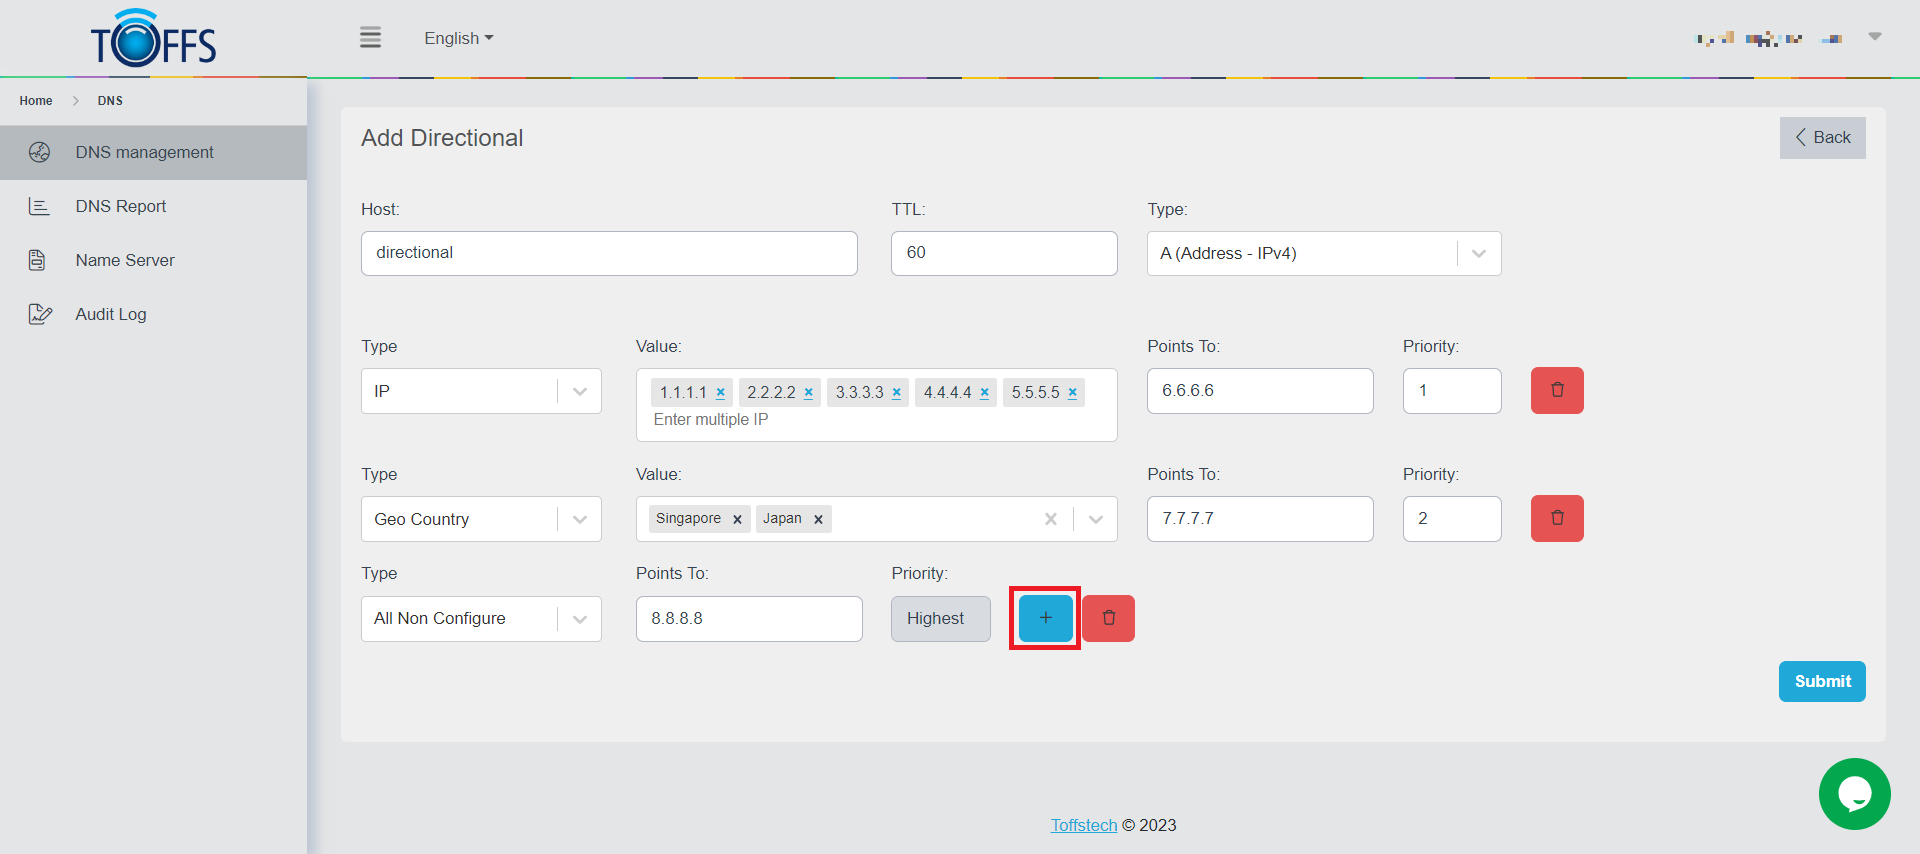
Figure 229
Step 9: Submit Your Configuration Once you have set up all the directional records, click the “Submit” button to finish.

Figure 230
Example Scenarios with selected Type as A (Address - IPv4):
- When a user with an IP within the range (124.32.12.0/24, 165.43.222.0/24) accesses the domain, they will be pointed to “1.1.1.1.”
- Users from Vietnam and Singapore, with IPs outside the range (124.32.12.0/24, 165.43.222.0/24), will be pointed to “2.2.2.2.”
- Users with IPs outside the range (124.32.12.0/24, 165.43.222.0/24) and not from Vietnam or Singapore will be pointed to “3.3.3.3.”
Example Scenarios with selected Type as A (Address - IPv4):
- If a user with an IP within the range (124.32.12.0/24, 165.43.222.0/24) accesses the domain, they will be pointed to “aaa.onl.ac.”
- Users from Vietnam and Singapore, with IPs outside the range (124.32.12.0/24, 165.43.222.0/24), will be pointed to “bbb.onl.ac.”
- Users with IPs outside the range (124.32.12.0/24, 165.43.222.0/24) and not from Vietnam or Singapore will be pointed to “ccc.onl.ac.”
How to Check Where a Domain Points To:
To find out where a domain points to, you can use the following commands on Ubuntu using the “Dig” tool:
- A record: Dig domain_name
- CName record: Dig domain_name CNAME
- MX record: Dig domain_name MX
- TXT record: Dig domain_name TXT
- ALIAS: Dig domain_name
- NS: Dig root_domain NS
How to Check Your IP Address:
You can check your current public IP address by visiting the website: https://whatismyipaddress.com/
Sitebacker (SB)
What is a SiteBacker Pool?
A SiteBacker pool is a collection of A or CNAME records designed to monitor your servers and provide failover support. By using this feature, you can safeguard your web-based operations from potential disruptions caused by server failures. SiteBacker achieves this by returning multiple IP addresses in response to DNS queries, ensuring seamless access to your website.
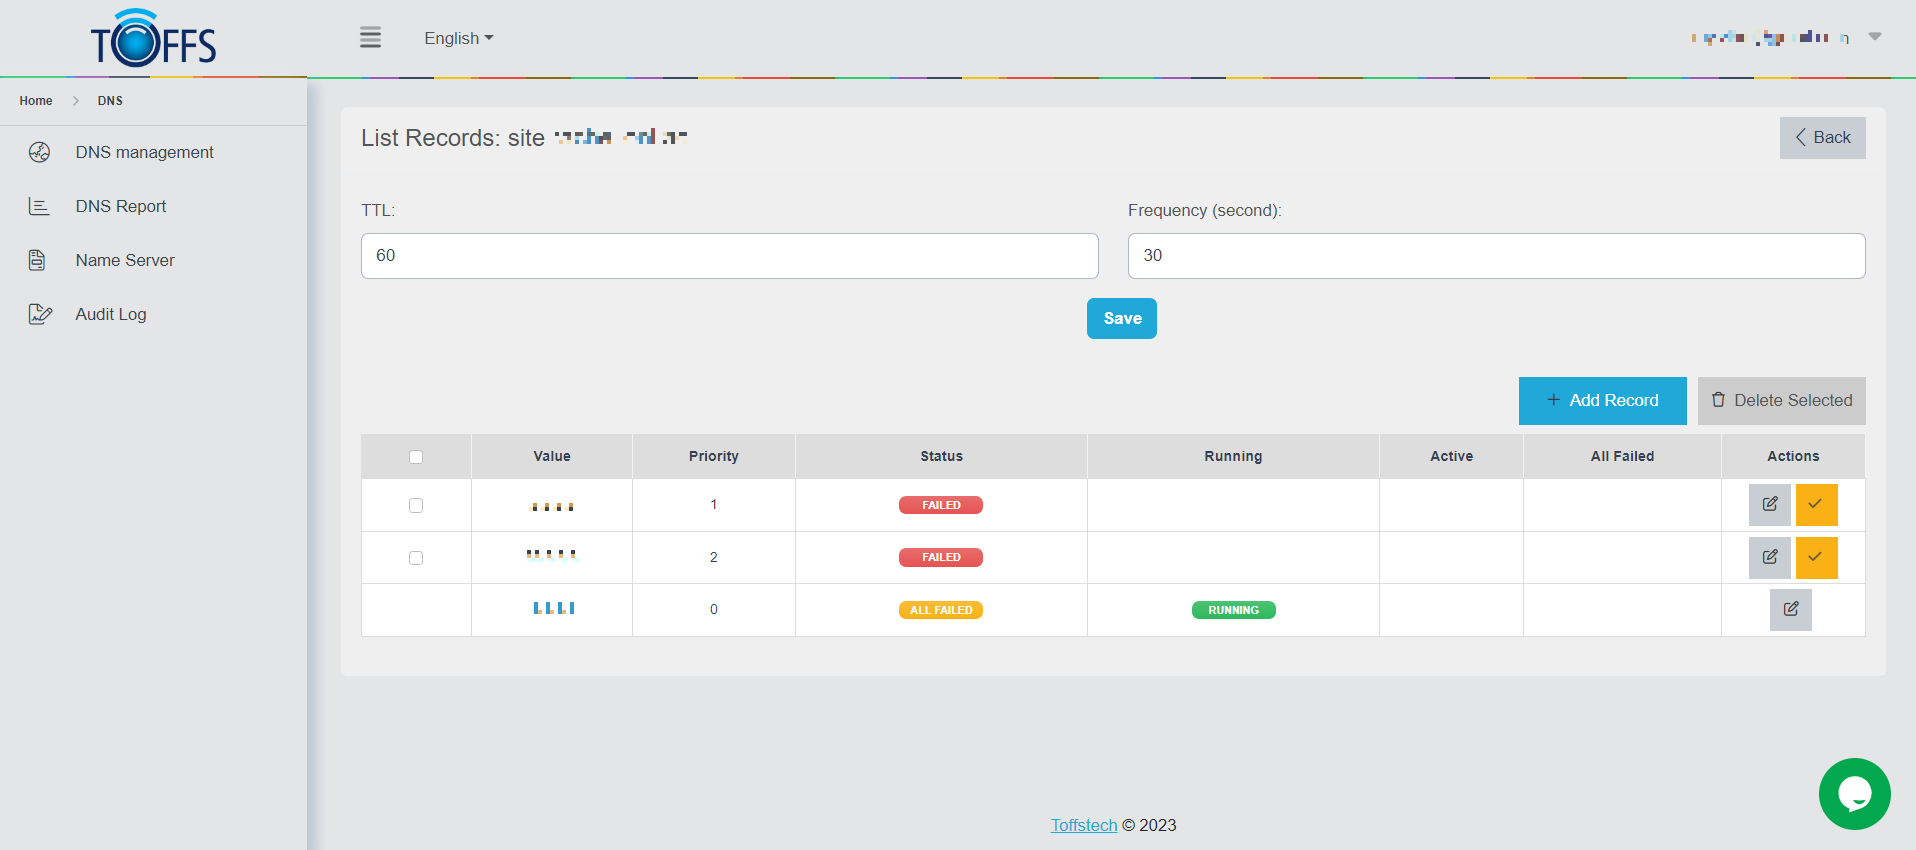
Figure 231
Why Use Monitoring and Failover Service?
As your online operations become increasingly critical to your business, a server failure can lead to severe consequences such as loss of customers, reduced employee productivity, and negative impacts on your bottom line. To prevent these disruptions, traditional monitoring and failover solutions exist, but they often involve deploying and maintaining expensive hardware and software. This cost can be prohibitive, especially as the number of mission-critical servers increases.
Configuration Rules for SiteBacker Pools
To set up a SiteBacker pool effectively, keep in mind the following configuration rules:
- Record Types: You can only select A types, AAAA types or CNAME types within the same pool.
- A Record Type: When using A type records, the value pointed to must be an IPv4 address.
- AAAA Record Type: When using AAAA type records, the value pointed to must be an IPv6 address.
- CNAME Record Type: If you choose CNAME type records, the value pointed to must be a domain name.
By adhering to these rules, you can optimize the efficiency and reliability of your SiteBacker pool.
With this knowledge, you are now equipped to create and manage SiteBacker pools to ensure high availability and continuous access to your web services. By leveraging SiteBacker’s monitoring and failover capabilities, you can protect your business from the detrimental impacts of server failures without the need for expensive hardware and software.
Create a Sitebacker Pool
Sitebacker pools are used to ensure high availability and failover capabilities for your domain or IP records. Here’s a step-by-step guide to creating and managing a Sitebacker pool:
Step 1: Access the List Records Page Navigate to the “List Records” page.
Step 2: Add a New Sitebacker Pool On the “List Records” page, locate and click the “Add Pool” button.

Figure 232
Step 3: Select Sitebacker (SB) Type Choose “Sitebacker (SB)” from the available options.
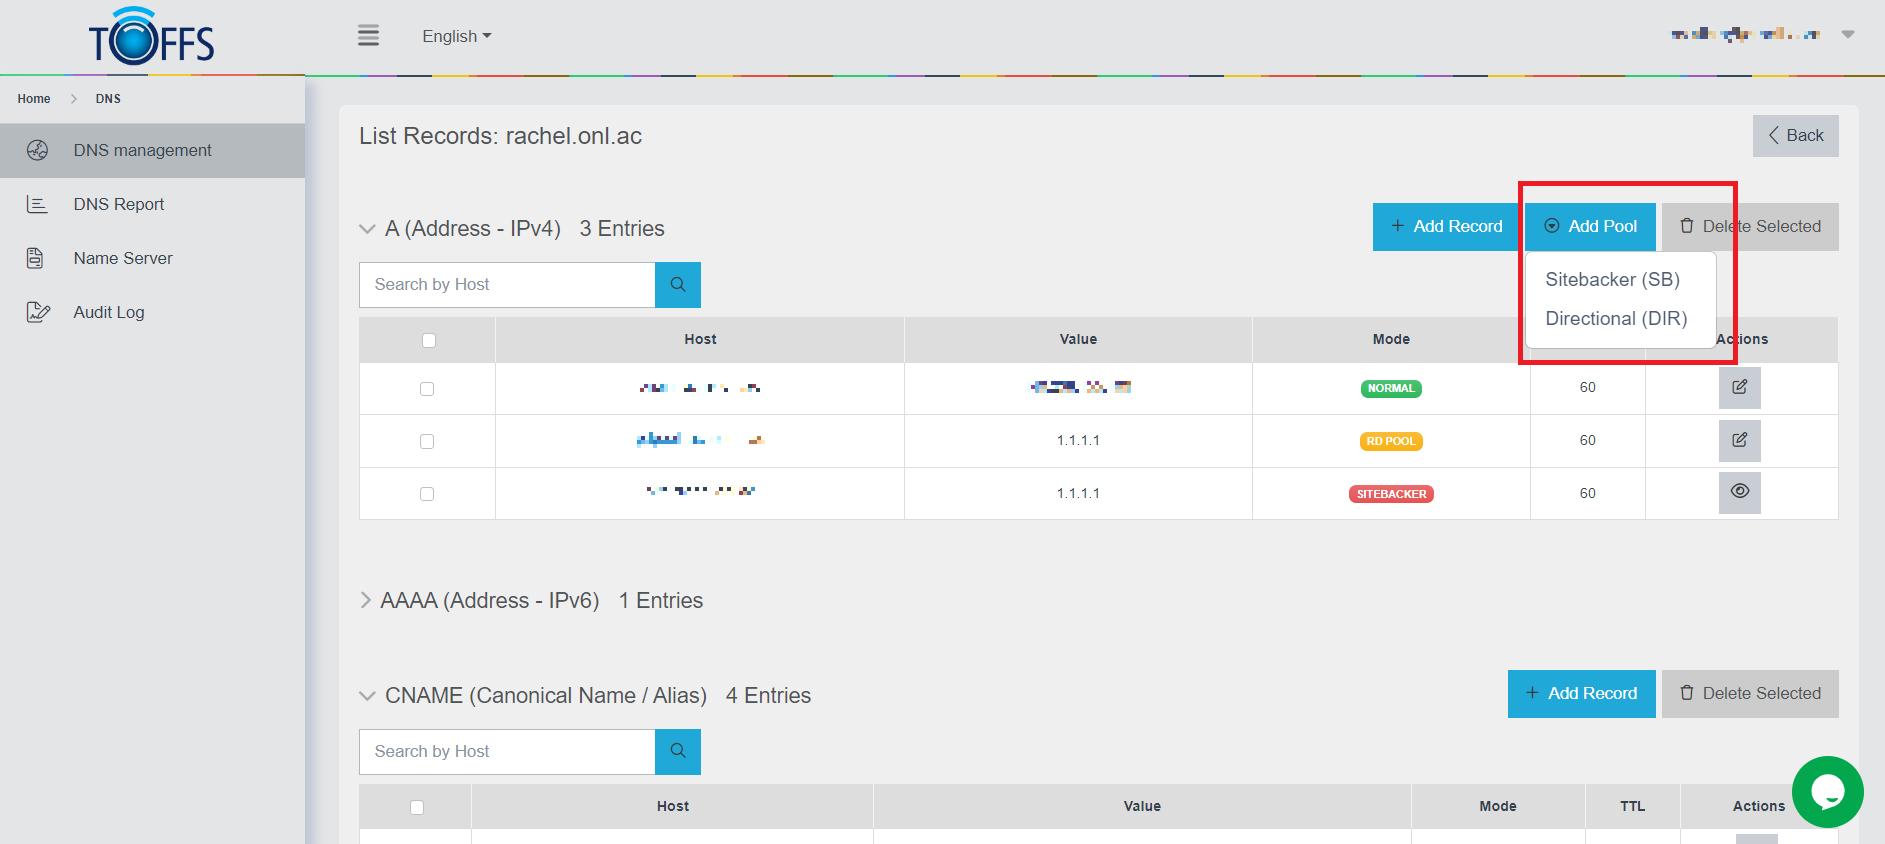
Figure 233
Step 4: Provide Host Enter the Host for your Sitebacker pool.
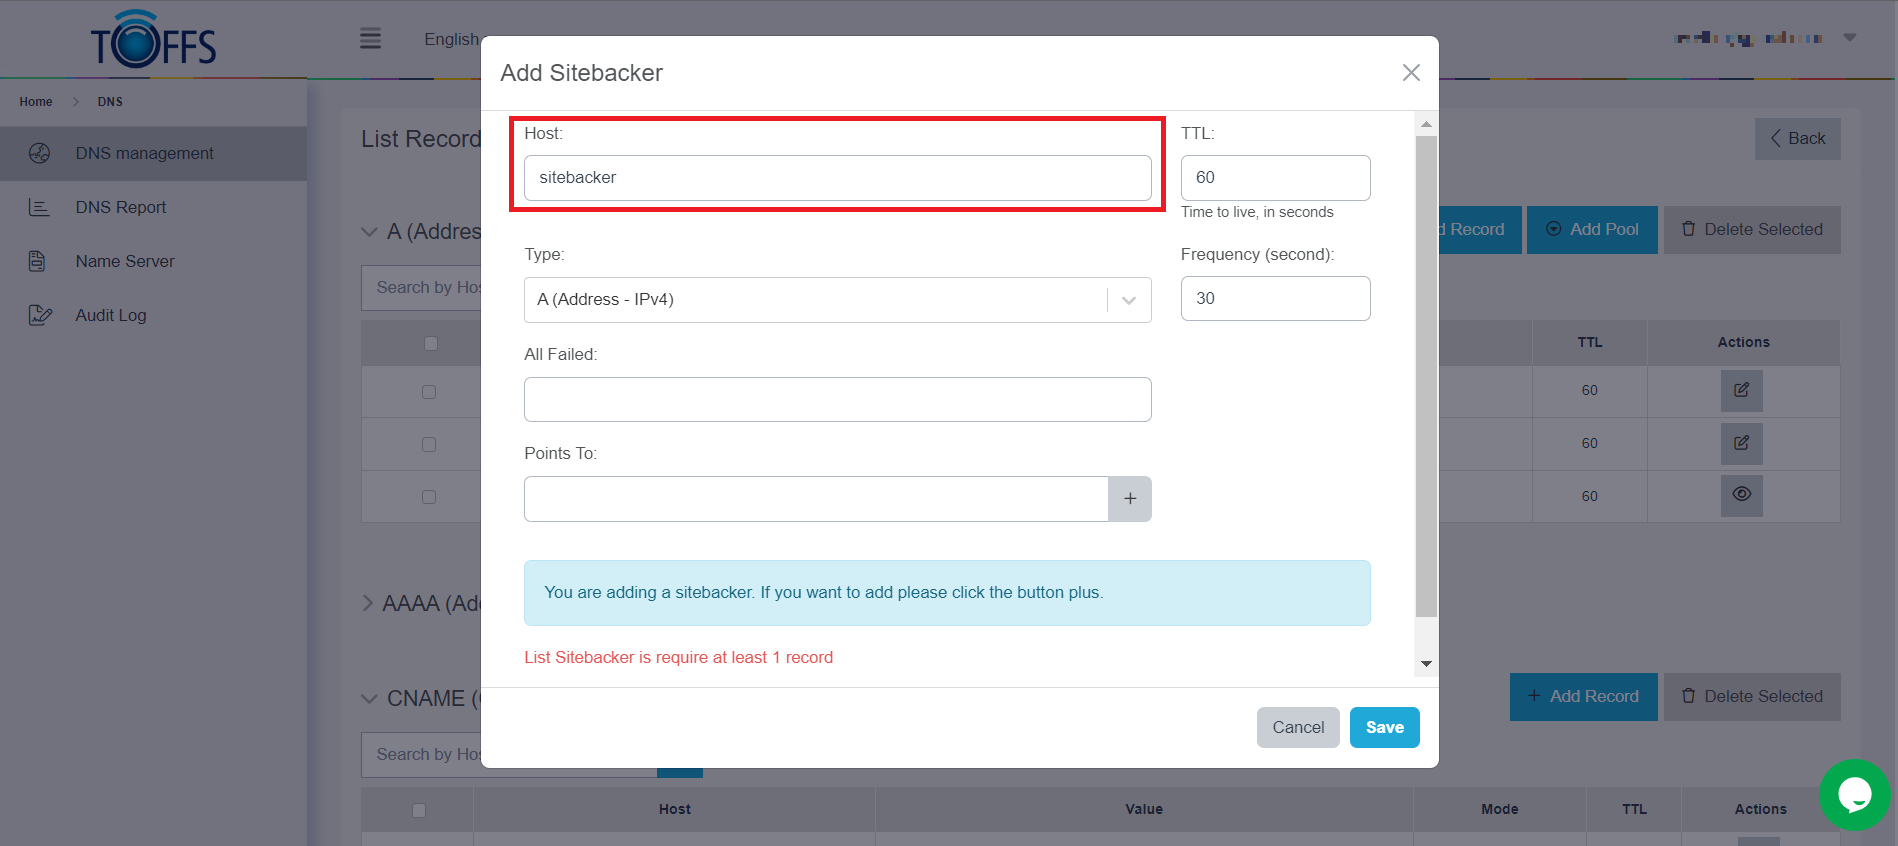
Figure 234
Step 5: Optional - TTL Value If desired, you can provide a Time to Live (TTL) value.
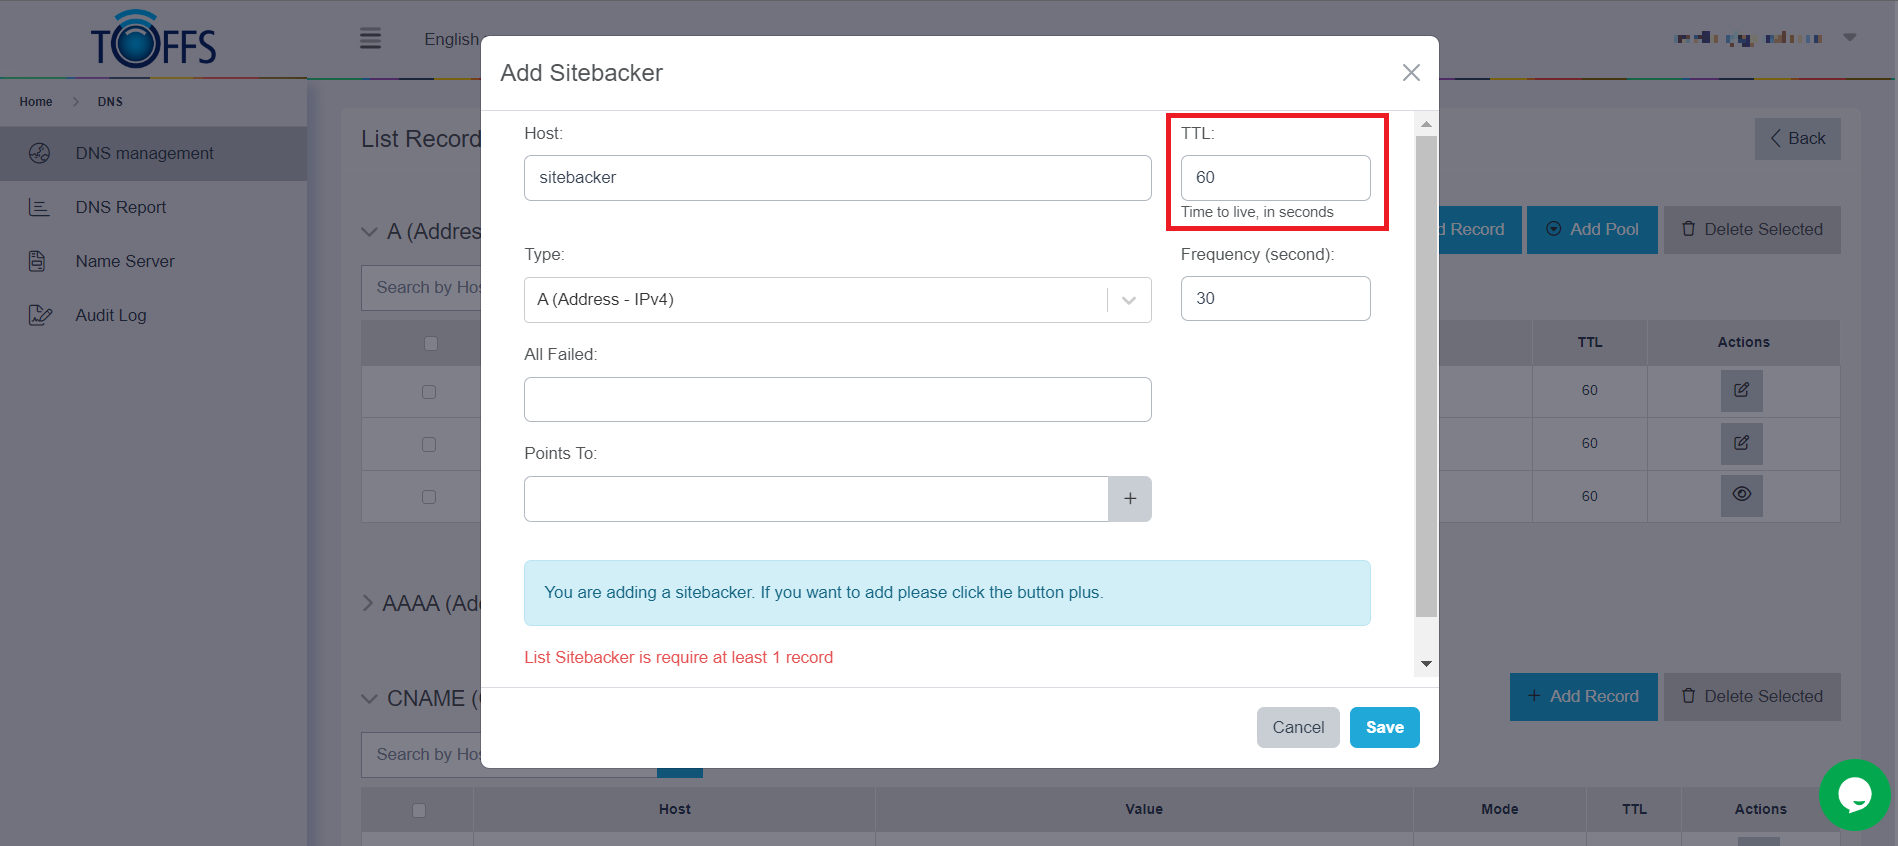
Figure 235
Step 6: Select Record Type Choose one of the following record types: A, AAAA, or CNAME.
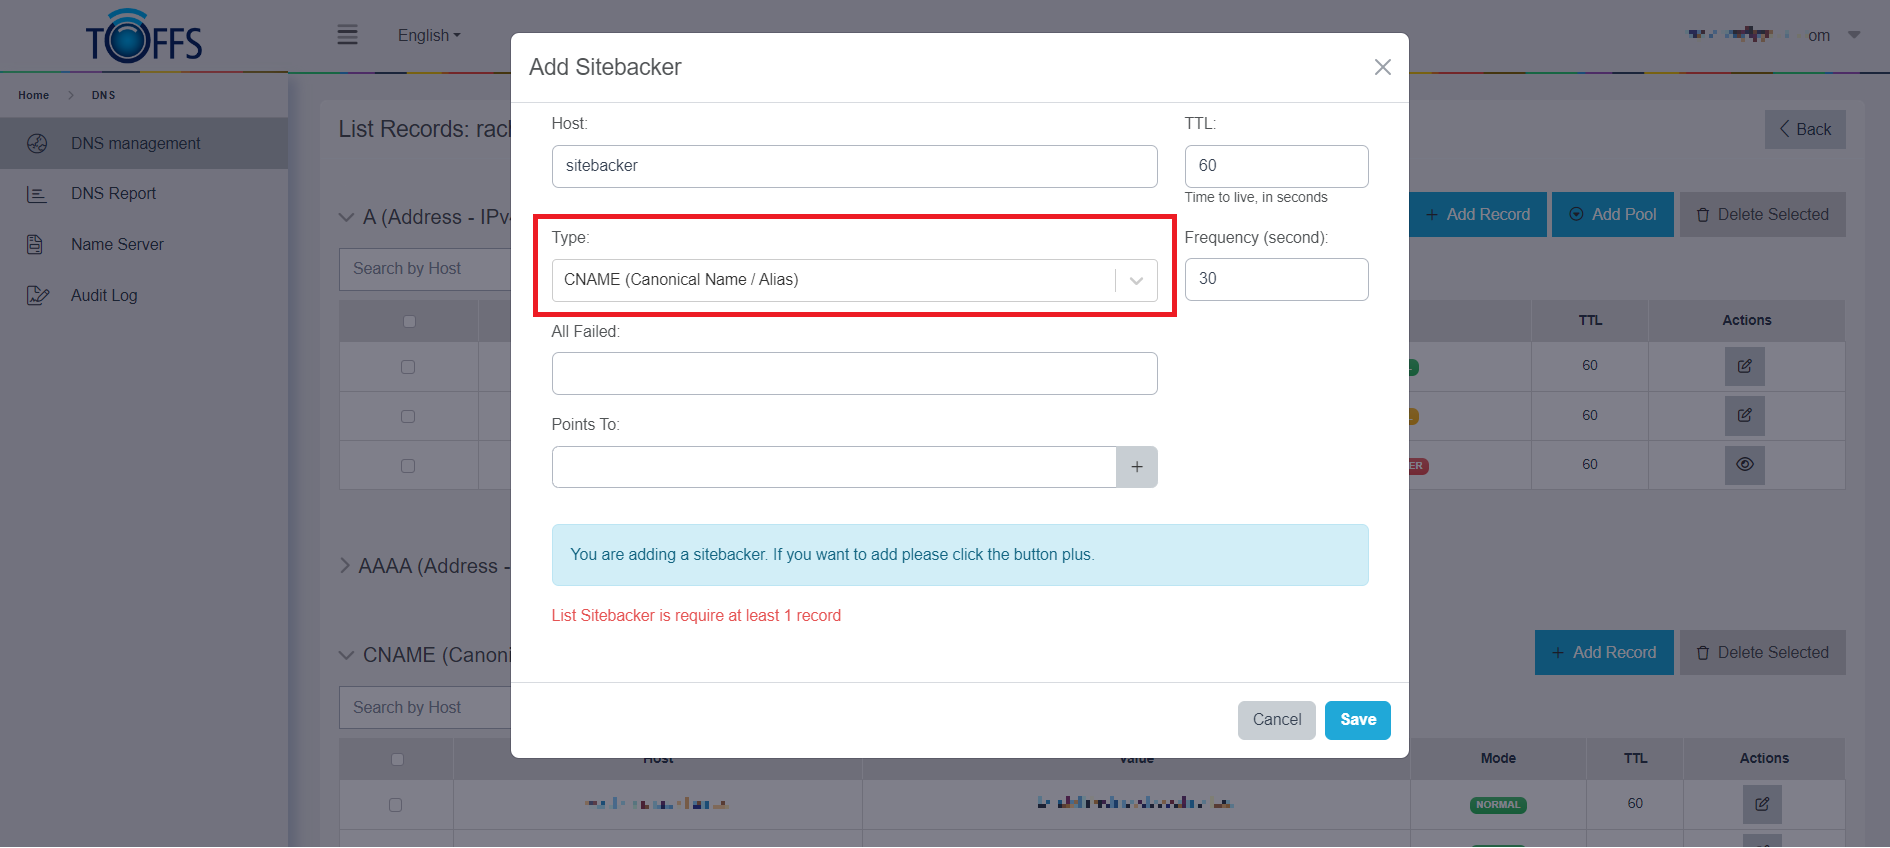
Figure 236
Step 7: Optional - Frequency Value If needed, you can specify a Frequency value.
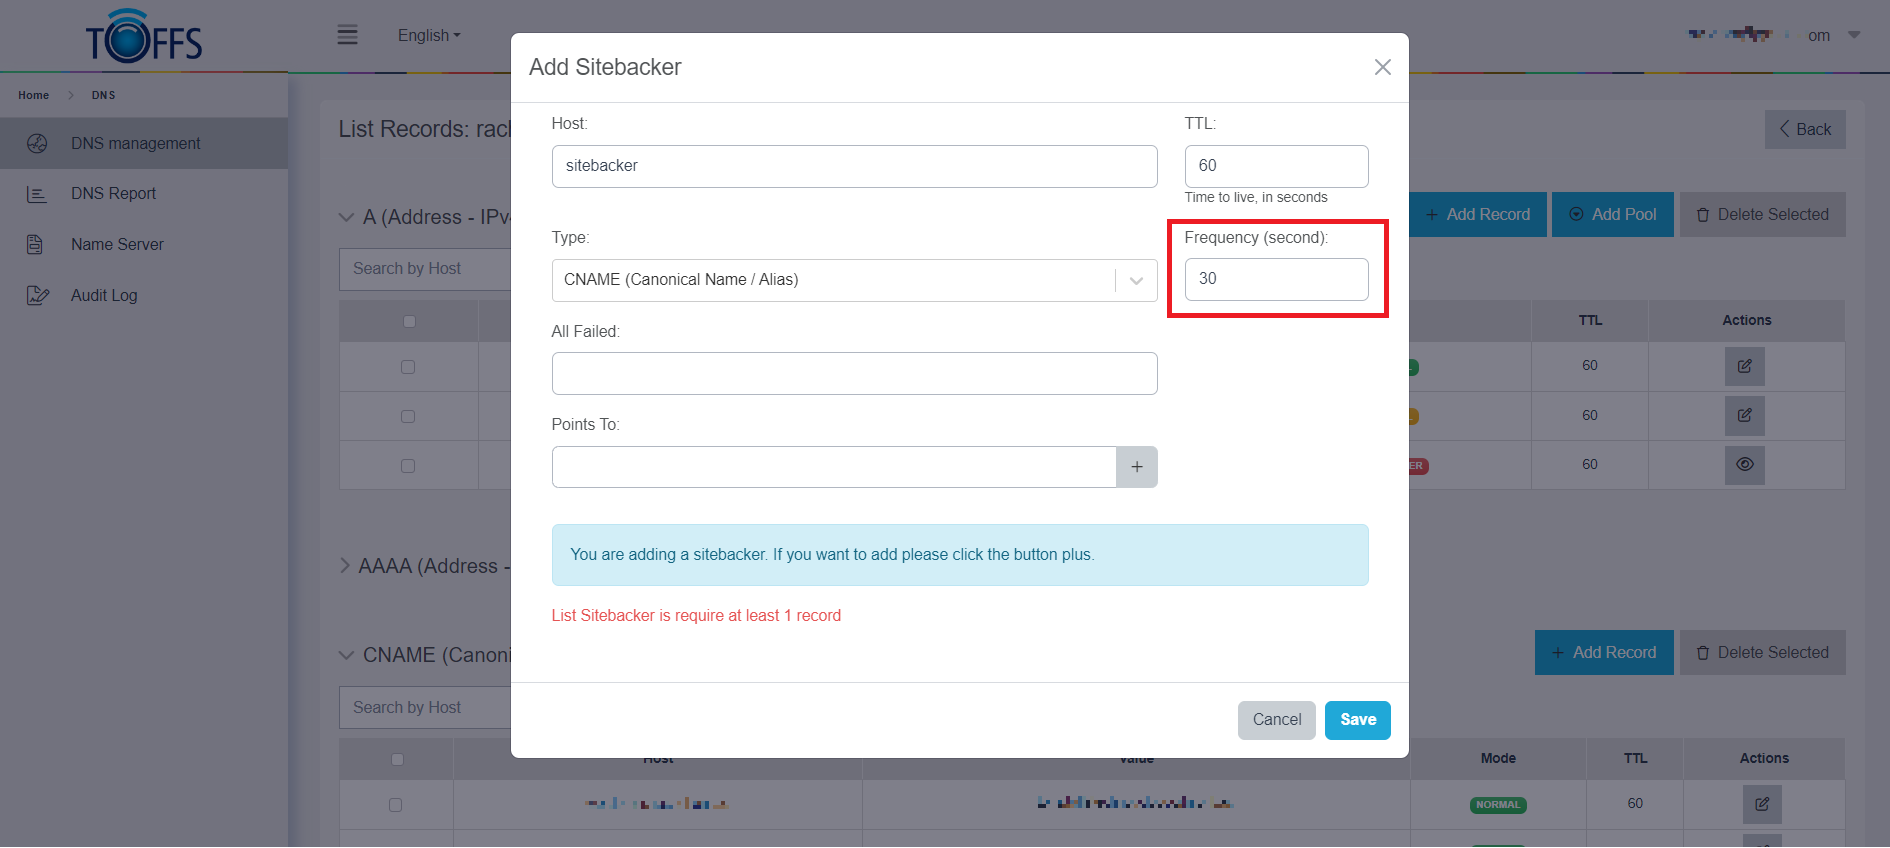
Figure 237
Step 8: Fill All Fail Field
Enter the value for the All Fail field, which will depend on the record type (A, AAAA orCNAME).
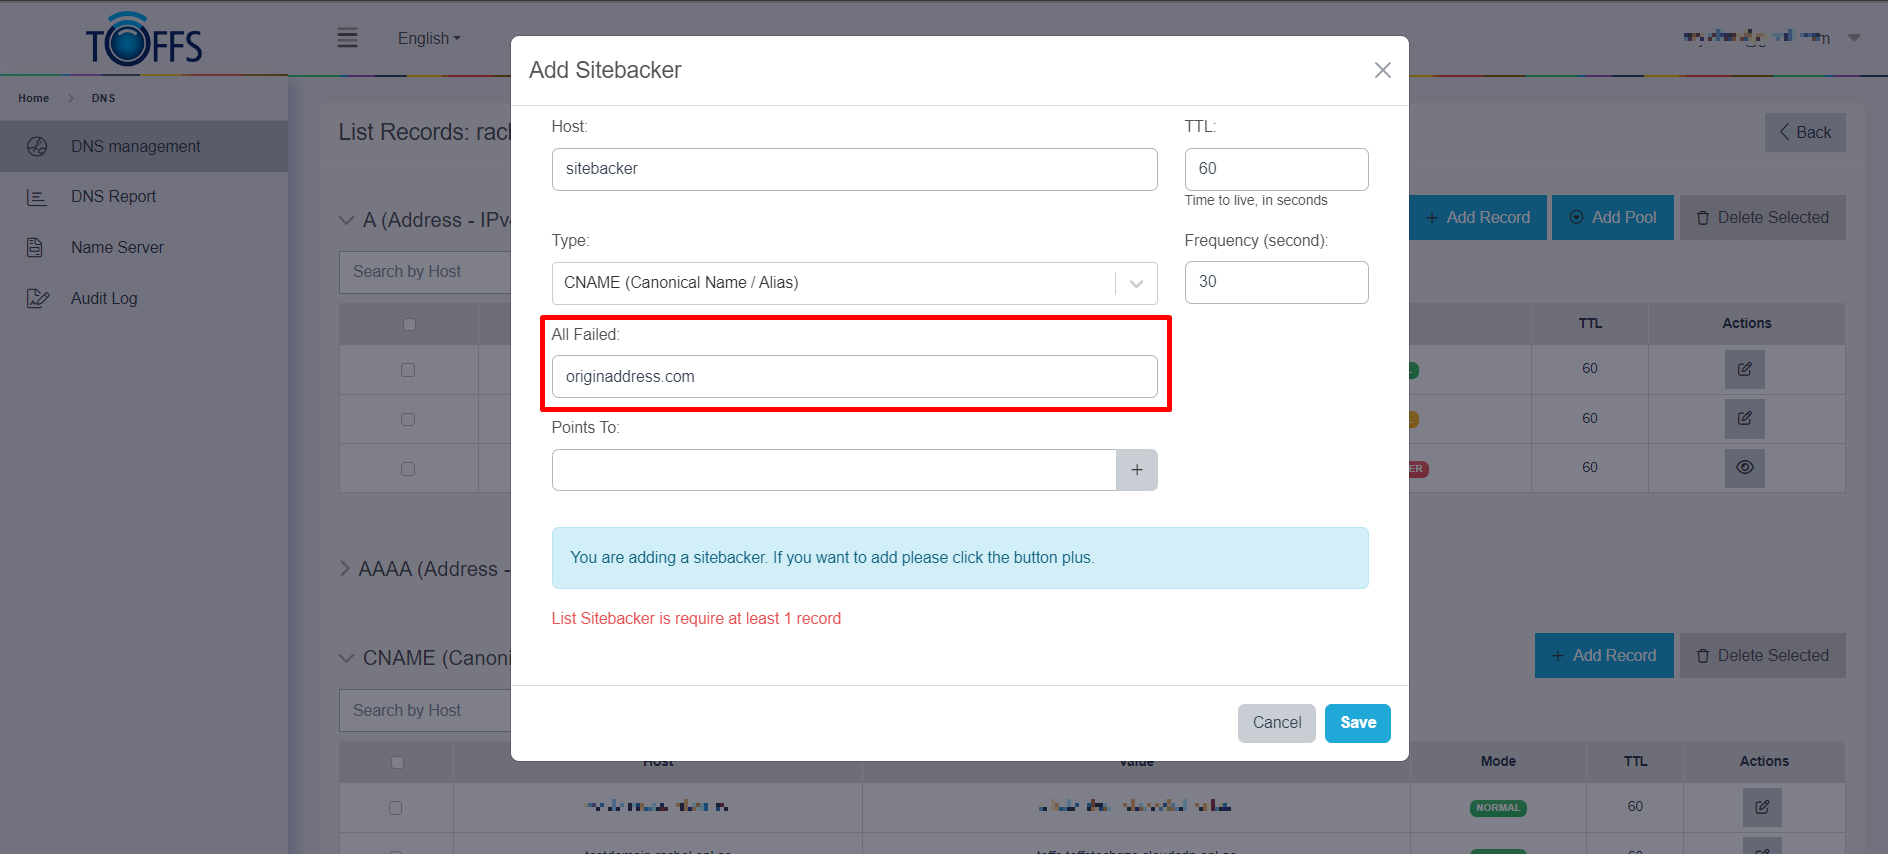
Figure 238
Step 9: Fill Point To Field Enter the value for the Point To field, which will depend on the record type(A, AAAA or CNAME).

Figure 239
Step 10: Add Record to the Sitebacker Pool Click the ”+” button to add the record into the Sitebacker pool.
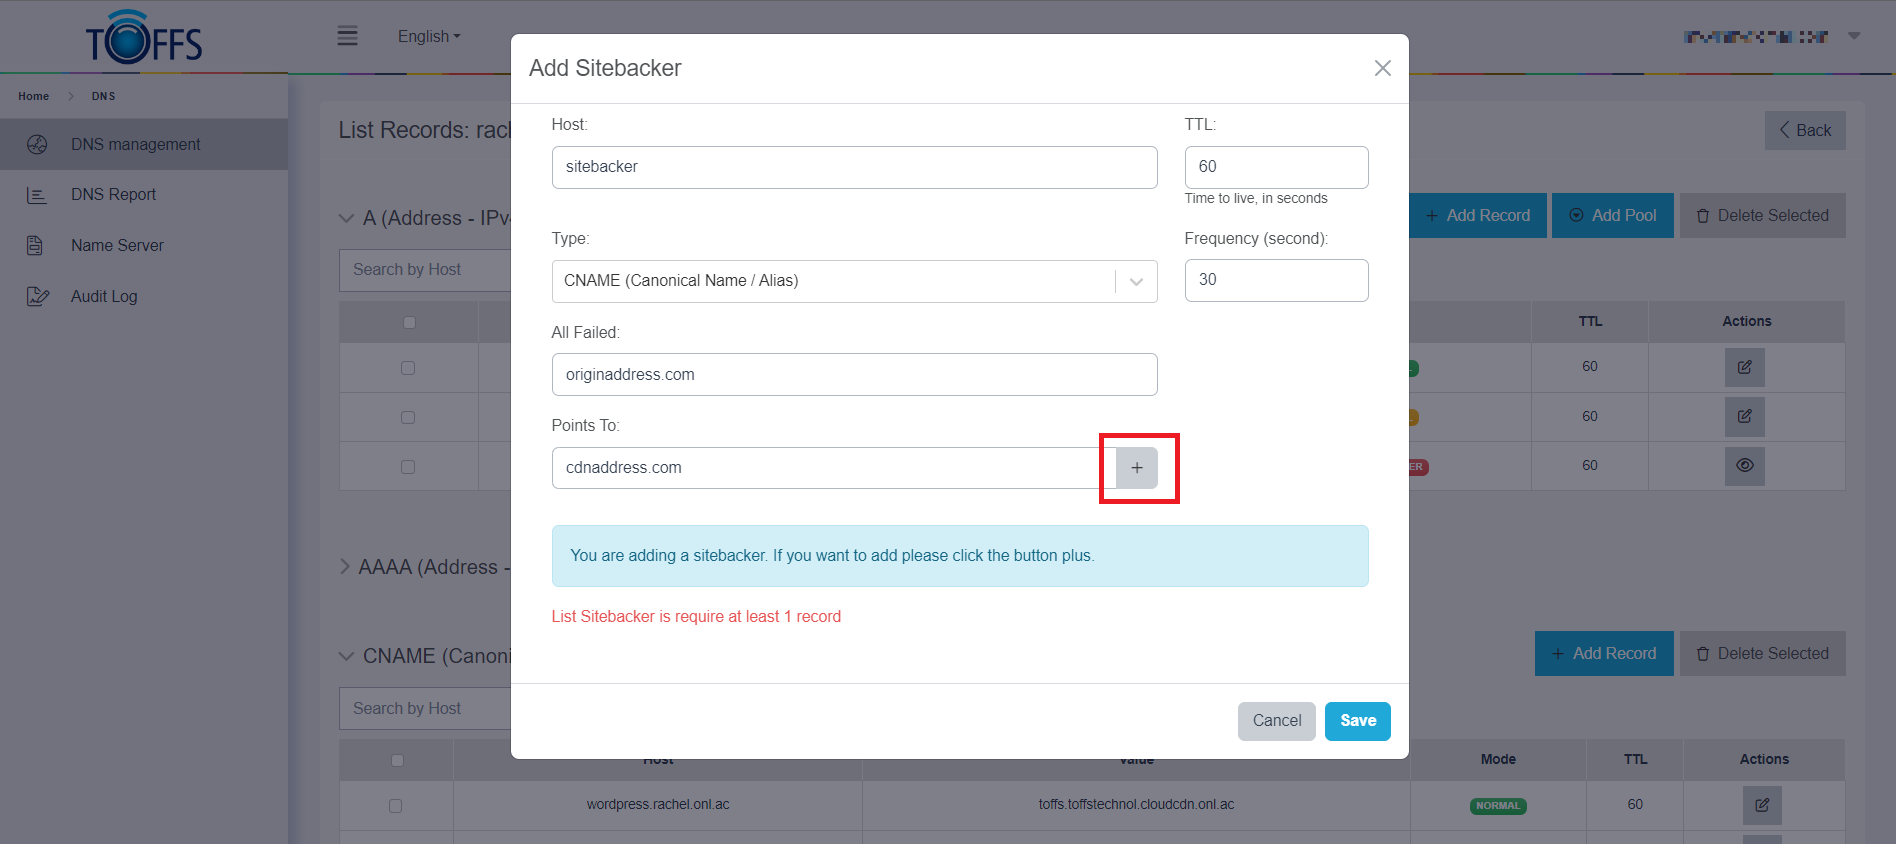
Figure 240
That record will be added to the below section
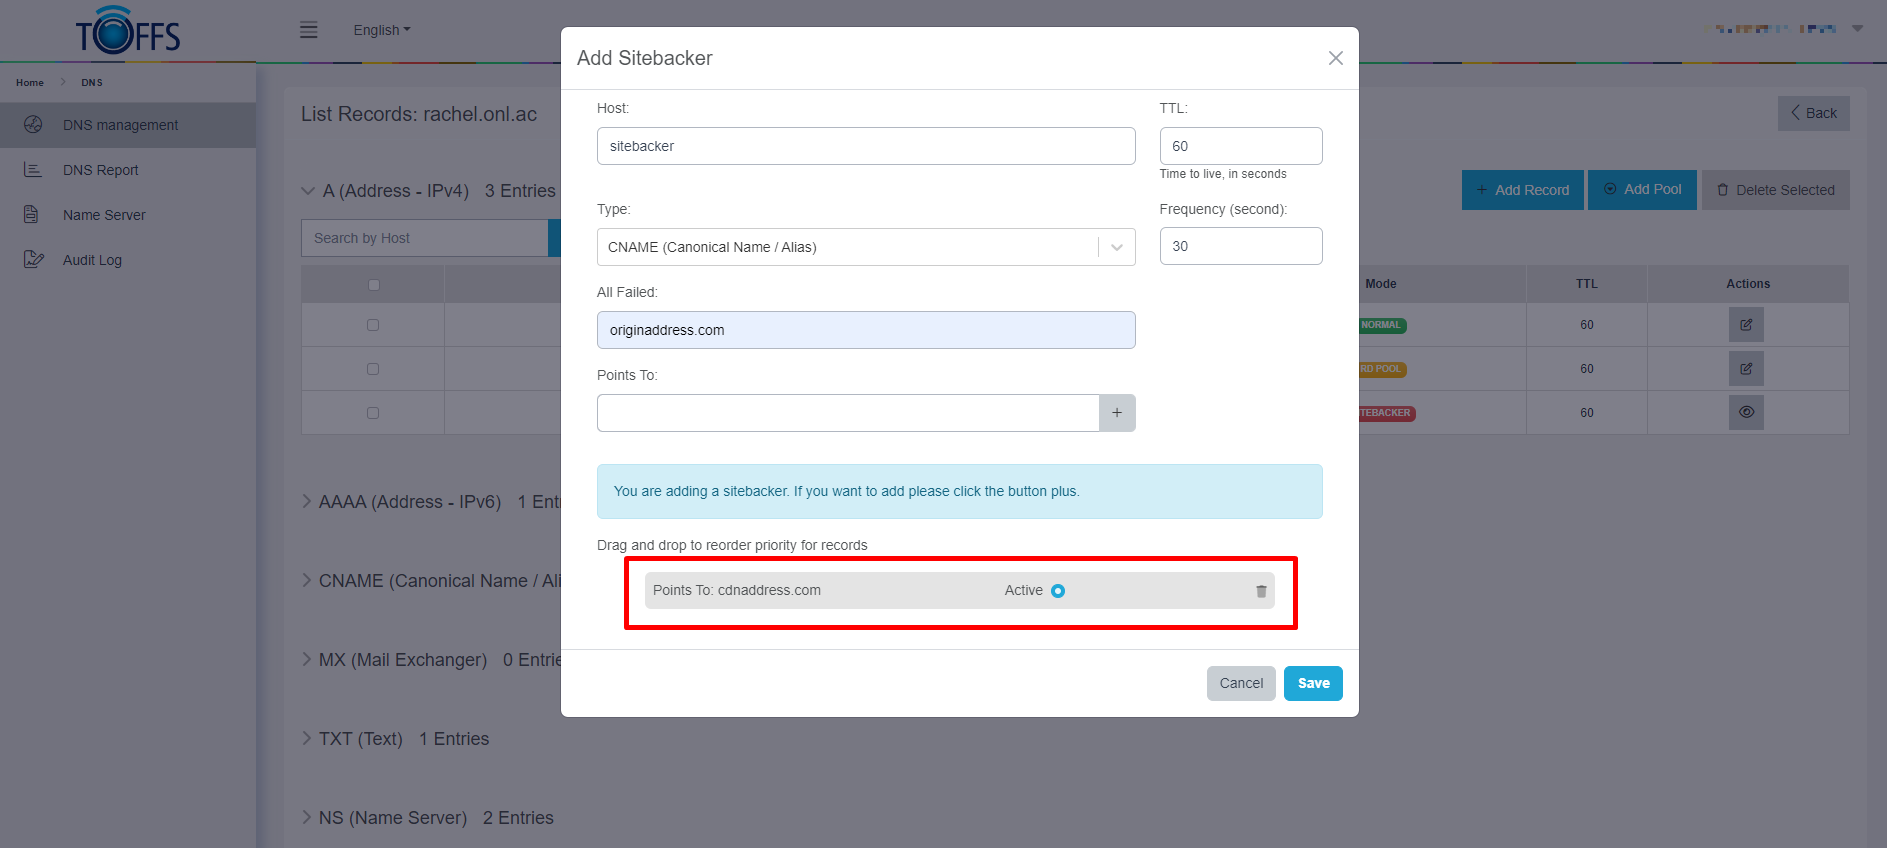
Figure 241
Step 11: Optional - Add Additional Records If you want to add more records to the pool, repeat Steps 9 and 10.
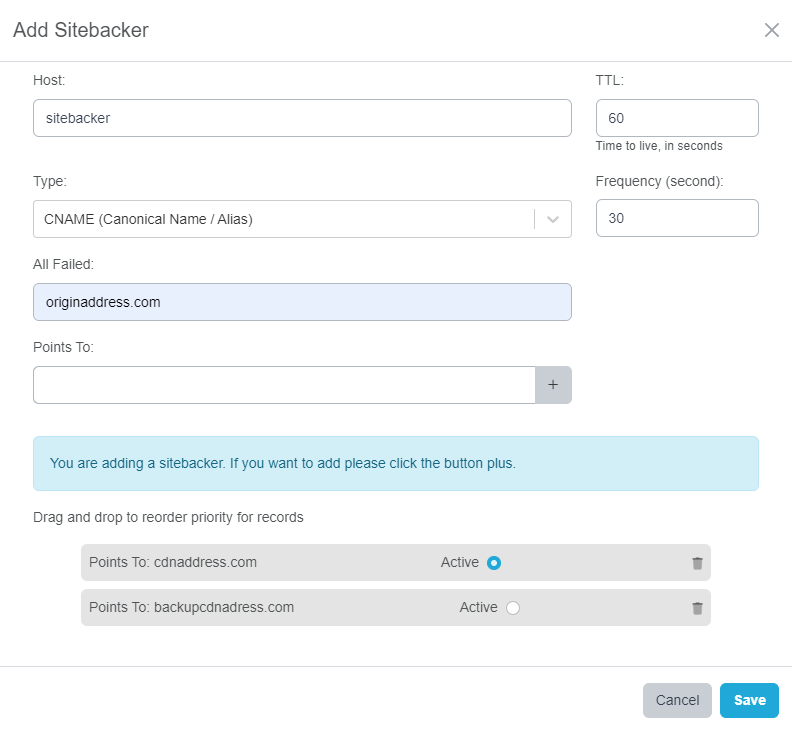
Figure 242
Step 12: Save the Sitebacker Pool Once you’ve added all the necessary records, click the “Save” button to finish creating the Sitebacker pool.
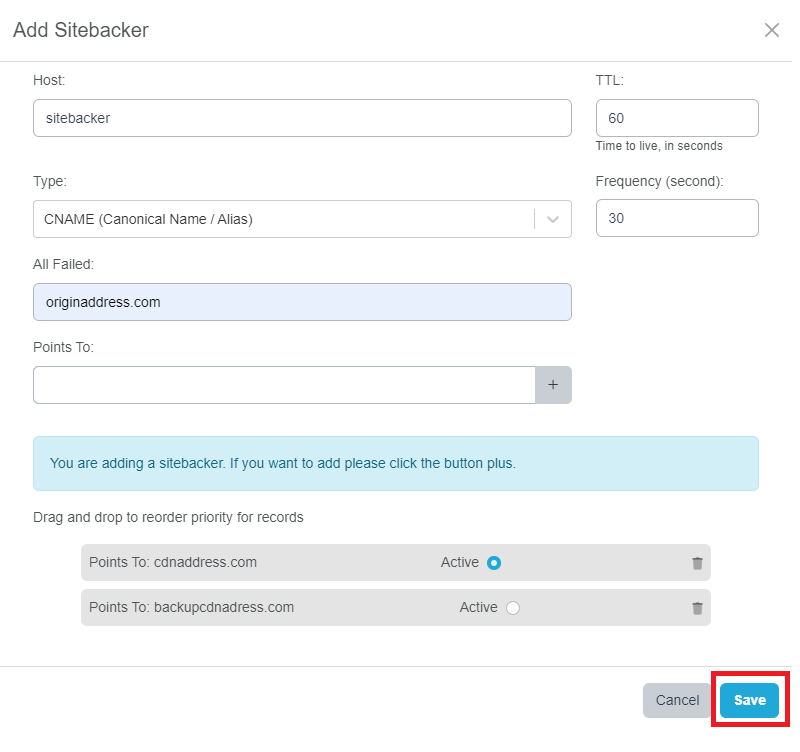
Figure 243
Example 1: Adding a Sitebacker Pool with A Type If you have an A type record like “site2.lientestsit.onl.ac” with IP address 140.238.155.109, and a backup record with IP address 3.3.3.3, you can create a Sitebacker pool to handle failures. In case all records fail, the system will switch to the “All-Failed” record with IP address 1.1.1.12 and send an email alert to the supporter.
Example 2: Adding a Sitebacker Pool with CNAME Type For a CNAME type record, you can use tools like Postman to check if the record is available or failed. Send a GET request with the value of the CNAME record (e.g., “Record 2.2.2.2”) and the hostname in the Host line. If the Status Code is 5xx, the record is still failed; if it’s <500, the record is available to serve.
Managing Sitebacker Pool Records
Once your Sitebacker pool is set up, you can view and manage the records on the “Records list” page. The displayed information includes:
- Value: The IPv4 address or domain of the record.
- Priority: The priority value of the records, which determines the order in which records are served after an active record fails.
Status:
- Blank: The record is running and not an “All Failed” record.
- BACKUP: The backup record.
- FAILED: The record has failed.
- ALL FAILED: The last record used when all records fail. It will not switch to any other record after this one fails.
Running: The record is in a served state.
Active: The record is running and is a backup (different from the “All Failed” record).
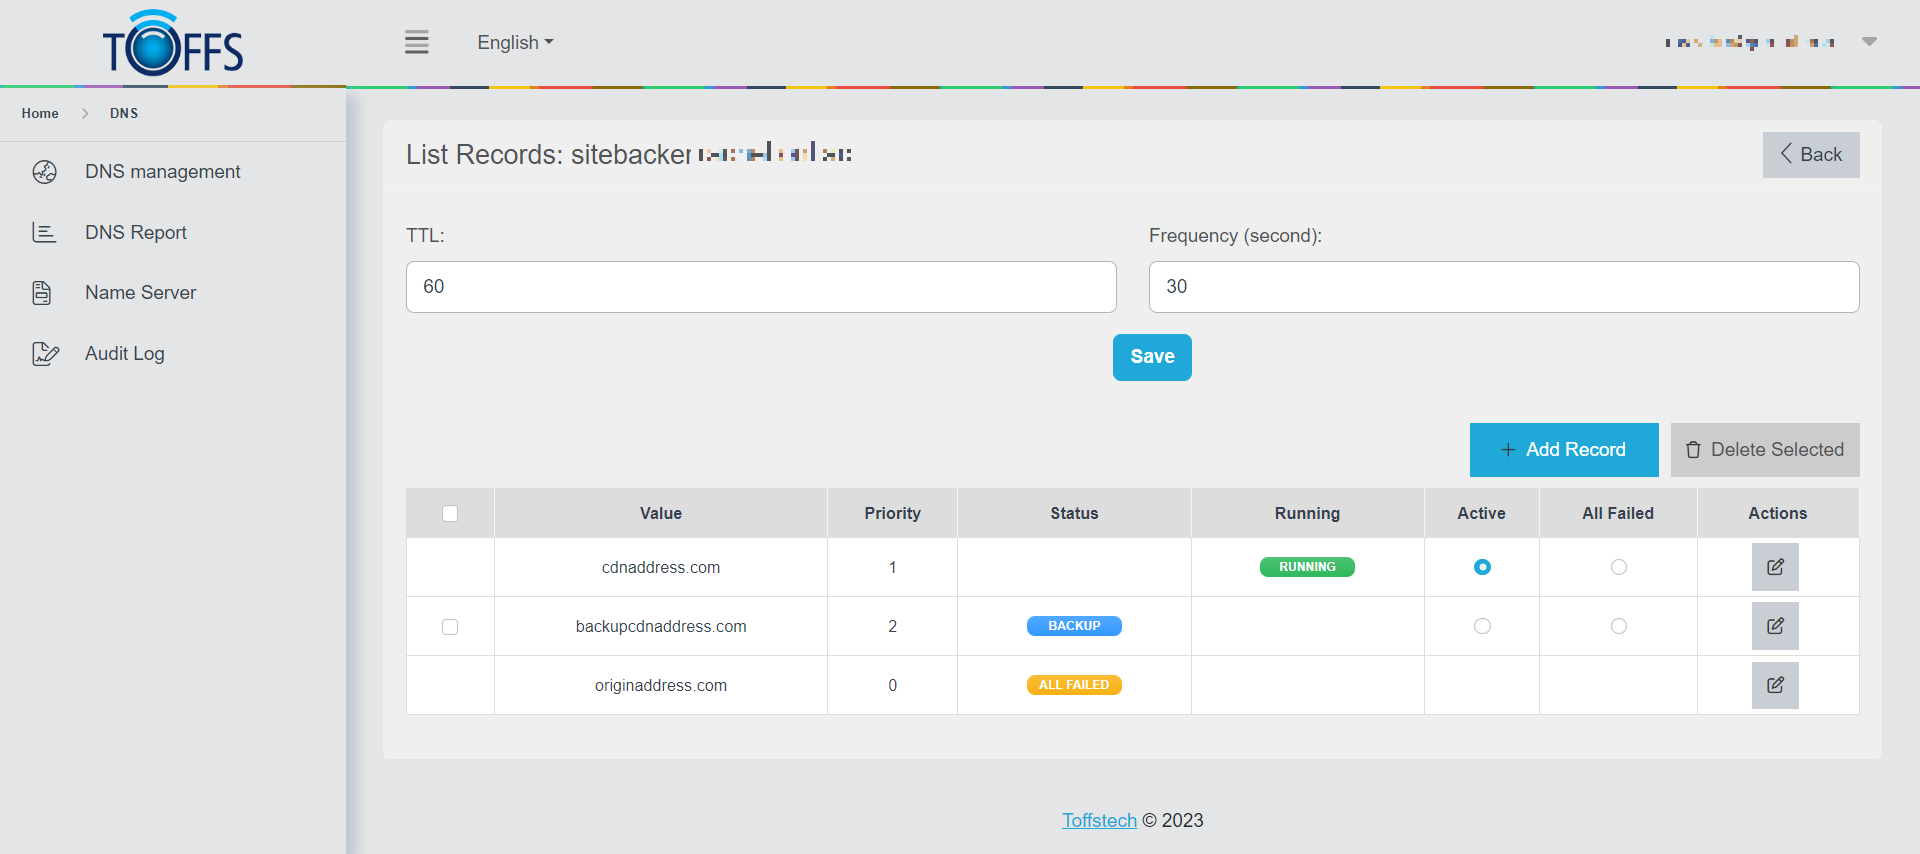
Figure 244
Actions:
- Click “Edit” to edit the record.
- Click “Check” to check a failed record. If the record is available to serve, the status will change from FAILED to BACKUP. If it’s still failed, the status will remain as FAILED.
Note: When the system switches to the “All Failed” record, an email will be sent to the supporter at “[Support@ToffsTech]” with the subject: “URGENT: SiteBacker Detected Record Failure for XXXXX. Designated ‘All-Fail’ Record(s) being Utilized.”
Emails are sent to different addresses based on the environment:
- Production: c4notifications@toffstech.com
- SIT and UAT: c4notifications.toffstech@gmail.com
Please contact Toffs Security Operation Center for assistance if you encounter any issues.